Воздуходувки Einhell X-Change - инструкция пользователя по применению, эксплуатации и установке на русском языке. Мы надеемся, она поможет вам решить возникшие у вас вопросы при эксплуатации техники.
Если остались вопросы, задайте их в комментариях после инструкции.
"Загружаем инструкцию", означает, что нужно подождать пока файл загрузится и можно будет его читать онлайн. Некоторые инструкции очень большие и время их появления зависит от вашей скорости интернета.


GB
- 18 -
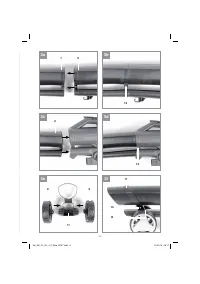
5.3. Fitting the handle
Slide the handle (Fig. 6a/Item A) onto the mounts
in the housing as far as the stop. Then fasten the
handle on both sides with one screw on each side
(Fig. 6b/Item 13).
5.4. Fitting the additional handle
Remove the star screw (Fig. 7/Item B),
fi
t the
handle (Fig. 7/Item 3) to the mount and secure the
handle in the required position with the star screw.
5.5. Fitting the harness
Open the knurled screw (Fig. 8/Item C), feed the
belt strap (Fig. 8/Item 4) through the opening and
close the knurled screw again.
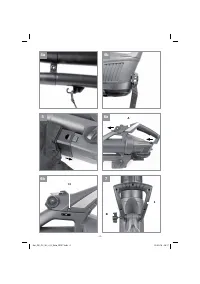
5.6 Fitting the battery (Fig. 9)
Press the pushlock button (Fig. 9/Item E) of the
battery as shown in Fig. 9 and push the battery
into the battery mount provided. When the bat-
tery is positioned as in Fig. 9, make sure that the
pushlock button latches in place! To remove the
battery pack, proceed in reverse order.
Important!
Use only batteries which are charged to the same
level. Never combine full and half-full batteries.
Always charge the two batteries simultaneously.
The equipment‘s operating time depends on the
battery with the lower charge level. The two batte-
ries must always be fully charged before use.
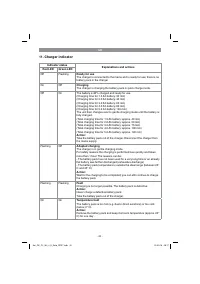
5.7 Charging the battery
1. Take the battery pack out of the equipment.
Do this by pressing the side pushlock buttons.
2. Check that your mains voltage is the same as
that marked on the rating plate of the battery
charger. Insert the power plug of the charger
into the socket outlet. The green LED will then
begin to
fl
ash.
3. Insert the battery pack into the charger.
4. In the section entitled „Charger indicator“ you
will
fi
nd a table with an explanation of the LED
indicator on the charger.
The battery pack can become a little warm during
the charging. This is normal.
If the battery pack fails to charge, check:
•
whether there is voltage at the socket outlet
•
whether there is good contact at the charging
contacts
If the battery pack still fails to charge, send
•
the charging unit
•
and the battery pack
to our customer service center.
To ensure that the battery pack provides long ser-
vice, you should take care to recharge it promptly.
You must recharge the battery pack when you
notice that the power of the cordless leaf blower
drops. Never allow the battery pack to become
fully discharged. This will cause it to develop a
defect.
Start up the equipment only when fully assem-
bled.
6. Operation
6.1. Sizing the strap (Fig. 1)
Size the length of the carrying strap (4) so that the
vacuum tube just clears the ground. The guide
rollers (9) at the bottom end of the suction tube
will help you to maneuver the suction tube on the
ground.
6.2. Switching on the equipment (Fig. 10)
•
To switch on, press the On/Off switch (5).
•
To switch off, let go of the On/Off switch (5)
again.
6.3 Selecting the mode of operation
6.3.1 Suctioning (Fig. 10)
Turn the lever (Fig. 10/Item 8) to position A. You
can do this both when the equipment is at a
standstill and while it is running.
6.3.2 Blowing (Fig. 10)
•
Turn the lever (Fig. 10/Item 8) to position B.
You can do this both when the equipment is
at a standstill and while it is running.
•
Channel the air stream forward and walk
slowly to blow foliage or garden refuse into a
pile or to clear out hard-to-reach places.
•
Important! Empty the catch bag before
blowing. Otherwise, the material that has
been vacuumed up could drop out.
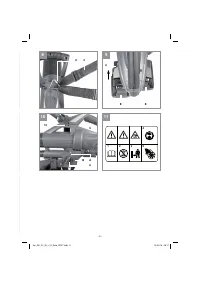
6.4 Emptying the catch bag (Fig. 1)
Empty the catch bag (7) in good time. With a
nearly full bag, the suction power drops notably.
Organic waste should be composted.
•
Switch off the equipment and remove the
Anl_GE_CL_36_Li_E_Solo_SPK7.indb 18
Anl_GE_CL_36_Li_E_Solo_SPK7.indb 18
23.03.16 08:17
23.03.16 08:17
Характеристики

Остались вопросы?Не нашли свой ответ в руководстве или возникли другие проблемы? Задайте свой вопрос в форме ниже с подробным описанием вашей ситуации, чтобы другие люди и специалисты смогли дать на него ответ. Если вы знаете как решить проблему другого человека, пожалуйста, подскажите ему :)


