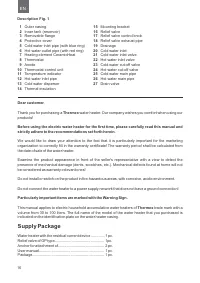
Водонагреватели Thermex ERD 100 V (pro) - инструкция пользователя по применению, эксплуатации и установке на русском языке. Мы надеемся, она поможет вам решить возникшие у вас вопросы при эксплуатации техники.
Если остались вопросы, задайте их в комментариях после инструкции.
"Загружаем инструкцию", означает, что нужно подождать пока файл загрузится и можно будет его читать онлайн. Некоторые инструкции очень большие и время их появления зависит от вашей скорости интернета.

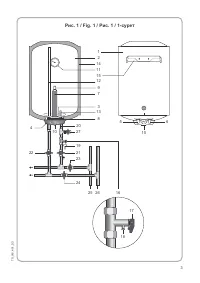


When selecting the installation site, the total weight of the EWH filled with water shall be taken into
account. The wall and the floor with a weak load-carrying capacity shall be strengthened,
respectively. When drilling (making) holes in the wall, it is necessary to take into account the cables,
channels, and pipes passing through it. The EWH is suspended using the casing brackets on the
anchor hooks fixed in the wall.
The manufacturer shall not bear responsibility for the EWH fall due to its incorrect installation.
The installation of hooks in the wall shall prevent the spontaneous movement of the EWH brackets
over them. For the purposes of EWH maintenance, the distance from the protective cover to the
nearest surface in the direction of the removable flange axis shall be at least 0.5 meters.
In order to avoid causing harm to the property of the customer and (or) third parties in case of faulty hot
water supply system, it is necessary to install the EWH in premises that are equipped with
waterproofing floors and drainage to the sewage system, and under no circumstances should you
place non-waterproof items exposed to water under the EWH. When placing the EWH in unprotected
premises, it is necessary to install a protective tray (not included in the EWH supply package) under
the EWH equipped with drainage into the sewage system.
In case EWH is installed in places that are difficult to access with a view to perform technical and
warranty maintenance (mezzanines, alcoves, ceiling void, etc.), the EWH shall be installed and
dismantled by the customer independently or at his/her own expense.
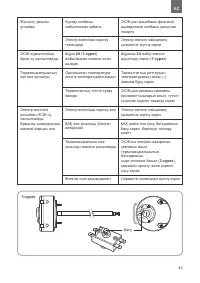
Connection to the water supply system
It is necessary to supply cold water to the EWH using a pre-treatment filter with a
purification degree of at least 200μm.
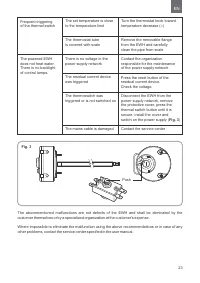
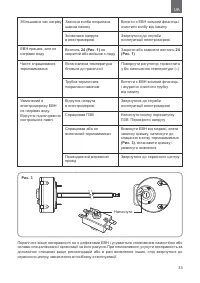
Install the relief valve
shown in
at the cold water inlet
the pipe with a blue ring, for
(16)
Fig. 1
(20)
–
, –
3 5 4 turns and ensure the connection tightness with any sealing material (flax, thread-fill tape, etc.).
When the water heater is operating, water can leak from the relief valve outlet pipe to relieve
excessive pressure, which occurs for the purpose of ensuring the water heater safety. The discharge
pipe shall remain open to the atmosphere and be directed downward constantly. It is advisable to
attach a rubber or silicone tube of the appropriate diameter to the drainage hole with a view to drain
water. It is necessary to drain a small amount of water regularly (at least once a month) through the
relief valve discharge pipe into the sewage system to remove calcareous sediments and to check
valve efficiency.
The handle
is designed to open the valve
. Make sure that during the operation of the water
(17)
(18)
heater this handle is in the position preventing water from being drained from the tank.
The connection to the plumbing system shall be made in accordance with
using copper/plastic
(Fig.1)
pipes or special flexible plumbing designed for a temperature of at least 100°C at the maximum
operation pressure. It shall be forbidden to use flexible connectors used in the past. Plumbing and
locking accessories shall be in line with the parameters of the water supply network and have the
necessary quality certificates. During installation, do not use excessive force to avoid damage to the
pipe threads, as well as the glass and porcelain finish of the inner tank.
CAUTION! It shall be forbidden to use the EWH without a relief valve or use a valve
made by other manufacturers.
21
EN
After connecting the EWH, make sure that the cold water shutoff valve in the EWH
is open and
(23)
the hot water shutoff valve
is closed. Open the cold water inlet faucet in the EWH
, the hot
(24)
(21)
water outlet faucet from the EWH
and the hot water faucet on the mixer to allow air to flow out of
(22)
the EWH. When the EWH has been filled in full, water will flow from the mixer faucet in the form of a
continuous stream. Close the hot water faucet on the mixer, check the flange for leaks and, if
necessary, tighten the bolts.
When connecting the EWH in places not equipped with running water, it is acceptable to supply water
to the EWH from the auxiliary reservoir using a pump station, or from a reservoir placed at a height of
not less than 5 meters from the top of the EWH.
Connection to the power supply network
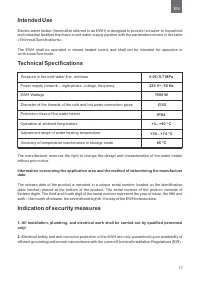
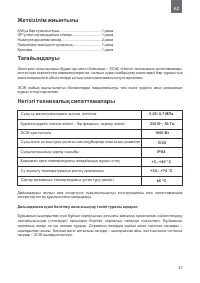
Before switching on the heater, make sure that its parameters are in line with the technical
characteristics of the water heater.
CAUTION! Before switching on the power supply, make sure that the EWH is filled with
water!
The water heater shall be grounded to ensure its safe operation.
The EWH is equipped with a regular power cord with or without a europlug and a residual current
device (optional). The electrical socket shall have a grounding terminal with a ground wire supplied to
it and be located in a place protected from moisture or meet the requirements not lower than IPX4.
It is important to constantly monitor the EWH after the initial powering. In case of any parameter
mismatch (heating, temperature, indication, thermostat failure), contact the maintenance
department.
Maintenance
Periodic maintenance and timely replacement of the magnesium anode are indispensable conditions
for the long-term operation of the EWH. Failure to comply with these requirements is the basis for
withdrawing the EWH from warranty service.
Maintenance and replacement of the magnesium
anode are not included in the manufacturer's and the seller's warranty liabilities.
During maintenance, the check is performed with respect to the condition of the magnesium anode.
Simultaneously, the sediment is removed, which may accumulate at the bottom of the EWH.
The magnesium anode shall be replaced at least once a year. If water contains a large number of
chemical impurities, the magnesium anode shall be replaced every six months.
If there is some scale on the
, it can be removed with the use of descaling agents
protective envelope
or mechanically. When removing sediment from the EWH, do not apply excessive force and use
abrasive cleaners to avoid damaging the protective coating of the inner tank.
The first maintenance procedure is particularly important, because the intensity of the formation of
scale and sediment and the consumption of magnesium anode serve as the grounds for determining
the timing of subsequent maintenance, which in turn provides an opportunity to extend the EWH life
cycle. If the above requirements are not fulfilled, the EWH life cycle is shortened, the probability of
EWH failure increases, and the warranty liabilities are terminated.
20
EN
Содержание
- 4 Thermex
- 6 Комплект поставки
- 8 Описание и принцип действия; Heating; Размещение и установка; За падение ЭВН, связанное с его неправильной установкой; Подключение к водопроводу; ной очистки воды со степенью очистки не менее 200 мкм.
- 10 Подключение к электросети; отметка с печатью организа
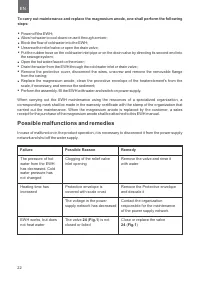
- 13 Возможные неисправности и методы их устранения
- 14 mail; ICS
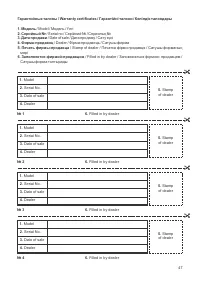
- 46 Warranty certificates /
- 48 Заполняется сервисным центром
- 49 Заполняется сервисным центром


