
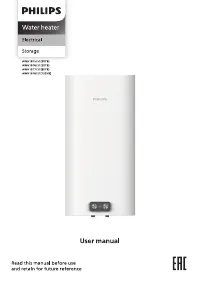
Водонагреватели PHILIPS AWH1617/51(80YB) - инструкция пользователя по применению, эксплуатации и установке на русском языке. Мы надеемся, она поможет вам решить возникшие у вас вопросы при эксплуатации техники.
Если остались вопросы, задайте их в комментариях после инструкции.
"Загружаем инструкцию", означает, что нужно подождать пока файл загрузится и можно будет его читать онлайн. Некоторые инструкции очень большие и время их появления зависит от вашей скорости интернета.


10
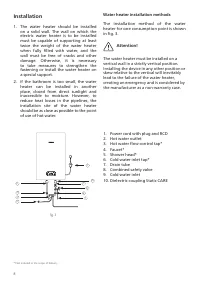
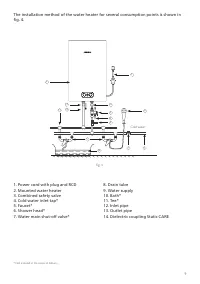
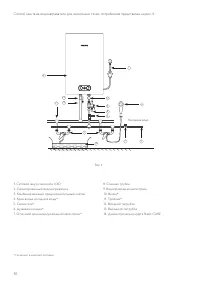
1 The water heater is connected to a water
supply network with a pressure of at least
0 02 MPa, maximum 0 7 MPa
2 To connect the water heater to the water
supply, pipes with a diameter of G1/2 are
used
3 When connecting pipes, use rubber seals
on the threaded pipe ends to prevent
leakage
4 Screw the safety valve onto the inlet
pipe, marked in blue and with a sign of
the direction of water flow, so that the
water flow matches the direction of the
arrow on the valve body On the pressure
relief hole of the safety valve, put a drain
pipe to drain water (it may appear when
heated) into the sewer
5 The safety valve is installed on the cold
water pipe (marked with a blue ring)
(maximum pressure 0 7 MPa / 7 0 Bar) If
the water pressure in the line exceeds 6
Bar, a pressure reducing valve should be
installed
6 Connect the water heater with the valve
mounted to the water supply network -
install a shut-off valve at the water supply
point
7
Connect the desired number of
consumption points to the outlet marked
in red
8. Open the shut-off valve and one of the
collapsible valves. After filling the tank, as
evidenced by the outflow of water from
the collapsible tap, close the collapsible
tap and check the tightness of all
connections
Water supply connection
Please use the accessories provided by the
manufacturer to install the water heater
The electric water heater must not be
mounted on the wall before you make
sure that the bracket is securely and firmly
installed Otherwise, the electric water
heater may fall off the wall, resulting in
damage and even serious injury or injury
When determining the points for holes
for anchor bolts, a free space between the
bottom of the water heater and the floor
should be at least 0 6 m
Mounting
1 Determine the points for the bolt
holes (determined according to the
specification of the instrument you have
chosen) Drill two holes of appropriate
depth in the wall using a drill bit that fits
the bolts, install the mounting bracket,
and then hang the electric water heater
2 Attach the power outlet to the wall The
socket requirements are as follows: 220-
240V / 10A, single-phase, three-wire. It is
recommended to place the socket on the
right side above the water heater
The water pressure in the water heater
corresponds to the water pressure in the
water main If the pressure in the line
exceeds 0 7 MPa, then a pressure reducer
should be installed in front of the water
heater so that the pressure does not
exceed 0 7 MPa
In places or on a wall where water can
enter, the installation height of the
electrical outlet must be at least 1 8 m
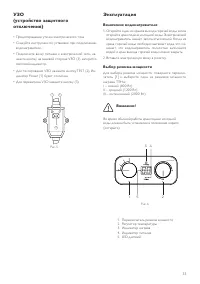
Attention!
Attention!
Attention!
Содержание
- 26 Используемые обозначения
- 27 Правила безопасности
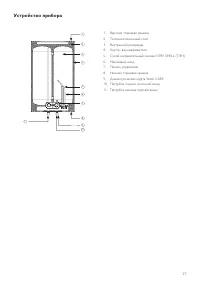
- 29 Устройство прибора
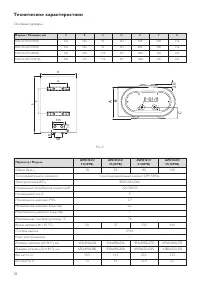
- 30 Технические характеристики
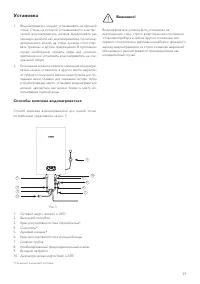
- 31 Установка; Способы монтажа водонагревателя
- 33 Монтаж
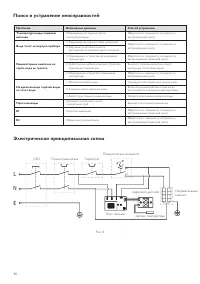
- 34 Подключение к электрической сети
- 35 Эксплуатация
- 36 Установка температуры нагрева воды; Выключение
- 37 Обслуживание
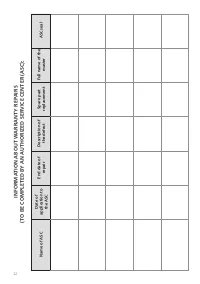
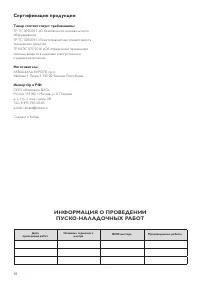
- 40 Сертификация продукции; Товар соответствует требованиям:; ИНФОРМАЦИЯ О ПРОВЕДЕНИИ
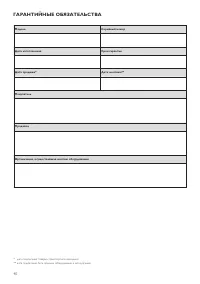
- 42 ГАРАНТИЙНЫЕ ОБЯЗАТЕЛЬСТВА
Характеристики

Остались вопросы?Не нашли свой ответ в руководстве или возникли другие проблемы? Задайте свой вопрос в форме ниже с подробным описанием вашей ситуации, чтобы другие люди и специалисты смогли дать на него ответ. Если вы знаете как решить проблему другого человека, пожалуйста, подскажите ему :)


