Водонагреватели Ariston PLATINUM INDUSTRIAL 150-200-300 - инструкция пользователя по применению, эксплуатации и установке на русском языке. Мы надеемся, она поможет вам решить возникшие у вас вопросы при эксплуатации техники.
Если остались вопросы, задайте их в комментариях после инструкции.
"Загружаем инструкцию", означает, что нужно подождать пока файл загрузится и можно будет его читать онлайн. Некоторые инструкции очень большие и время их появления зависит от вашей скорости интернета.

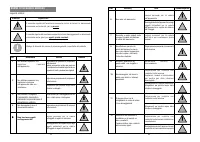

The installation, set-up, maintenance and possible replacement of the water heater must be
car ried out by qualified personnel in conformity with the applicable norms in force and with any
provisions set for th by local authorities and public health bodies.
Before carrying out any maintenance work and/or replacing any par ts, make sure that the
appliance switched off.
The appliance heats water to a temperature below boiling point. It must be linked up to a
domestic water mains sized according to the appliance per formance levels and capacity.
Before connecting the appliance, it is first necessar y to:
-
Check whether the characteristics (please refer to the data plate) meet the customer’s
requirements.
-
Make sure the installation conforms to the IP degree (of protection against the
penetration of liquids) of the appliance according to the applicable norms in force.
-
Read the instructions provided on the packaging label and on the appliance data plate.
Installing the appliance
This appliance was designed to be installed only inside buildings in compliance with the applicable
nor ms in force. Fur thermore, installers are requested to keep to the following advice in the
presence of:
-
Damp
: do not install the appliance in closed (unventilated) and damp rooms.
-
Frost
: do not install the appliance in rooms where the temperature may drop critically.
-
Sunlight
: do not expose the appliance to direct sunrays, even in the presence of windows.
-
Dust/vapours/gas
: do not install the appliance in the presence of par ticularly aggressive
atmospheres such as acidic vapours, dust or those saturated with gas.
-
Electrical discharges
: do not install the appliance directly on electric lines that aren’t
protected against sudden voltage jumps.
Choosing a sur face that is per fectly flat and level on which to rest the appliance will ensure that
it remains stable. Remember to place the 4 feet under the appliance at an angle of 90° from one
another.
Warnings when assembling the feet:
-
af ter having removed the packaging, rest the product on the ground as close as possible
to the final installation point.
-
Tilt the appliance slightly to allow the first foot to be placed under the water heater (this
must be done by two people).
-
Tilt the appliance slightly again so that you can place the second foot under it at an angle
of 90° from the first one and do the same for the third and four th feet.
Position the appliance in a ver tical position and tighten the lock nuts on the feet.
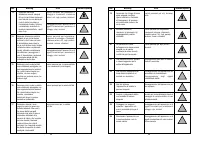
See warning no. 9
In the case of walls made of bricks or per forated blocks, par tition walls featuring limited
static, or masonr y different in some way from those stated, you first need to carr y out a preliminar y
static check of the suppor ting system.
The wall-mounting fastening hooks must be capable of suppor ting a weight that is three times
higher than the weight of the water heater filled with water. Fastening hooks with a diameter of
at least 10 mm are recommended.
!!!!!
See warning no. 10
Local norms could set for th restrictions regarding the installation in a bathroom envi-
ronment. Therefore keep to the minimum distances foreseen by the applicable nor ms in force.
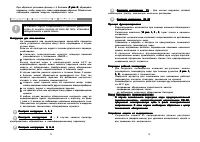
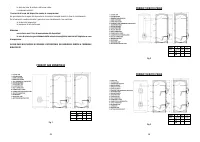
The appliance (
A fig.1
) should be installed as close as possible to the point of use to limit heat
dispersion along the piping.
A gap of at least 50 cm should be lef t to have access to the electrical components, thus
facilitating the maintenance activities.
See warning nos. 20, 26
Hydraulic connection
Before making the hydraulic connection, you must arrange for the system to be cleaned
thoroughly to eliminate any residue or dir t that could compromise the proper operation of
the water heater.
Connect the water heater inlet and outlet to resistant pipes or pipe fittings, as well as to the
operating pressure, the temperature of the hot water that could at times reach well over 80°C.
We advise against the use of materials that cannot withstand such high temperatures.
We recommend you use dielectric joints for the electrical insulation of the appliance from the
water mains.
The water heater must come with a pressure safety device connected to the cold water pipe
which must have a maximum calibration that is equal to the maximum operating pressure indicated
on the data plate and it must comply with the national norms in force.
WARNING! For those nations that have taken on European norm EN 1487:2000, the pressure
safety device provided with the product does not comply with national norms. According to
the norm, the device must have a maximum pressure of 0.7Mpa (7 bar) and have at least: a
cut-off valve, a non-return valve, a control mechanism for the non-return valve, a safety
valve, a water pressure shut-off device.
The device relief must be connected to a relief pipe that is tilted downwards and has a diameter
at least identical to the one of the equipment connection. Use a funnel that creates an air gap of
at least 20mm (exposed to the atmosphere) and allows visual checks so that no personal injur y,
proper ty damage or damage to animals will occur in case of safety device enabling. The
manufacturer will not be held responsible for such damage.
In addition, the pressure safety device’s relief pipe must be installed in a place where it will be
protected from ice.
During the heating phase, some water may trickle from the tap. This is nor mal.
Should you install a pressure safety device that does not comply with EN 1487:2000, the following
installation procedure must be followed.
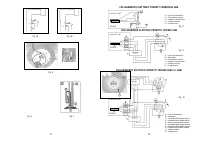
Tighten a Tee fitting on the equipment water inlet pipe, distinguished by the small blue collar. On
this fitting, screw on a tap to empty the water heater, which can be operated only using a tool, on
the one side (
B fig.4A-4B
) , and the pressure safety device or safety assembly on the other side
(
A fig.4A-BB
).
Connect it to the cold water system using a flexible tube. In addition, a water discharge tube on
the outlet is necessar y if the emptying tap is opened. When tightening the pressure safety device,
do not over tighten and do not tamper with it.
Should the network pressure be close to the maximum operating pressure, it is necessar y to
apply a pressure reducer as far as possible from the appliance.
If the water systems have the following features:
!!!!!
!!!!!
25
26


