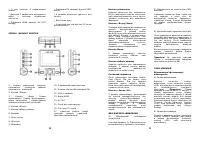
Видеорегистратор Saturn ST-VDR0009 - инструкция пользователя по применению, эксплуатации и установке на русском языке. Мы надеемся, она поможет вам решить возникшие у вас вопросы при эксплуатации техники.
Если остались вопросы, задайте их в комментариях после инструкции.
"Загружаем инструкцию", означает, что нужно подождать пока файл загрузится и можно будет его читать онлайн. Некоторые инструкции очень большие и время их появления зависит от вашей скорости интернета.


6
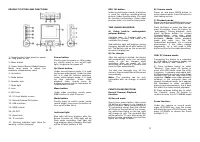
AVOUT/HDMI output test:
After power on, please connect DVR to
LED TV by A/V cable or HDMI cable,
then the device will automatically
switch to playback mode; Meantime,
the DVR's screen don't show anything,
only TV shows menu operation. (Note:
A/V and HDMI cannot be used at the
same time).
G-SENSOR (collision sensor):
The device is automatically recording
after car charger is plugged into. It
measures the gravity sensor by
dynamic acceleration due to gravity,
and could sense the moving direction
(Left - right - front - back) and the
vibration of collision of the vehicle. If
the occurrence of serious vehicle
collision, "lock" icon displays on the
upper left screen, the collision sensor
would be triggered soon. White lock
icon means DVR will start to record
with a recycle time after the accident
happened, and this video will not be
removed or overwritten, then it returns
to normal working state. In case of
serious collision of the vehicle, the
device automatically start the collision
induced and incidents video will be an
important files saved, can serve as an
evidence or proof (This file will not be
overwritten or deleted).
G-SENSOR works in a cycle time, after
saved files of the cycle time period, the
icon disappears, it restarts from next
time period.
The G-sensor function also could be
performed by MENU operation.
MENU FUNCTION SETTINGS:
Turned on, press the MENU button to
enter the camera mode setting
interface, press Down button to enter
the option, Press Up/Down buttons to
select the listed settings, press the OK
button to enter the set function
parameter interface, turn the button
and press Up/Down to select their
specific parameter, and finally press
OK to exit.
1) Resolution: 1080Full HD
(1920x1080) 720P (1280x720)
WVGA (848x480) VGA (640x480)
2) Cycle recording: OFF, 2 minutes, 3
minutes, 5 minutes
3) WDR: Full-time opening
4) Exposure Value: +2.0 +5/3 +4/3
+1.0 +2/3 +1/3 +0.0 -1/3 -
2/3 -1.0 -4/3 -5/3 -2.0
5) Motion detection: OFF/ON
6) Recording audio: OFF/ON
7) Time Display:: Off/On (Time
watermark of video recording)
8) G-Sensor: Off High Middle Low
Power on, press MODE button to enter
the camera mode, press the MENU
button to enter the camera settings
interface, press Down button to enter
the option, Press Up/Down buttons to
select the listed settings, press OK
button to enter the set function
parameter interface, and then press
Up/Down buttons to select specific
parameters, press the OK button to
exit.
1) Shooting mode: single shoot 2
seconds pacemaker 5
seconds pacemaker 10
seconds pacemaker
2) Resolution: 12M
(
4032x3024
)
10M
(
3648x2736
)
8M
(
3264x2448
)
5M
(
2592x1944
)
3M
(
2048x1536
)
2M HD
(
1920x1080
)
VGA
(
640x480
)
1.3M
(
1280x960
)
3) Continuous shooting: Off/On
4) Image quality: High, Medium,
Economic
5) Sharpness: Strong/Standard/Soft
6) White Balance: Auto/ Daylight/
Cloudy/ Tungsten/
Fluorescent
7
7) Color: Normal/ Black and white/
Brown
8) ISO: Auto 100 200 400
9) Exposure Value : +2.0 +5/3 +4/3
+1.0 +2/3 +1/3 +0.0 -
1/3 -2/3 -1.0 -4/3 -5/3 -
2.0
10) Anti-shake: Off/ On
11) Time display: Off, Date, Date/Time
(Time watermark of taking pictures)
Power on, press MODE button twice to
enter the playback mode, press the
MENU button to enter the Playback
Settings interface, press Down button
to enter the option, Press Up/Down
buttons to select the listed settings,
press OK button to enter the function
parameter interface, and then press
Up/Down button to select specific
parameter, press OK button to exit.
1) Delete: Delete current, Delete All.
2) Protection: Locking current, Unlock
current, All locking, Unlock all
3) Slide show: 2 seconds, 5 seconds,
8 seconds
Under Recording Mode or Camera
Mode, press the MENU button again,
DVR will enter the setting interface,
press Down button to enter the option,
Press Up/Down button to select their
specific parameter, and finally press
the OK button to exit.
1) Date/Time: Press Up/Down button
to select the date/time, press OK
button to enter the setting interface,
press the OK button to select the
year/month/day/hour/minute/second,
press Up/Down to adjust, finally press
OK button to exit.
Up/Down button are used to adjust the
time and date, press OK button to
enter the next setting, when all setting
is finished, press OK button to exit.
Note:
before setting time, press
Up/Down to select: [year/month/day],
[date/month/year] and [month/day/
year].
2) Automatic shutdown: off, 3 minutes,
5 minutes, 10 minutes
3) Button sound: Off/On
4) Language: English/ Simplified
Chinese/
Traditional
Chinese/
Japanese/ Russian/ French/ German/
Italian/ Spanish/ Portuguese
5) TV system: NTSC PAL
6) Frequency: 50HZ 60HZ
7) Screen protection: off, 3 minute, 5
minutes, 10minutes.
8) Infrared light: Off/On
9) Format: memory SD card
10) Default settings: Press the OK
button to enter, press Up/Down
buttons to select the cancel/confirm,
press the OK button to exit.
11) Version: press OK button to enter,
display the current version.
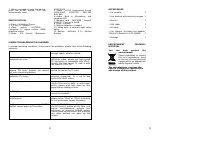
WARM TIPS:
1. Please, use only the 5V output to
charge the device, otherwise you will
cause damage.
2. Make sure TF card plug in right
direction, if the direction is incorrect, it
may damage the camera and TF card.
3. Please use standard SDHC high
speed TF card with mark “C4 “ or “C6”
tag.
4.
If TF card is not compatible with the
device, the card cannot be read. Please
format the TF Card by the DVR device.
5. To save the battery power , please
set the time of turning off the screen
and auto power-off in the menu, then
the camera will be automatic power-off
and in the mode of screen saver in the
set time when no any operation .
6. When the Li-polymer is in low level,
the screen will show the words and icon
of “Low Battery”. At this time, please
charge the device. Otherwise the
device will automatically save files and
turn off in 2 seconds.

