Видеорегистратор Saturn ST-VDR0009 - инструкция пользователя по применению, эксплуатации и установке на русском языке. Мы надеемся, она поможет вам решить возникшие у вас вопросы при эксплуатации техники.
Если остались вопросы, задайте их в комментариях после инструкции.
"Загружаем инструкцию", означает, что нужно подождать пока файл загрузится и можно будет его читать онлайн. Некоторые инструкции очень большие и время их появления зависит от вашей скорости интернета.

4
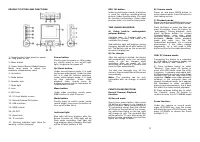
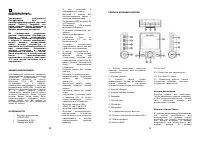
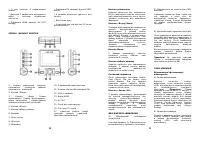
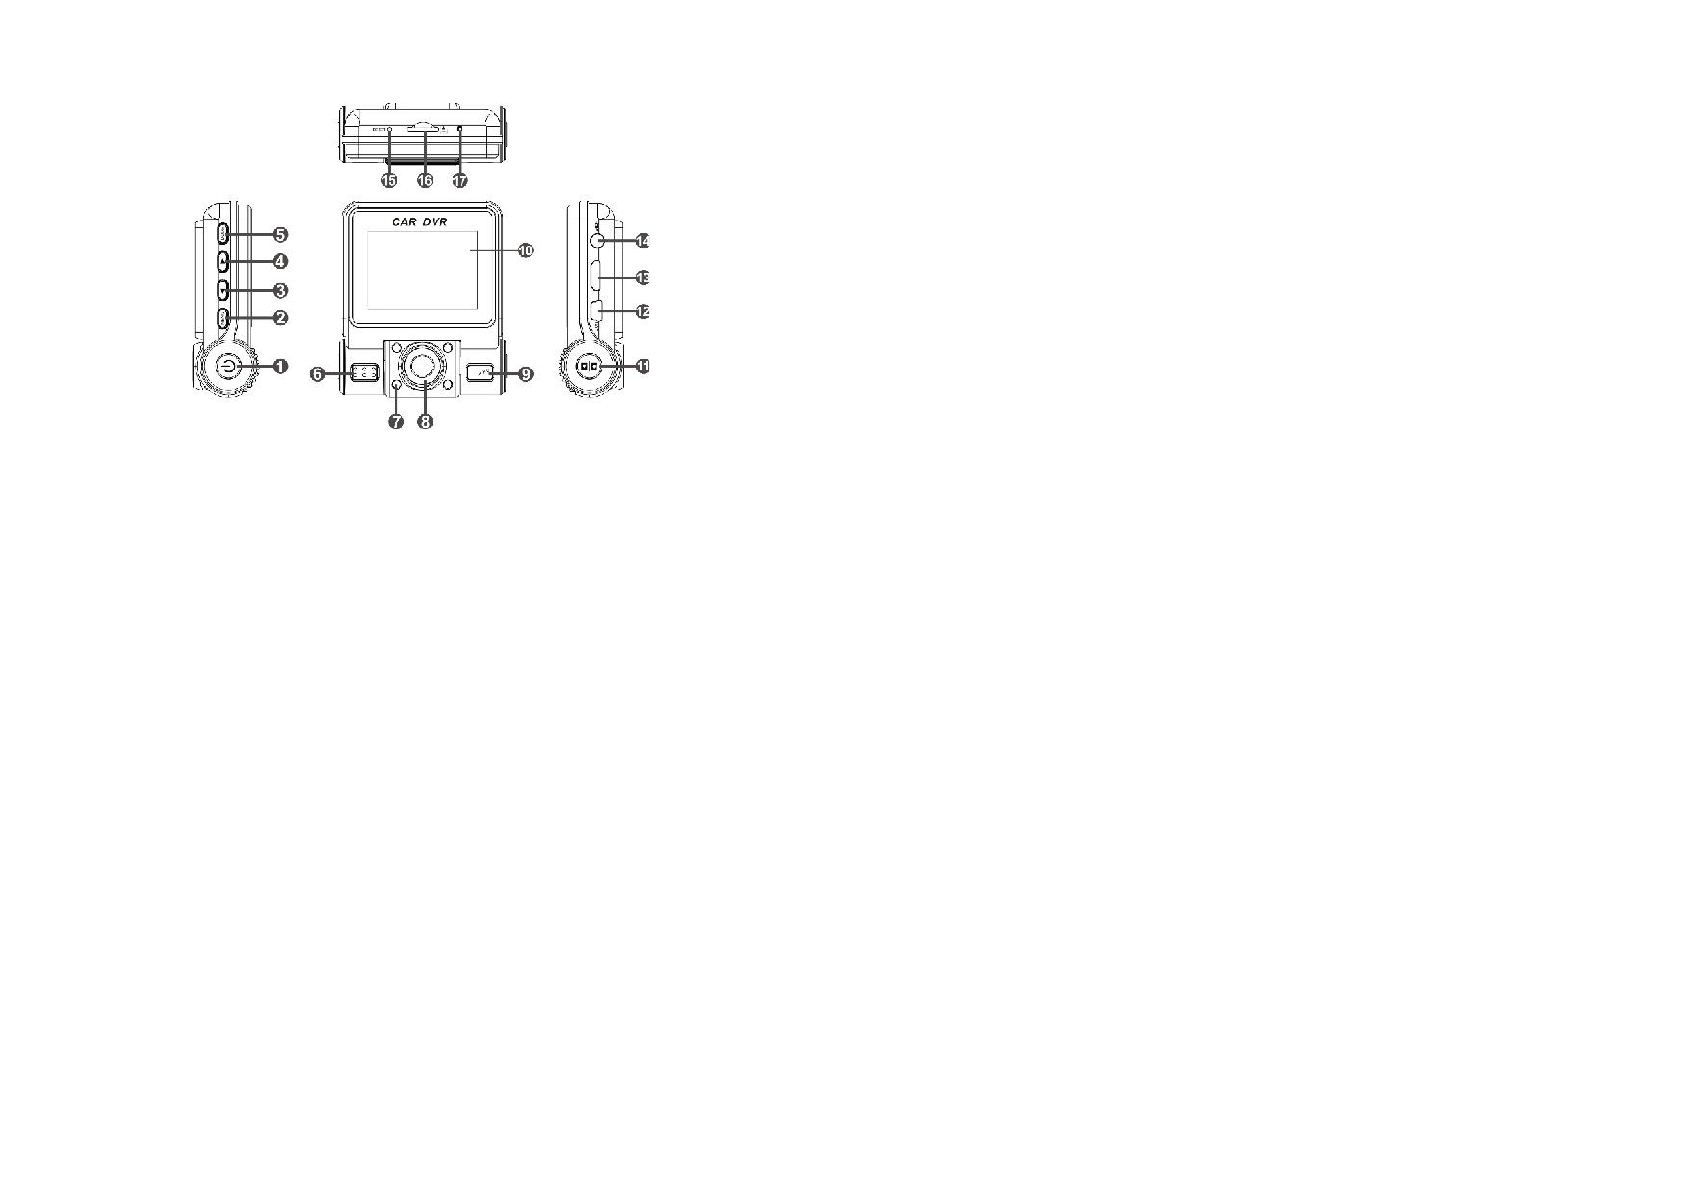
PRODUCT PICTURE AND FUNCTIONS:
1: Power button (short press for power
on, long press for off)
2: Menu button
3: Down button/Record Mode/Camera
Mode, long press to adjust the
exposure compensation value
4: Up button
5: Mode button
6: Speaker hole
7: Night light
8: Lens
9: MIC hole
10: 2.0 inch display screen
11: Record/Camera/OK button
12: USB interface
13: HDMI output
14: AV OUT
15: Reset hole
16: TF card slot
17: Working indicator light (blue for
working, red for charging)
Power button
:
Shortly press for power on; After power
on, shortly press to turn on/off night
light; long press for power off.
Up/Down button
:
Under record/camera mode, it is used
for focuses adjustment; Under function
list, it is used for function selection;
under video/camera mode, it is used
for files selection. Under video
playback state, shortly press for
volume increase/reduce; long press for
forward/fast reverse.
Menu button
:
Under video recording, shortly press
MENU button to start G-sensor.
Mode button:
Shortly press to switch mode; under
record mode, long press the button to
turn on/off video voice.
Indicator light
:
Blue light will long brighten after the
device is power on; Blue light will be
flash when recording; Red light will
long brighten when charging. Red light
will be off after battery is full.
5
REC/OK button
:
under record/camera mode, the button
is used for starting recording/taking
picture; Under function state, it is used
for function confirmation; Under video
preview state, it is used for play/pause.
TWO CHARGING MODES:
A) Using built-in rechargeable
polymer battery
Charging way: 1) Connect with car
charger, 2) Connect USB cable to a
computer for charge.
Red indicator light will brighten during
charging, and will be off after battery is
full. The battery icon on the screen will
become charging icon.
B) Car charger
After the vehicle is started, the device
will automatically enter the recording
mode, it can be charged while
recording. After car power off, the
device will shut down in 5 seconds and
save the files automatically.
You also can manually turn off the
camera, the recorded files will be saved
automatically.
Note:
The machine can be only
compatible with car charger of output
5V !
FUNCTION DESCRIPTION:
Record/Camera/Playback
function.
A) Record mode
Short press power button, then press
OK button or connect to car charger to
start recording. (Note: please plug into
TF card before using), then the red dot
will flash on the top left of the screen,
the white time figure on the top right
will change to red. The recorded files
will be saved in TF card. After press OK
button to stop recording, the red time
figure will change to white.
B) Camera mode
Power on and press MODE button to
enter camera mode. Press OK button to
start taking picture.
C) Playback mode
Power on and press MODE button twice
times and it will enter Playback mode.
Press Up/Down to select the files you
want to preview, Press OK button for
“play/pause”. During playback, short
press Up/Down button to volume
increase/reduce, and long press
Up/Down button to fast forward/fast
backward. (
Note:
Under playback
mode and enter into the fast
forward/fast backward, it’s a normal
phenomenon if the video paused
temporarily, as it will need a little
buffering time for the video decoding.)
USB/PC Camera mode:
Connecting the device to a computer
by USB cable, the device's display will
pop up "memory" and "camera".
A) Press up/down button to select
"Memory", then press OK button to
enter into USB mode, open file of My
Computer, it appears removable disk.
All files of icons are stored in the folder
named DCIM, you can copy files to the
computer. (
Note:
some video playback
software in the computer does not
support thumbnail mode, so it appears
the thumbnail of video corruption/
green screen phenomenon, but it does
not affect the video normal playback)
B) Press up/down button key to select
the ‘Camera’, press OK button to
confirm to enter into PC CAMERA mode
Focus function:
Under the camera or record mode,
press UP/DOWN key, then the screen
will show the icon of FOCUS zoom, and
press UP/DOWN to choose the Zoom
multiple (1-4 ).

