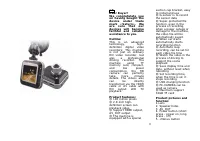
Видеорегистратор Saturn ST-VDR0002 - инструкция пользователя по применению, эксплуатации и установке на русском языке. Мы надеемся, она поможет вам решить возникшие у вас вопросы при эксплуатации техники.
Если остались вопросы, задайте их в комментариях после инструкции.
"Загружаем инструкцию", означает, что нужно подождать пока файл загрузится и можно будет его читать онлайн. Некоторые инструкции очень большие и время их появления зависит от вашей скорости интернета.


8
interface, press «OK»
button to enter the
Function
parameter
interface, and then press
«Up/Down» button to
select
specific
parameter, press «OK»
button to exit.
1) Delete: Yes/ No/
Delete all.
2) Protection: Yes/ No.
3) Volume: Mute/
Volume1/ Volume2/
Volume3/ Volume4/
Volume5/ Volume6/
Volume 7
Under Recording Mode or
Camera Mode, press the
«Menu» button again,
DVR will enter the
Setting interface. Press
«Up/Down» button to
select
their
specific
parameter, and finally
press «OK» button to
exit.
1) Date/Time: Press
«Up/Down» button to
select the Date/Time,
press «OK» button to
enter
the
Setting
interface, press «Menu»
button to select the
year/ month/ day/ hour/
minute/ second, press
«Up/Down» to adjust,
finally press OK button
to exit.
Note
: before setting
time, press «Up/Down»
to select: [year/ month/
day], [day/ month/ year]
or [month/ day/ year].
2) Automatic shutdown:
off/
2
minutes/
5
minutes/ 10 minutes.
3)
Screen protection:
off/
1
minute/
3
minutes/ 5 minutes.
4) Button tone: Off/On
5) Language: English/
Simplified
Chinese/
Traditional
Chinese/
Japanese/
Russian/
French/ German/ Italian/
Spanish/ Portuguese
6)Frequency:
50HZ
60HZ
7) TV system: NTSC PAL
8) Default settings: Press
«OK» button to enter,
press
«Up/Down»
buttons to select the
Сancel/Сonfirm,
press
the «OK» button to exit.
9) Format: memory SD
card
10) Version: press «OK»
button to enter, display
the current version.
Download:
Connect the product to a
computer by USB cable.
[My computer] will occur
removable disk.
Download
files
from
DCIM file.
Note:
1) When the screen
shows «Memory error»,
9
please use the machine
to format TF card.
2) Power on, light blue.
Blue light flashing when
recording;
Red
light
lasting when charging;
Red light goes off when
the charge is full.
3)
Under
Recording
Mode, when you choose
cycle
recording,
the
device will continue to
record when memory
card is full.
Note
: The camera file
will be overwritten one
by one. In order to avoid
all the old files deleted,
the device offers 3
minutes/ 5 minutes/ 10
minutes for a section for
users to choose.
4) «Low battery» and
icon on the screen occurs
when
the
polymer
battery is low,
and you should charge
the machine, or five
seconds later, the DVR
will automatically save
the file and automatically
shut down.
5) When you need to
reset your DVR, press
«RESET» button, DVR
will automatically reset.
6) Connect the machine
to the computer with a
USB cable, you will find
«memory/camera»
to
choose. (
Note
: entering
the «memory/camera»,
the display will be dark
)
7) Power on, shortly
press the power button,
LED lamp turned on.
Press
the
«Power»
button again, LED lamp
turned off. (
Not
e: After
Power on, you need to
press
the
«Power»
button twice if the first
time you turn on the LED
lights).
8) «POWER» button is
for LED On/Off shortcuts,
cannot
achieve
two
functions simultaneously.
So when the screen
saver, press «POWER»
button may not wake up
the screen, and you can
press any other button
to wake up the screen.
9) Horizontal stripe on
the video caused by
wrong frequency. Please
reset to 50Hz or 60Hz
according to the local
power supply frequency.
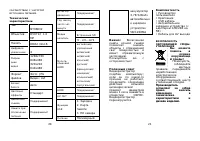
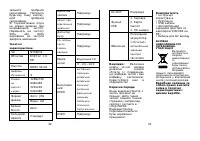
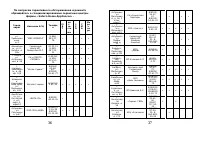
Specifications
:
Main chip
NT96632
Memory
DDR2 32x16
Digital
magnification
4
Lens
OV9712 1.0 MP

