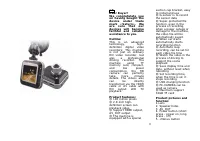
Видеорегистратор Saturn ST-VDR0002 - инструкция пользователя по применению, эксплуатации и установке на русском языке. Мы надеемся, она поможет вам решить возникшие у вас вопросы при эксплуатации техники.
Если остались вопросы, задайте их в комментариях после инструкции.
"Загружаем инструкцию", означает, что нужно подождать пока файл загрузится и можно будет его читать онлайн. Некоторые инструкции очень большие и время их появления зависит от вашей скорости интернета.


6
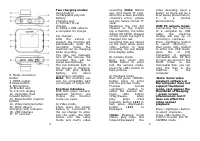
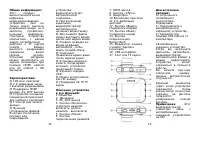
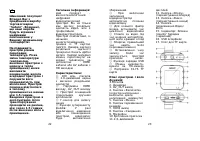
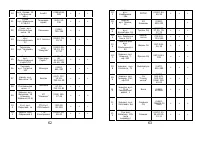
Focus function:
In camera mode or
recording mode, press
«Up/Down» button, the
screen will display the
focus multiples icon, and
then press «Up/Down»
button to choose needed
focus multiple (1 times -
4 times).
AVOUT/HDMI output
test:
After boot, the TV
AV/HDMI cable connect
into corresponding
interface of the product
the machine will
automatically switch to
playback mode;
meantime the screen of
the device doesn't show
anything, but LCD TV
screen has
corresponding show.
Note:
A) Connected AV/HDMI
cable should be first
switched on the product,
when the TV display
shows and then insert
the car charger.
B) AV_OUT and HDMI
output cannot be used
simultaneously, and
enter into the playback
mode only.
G-SENSOR (the collision
sensing function):
Plug
car
charging
machine
will
automatically
start
recording
state,
the
gravity
sensors
measuring
dynamic
acceleration
due
to
gravity, vibration sensed
vehicle collision direction
(left - right - front - rear)
and
mobile
vehicle
collision. Serious vehicle
collision, the display will
show the icon of the
character
prompted,
start collision sensing;
lock
icon
White
represents
that
important accident video
has been delayed to the
end process all saved,
and then resume the
normal screen video
work state.
Note:
In the event of a
serious vehicle collision,
the collision sensors start
automatically saved can
be used as an evidence
of the accident for some
important video file.
(This
file
is
not
overwritten deleted)
G-SENSOR function as a
cycle time, to save the
contents of the cycle
time segment, the icon
disappears, restart from
the next time period.
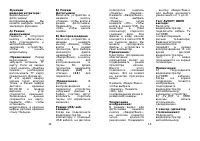
7
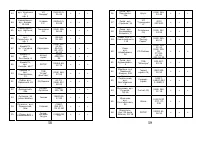
Menu function
settings:
Turned on, press the
«Menu» button to enter
the Сamera mode setting
interface.
Press
«Up/Down» buttons to
select the listed settings,
press «OK» button to
enter the set function
parameter interface, turn
the button and press
«Up/Down»
to select
their specific parameter,
and finally press «OK» to
exit.
1) Resolution: 720P
(1280x720) WVGA
(848x480) QVGA
(320x240) VGA
(640x480)
2) Cycle Recording: OFF/
3 minutes/ 5 minutes/
10 minutes
3) Motion detection:
OFF/ON
4) Recording audio:
OFF/ON
5) Exposure Value: +2.0
+5 / 3 +4 / of 3 +1.0 +2
/ 3 + 1/3 +0.0 -1 / 3 -2
/ 3 -1.0 -4 / 3-5 / 3 -2.0
6) Time Display: Off/On
(Time watermark of
video recording)
7) G-Sensor: Off/ 2G/
4G/ 8G
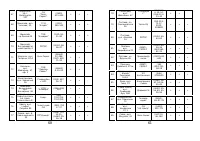
Power on, press «Mode»
button to enter «Camera
Mode», press «Menu»
button to enter the
Camera
Settings
interface, press «OK»
button to enter the Set
function
parameter
interface, and then press
«Up/Down» buttons to
select
specific
parameters, press «OK»
button to exit.
1) Resolution: 12M
(4000x3000), 10M
(3648x2736), 8M
(3200x2400), 5M
(2592x1944), 3M
(2048x1536), 2M HD
(1920x1080), 1.3M
(1280x960), VGA
(640x480)
2) Image quality: High/
Medium/ Economy
3) Sharpness: Strong/
Standard/ Soft
4) White balance: Auto/
Daylight/
Cloudy/
Tungsten/ Fluorescent
5) Color: Normal/ Black
and white/ Retro
6) ISO: Auto 100 200
400
7) Exposure value : +2.0
+5/3 +4/3 +1.0 +2/3
+1/3 +0.0 -1/3 -2/3
-1.0 -4/3 -5/3 -2.0
8) Time display: Off/
Date/ Date and time
(Time
watermark
of
taking pictures)
Power on, press «Mode»
button twice to enter the
Playback Mode, press
«Menu» button to enter
the Playback Settings

