
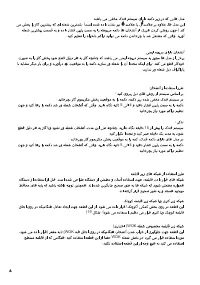
Варочная панель MBS PG-904 - инструкция пользователя по применению, эксплуатации и установке на русском языке. Мы надеемся, она поможет вам решить возникшие у вас вопросы при эксплуатации техники.
Если остались вопросы, задайте их в комментариях после инструкции.
"Загружаем инструкцию", означает, что нужно подождать пока файл загрузится и можно будет его читать онлайн. Некоторые инструкции очень большие и время их появления зависит от вашей скорости интернета.


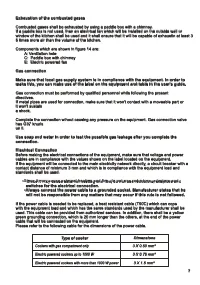


USAGE OF THE COOKER
USAGE OF THE COOKER
3
3
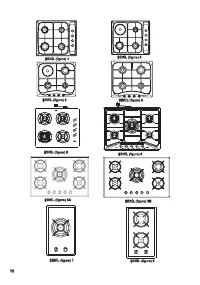
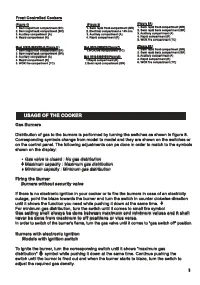
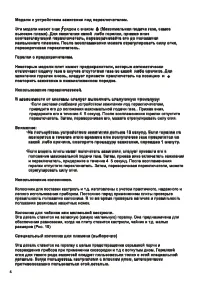
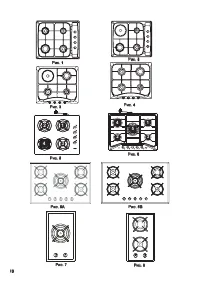
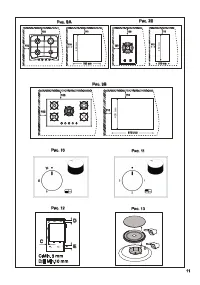
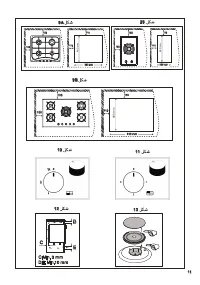
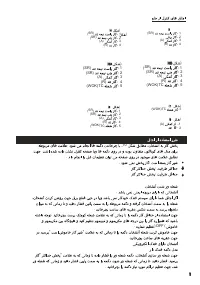
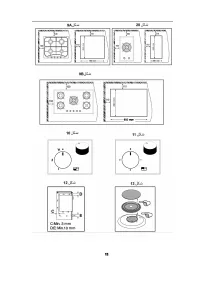
Front Controlled Cookers
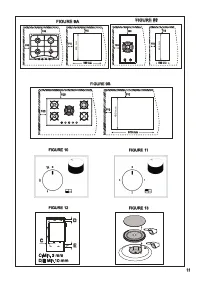
(Figure 4) (Figure 3)
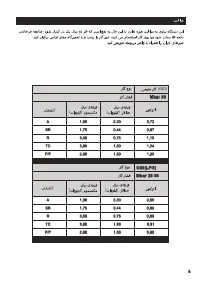
1. Semi rapid front compartment (SR)
1. Semi rapid front compartment (SR)
2. Semi rapid back compartment (SR)
2. Electrical compartment ø 145 mm
3. Auxiliary compartment (A)
3. Auxiliary compartment (A)
4. Rapid compartment (R)
4. Rapid compartment (R)
Mod. HX23-55SVED-6 (Figure 6 )
(Figure7)
1. Semi rapid front compartment (SR) 1.WOK fire compartment (TC)
2. Semi rapid back compartment (SR)
3. Auxiliary compartment (A)
(Figure8)
4. Rapid compartment (R) 1.Rapid compartment (R)
5. WOK fire compartment (TC) 2.Semi rapid compartment (SR)
Mod. HD12-KWSVED
Mod. HD12-K2GSVED
Front Controlled Cookers
(Figure 4) (Figure 3)
Mod. HX23-55SVED-6 (Figure 6 )
(Figure7)
(Figure8)
1. Semi rapid front compartment (SR)
1. Semi rapid front compartment (SR)
2. Semi rapid back compartment (SR)
2. Electrical compartment ø 145 mm
3. Auxiliary compartment (A)
3. Auxiliary compartment (A)
4. Rapid compartment (R)
4. Rapid compartment (R)
1. Semi rapid front compartment (SR) 1.WOK fire compartment (TC)
2. Semi rapid back compartment (SR)
3. Auxiliary compartment (A)
4. Rapid compartment (R) 1.Rapid compartment (R)
5. WOK fire compartment (TC) 2.Semi rapid compartment (SR)
Mod. HD12-KWSVED
Mod. HD12-K2GSVED
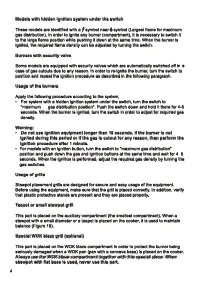
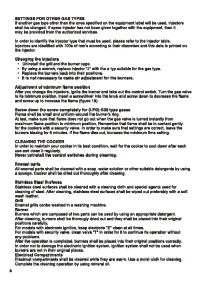
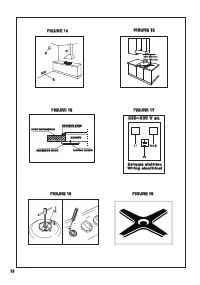
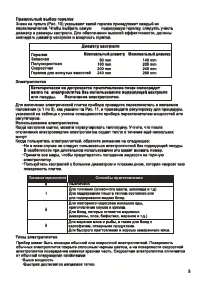
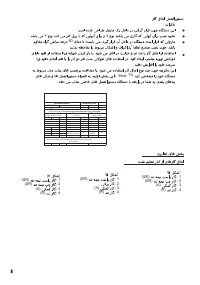
Gas Burners
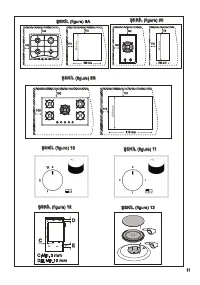
Distribution of gas to the burners is performed by turning the switches as shown in figure 8.
Corresponding symbols change from model to model and they are shown on the switches or
on the control panel. The following adjustments can pe done in order to match to the symbols
shown on the display:
Gas valve is closed : No gas distribution
Maximum capacity : Maximum gas distribution
Minimum capacity : Minimum gas distribution
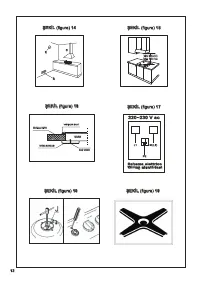
Firing the Burner
Burners without security valve
If there is no electronic ignition in your cooker or to fire the burners in case of an electricity
outage, point the blaze towards the burner and turn the switch in counter clokwise direction
until it shows the function you need while pushing it down at the same time.
For minimum gas distribution, turn the switch until it comes to small fire symbol
.
Gas setting shall always be done between maximum and minimum values and it shall
never be done from maximum to off positions or vice versa.
In order to switch of the burner's flame, turn the gas valve until it comes to "gas switch off" position.
Burners with electronic ignition
Models with ignition switch
To ignite the burner, turn the corresponsing switch until it shows "maximum gas
distribution" symbol while pushing it down at the same time. Continue pushing the
switch until the burner is fired out and when the burner starts to blaze, turn the switch to
adjust the required gas density.
Gas Burners
Firing the Burner
Burners without security valve
Gas setting shall always be done between maximum and minimum values and it shall
never be done from maximum to off positions or vice versa.
Burners with electronic ignition
Models with ignition switch
Distribution of gas to the burners is performed by turning the switches as shown in figure 8.
Corresponding symbols change from model to model and they are shown on the switches or
on the control panel. The following adjustments can pe done in order to match to the symbols
shown on the display:
Gas valve is closed : No gas distribution
Maximum capacity : Maximum gas distribution
If there is no electronic ignition in your cooker or to fire the burners in case of an electricity
outage, point the blaze towards the burner and turn the switch in counter clokwise direction
until it shows the function you need while pushing it down at the same time.
For minimum gas distribution, turn the switch until it comes to small fire symbol
.
Minimum capacity : Minimum gas distribution
To ignite the burner, turn the corresponsing switch until it shows "maximum gas
distribution" symbol while pushing it down at the same time. Continue pushing the
switch until the burner is fired out and when the burner starts to blaze, turn the switch to
adjust the required gas density.
In order to switch of the burner's flame, turn the gas valve until it comes to "gas switch off" position.
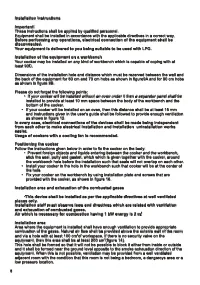
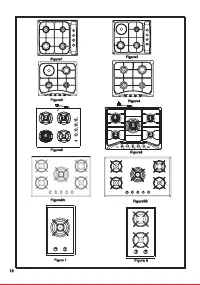
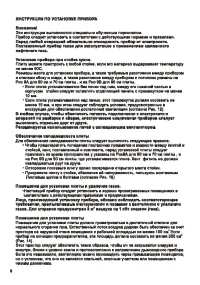
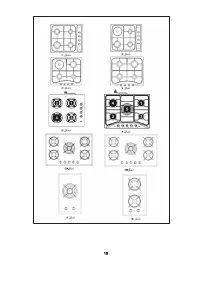
(Figure 5A)
1. Semi rapid front compartment (SR)
2. Semi rapid back compartment (SR)
3. Auxiliary compartment (A)
4. Rapid compartment (R)
5. WOK fire compartment (TC)
(Figure 5B )
1. Semi rapid front compartment (SR)
2. Semi rapid back compartment (SR)
3. Auxiliary compartment (A)
4. Rapid compartment (R)
5. WOK fire compartment (TC)
(Figure 5A)
(Figure 5B )
1. Semi rapid front compartment (SR)
2. Semi rapid back compartment (SR)
3. Auxiliary compartment (A)
4. Rapid compartment (R)
5. WOK fire compartment (TC)
1. Semi rapid front compartment (SR)
2. Semi rapid back compartment (SR)
3. Auxiliary compartment (A)
4. Rapid compartment (R)
5. WOK fire compartment (TC)
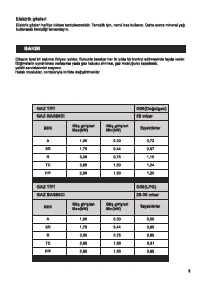
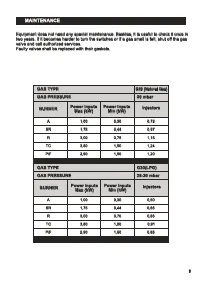
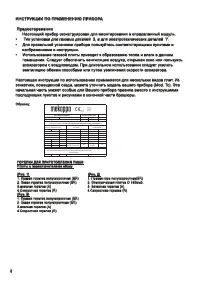
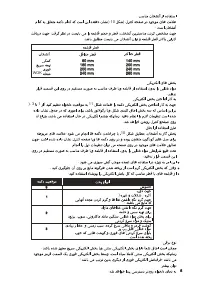
Характеристики

Остались вопросы?Не нашли свой ответ в руководстве или возникли другие проблемы? Задайте свой вопрос в форме ниже с подробным описанием вашей ситуации, чтобы другие люди и специалисты смогли дать на него ответ. Если вы знаете как решить проблему другого человека, пожалуйста, подскажите ему :)


