
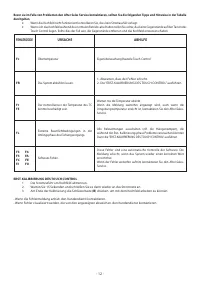
Варочная панель Korting HK 6350 B3 - инструкция пользователя по применению, эксплуатации и установке на русском языке. Мы надеемся, она поможет вам решить возникшие у вас вопросы при эксплуатации техники.
Если остались вопросы, задайте их в комментариях после инструкции.
"Загружаем инструкцию", означает, что нужно подождать пока файл загрузится и можно будет его читать онлайн. Некоторые инструкции очень большие и время их появления зависит от вашей скорости интернета.

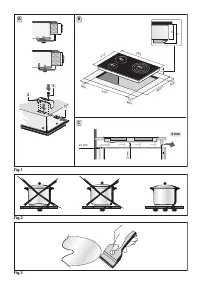


as illustrated in the specific figure. Apply sealant around the
entire perimeter (cut-out dimensions Fig.1B).
Fix the domestic appliance on the worktop by means of the
4 brackets provided, taking the thickness of the worktop into
account (Fig.1A). If the lower part of the appliance, after instal-
lation, is accessible via the lower part of the cabinet then it is
necessary to mount a separator panel respecting the distances
indicated (Fig.1C). If the appliance is installed with an oven
underneath then the separator is not necessary.
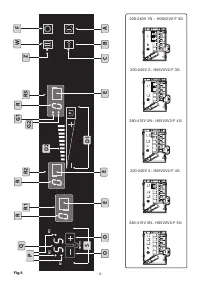
Electrical connections (Fig.4):
Before making the electrical connections, check that:
- The ground cable is 2 cm longer than the other cables;
- The system ratings meet the ratings indicated on the identi-
fication plate fixed on the lower part of the worktop;
- The system is fitted with efficient earthing compliant to the
laws and regulations in force.
If the appliance is not fitted with a cable, use type:
“
H05V2V2-F
” the cross-section of the cable should be at
4 mm².
The cable should never reach a temperature which is 50°C
above the temperature of the room in which it is installed.
The
appliance is to be permanently connected to the electrical
mains, therefore an omnipolar switch must be inserted,
enabling complete disconnection under the conditions of
overvoltage category III; it must be fitted between the ap-
pliance and the power supply, sized according to the load
and in compliance with the standards in force
(the yellow/
green earth wire must not be interrupted by the switch). The
omnipolar switch must be easy to reach once the installation
process has been completed.
USE AND MAINTENANCE
· Maintenance
Remove any residues of food and drops of grease from the
cooking surface using the special scraper supplied on request
(Fig.3) Clean the heated area as thoroughly as possible using
SIDOL, STAHLFIX or similar products and a cloth/paper, then
rinse with water and dry with a clean cloth. Using the special
scraper (optional) immediately remove any fragments of alu-
minium and plastic material that have unintentionally melted
on the heated cooking area or residues of sugar or food with
a high sugar content (Fig.3). In this way, any damage to the
cooktop surface is prevented. Under no circumstances use
abrasive sponges or irritating chemical detergents such as
oven sprays or stain removers.
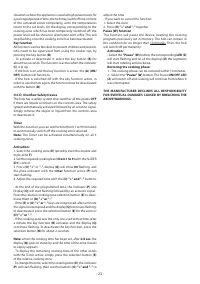
· USE
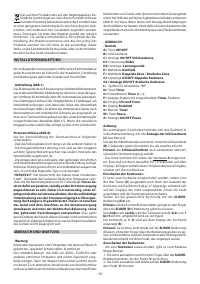
· Operation
A= ON/OFF
button
B= Key
button
C= Key ON/OFF
button indicator
D1= Slider
control
D2= Cooking level
Indicator
E= Cooking zone
selection button
F= Double zone / Triple zone
selection button
G1= Double cooking zone ON/OFF
Indicator
G2= Triple cooking zone ON/OFF Indicator
I= “H”
heat residue symbol
N= Timer
button
O= Timer (+ / -)
buttons
P=
Hob indicator with the
timer function active.
Q= Clock and Timer
display
R= Cooking zone
display
S= Timer
area
W= Pause
button
Z= Pause ON/OFF
indicator
Warning:
The first time the hob is switched on it will be in safety mode,
i.e. the “
Lock button indicator light
” (
C
) will be switched on.
To use the hob, press and hold the Lock button (
B
) for 3
seconds, until the indicator light switches off.
Note:
the
Lock
function is activated automatically every time
the power supply is cut off.
- The appliance can be switched on by selecting start-up
button
A
. A zero will appear on all displays for 10 seconds. If
no command is made within 10 seconds, the hob will switch
off again.
Switching on the cooking zones
Select one of the three buttons (E) to switch on the cooking
zone. “0” will appear on the display when you have selected the
cooking zone, whilst on the displays of the zones not selected,
the level will switch off and the decimal point will switch on.
Set the desired cooking level by acting on the
SLIDER
control (
D1
).
Note:
to set the cooking level, just slide your finger over
the
SLIDER
control
(
D1
).
From
Left
to
Right
the temperature level is increased (
D2
)
from
1
to
9
. To decrease just perform the operation in the
reverse order.
The cooking level (e.g.
6
) will appear on the cooking zone
display (
R
).
Note:
you may also directly press any point on the
SLIDER
control without running your finger along it; in this case the
temperature level corresponding to the point at which the
control was touched will be activated directly.
Switching off the cooking zones:
- There are several different ways of switching off a
cooking
zone
:
1- Select it and run your finger over the
SLIDER
control until
you reach “
0
”.
2- Select it and directly press the “
0
” symbol on the
SLIDER
control.
Double/triple zone function
To select the double and triple cooking zone
1. Press (
E
)
2. Adjust the cooking level (
D1
)
3. Press the
double/triple zone
selection button (
F
):
the first press will activate the double, press again to active
the triple.
The warning light (
G1
) lights up with the
double zone
active,
warning light (
G2
) with the
triple zone
.
To deactivate them, first press (
E
) and then (
F
).
Heat residue function
- When a
cooking zone
(
E
) is switched to the
OFF
setting
and the temperature of the glass surface remains above
approximately 50°, the display (
R
) corresponding to that zone
will show a luminous signal alternating between “
0
” and “
H
”.
- If the
hob
is switched to the
OFF
setting (
A
), the luminous
signal will display the letter “
H
” in a fixed manner.
Warning:
To prevent damage being inflicted on the electronic circuits,
the hob is fitted with an overheating safety system. In
- 22 -
Характеристики

Остались вопросы?Не нашли свой ответ в руководстве или возникли другие проблемы? Задайте свой вопрос в форме ниже с подробным описанием вашей ситуации, чтобы другие люди и специалисты смогли дать на него ответ. Если вы знаете как решить проблему другого человека, пожалуйста, подскажите ему :)


