Варочная панель Korting HGG 7987 CTN FLC - инструкция пользователя по применению, эксплуатации и установке на русском языке. Мы надеемся, она поможет вам решить возникшие у вас вопросы при эксплуатации техники.
Если остались вопросы, задайте их в комментариях после инструкции.
"Загружаем инструкцию", означает, что нужно подождать пока файл загрузится и можно будет его читать онлайн. Некоторые инструкции очень большие и время их появления зависит от вашей скорости интернета.

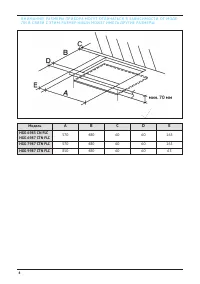

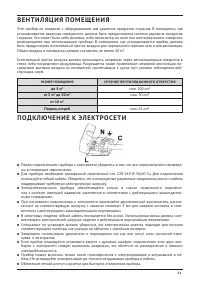

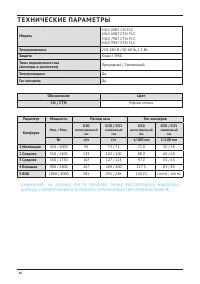


5
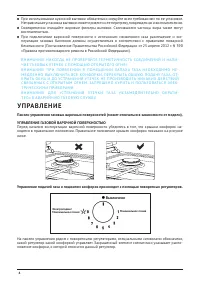
Для включения конфорки нажмите на регулятор и поверните его против часовой стрелки в положе
-
ние
4
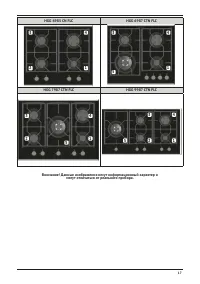
1) BURNERS
A
diagram is screen-printed above each knob on
the front panel. This diagram indicates to which
b u r n e r t h e k n o b i n q u e s t i o n c o r r e s p o n d s . A ft e r
having opened the gas mains or gas bottle tap,
light the burners as described below:
- automatic electrical ignition
P u s h a n d t u r n t h e k n o b c o r r e s p o n d i n g t o t h e
required burner in an anticlockwise direction until it
reaches the full on position of full
(position 9
fig. 1), then depress the knob, the tap is equipped
w i t h a s c a l e o f 9 p o s i t i o n s , w i t h e a c h c l i c k t h e
flame is reduced until you reach the position of 1,
ie the minimum supply of gas.
- Lighting burners equipped with flame failure
device
The knobs of burners equipped with flame failure
d e v i c e m u s t b e t u r n e d i n a n a n t i c l o c k w i s e
d i r e c t i o n u n t i l t h e y r e a c h t h e f u l l o n p o s i t i o n
( P o s i t i o n 9 , f i g . 1 ) a n d c o m e t o a s t o p . N o w
d e p r e s s t h e k n o b i n q u e s t i o n a n d r e p e a t t h e
previously indicated operations.
Keep the knob depressed for about 10 seconds
once the burner has ignited.
Then follow the instructions for using the tap as
explained above.
With regards to all the models, in case of accidental
extinguishment of the flame, disengage the ignition
by rotating the knob to the off position. Wait at least
1 minute before re-igniting the flame.
HOW TO USE THE BURNERS
Bear in mind the following indications in order to
a c h i e v e m a x i m u m e f f i c i e n c y w i t h t h e l e a s t
possible gas consumption:
- use adequate pans for each burner (consult the
following table and fig. 2).
- When the pan comes to the boil, set the knob to
the reduced rate position (Position 1, fig. 1).
- Always place a lid on the pans.
- Use only pan with a flat bottom.
WARNINGS:
- Burners with flame failure device may only be
ignited when the relative knob has been set
to the Full on position (Position 9, fig. 1).
- Matches can be used to ignite the burners in
a blackout.
- Never leave the appliance unattended when
the burners are being used. Make sure there
a r e n o c h i l d r e n i n t h e n e a r v i c i n i t y .
Particularly make sure that the pan handles
are correctly positioned and keep a check on
foods requiring oil and grease to cook since
these products can easily catch fire.
- Never use aerosols near the appliance when
it is operating.
- C o n t a i n e r s w i d e r t h a n t h e u n i t a r e n o t
recommended.
- If the built-in hot plate has a lid, any spilt food
s h o u l d b e i m m e d i a t e l y r e m o v e d f r o m t h i s
b e f o r e i t i s o p e n e d . I f t h e a p p l i a n c e h a s a
g l a s s l i d , t h i s c o u l d s h a t t e r w h e n t h e h o t
plate becomes hot. Always switch off all the
burners before closing the lid.
- Don't scrape the pans on the crystal because
the surface remains scratch.
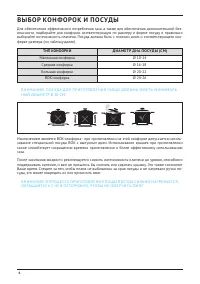
USE
Burners
Pan Ø in cm
Ultrarapid
24 ÷ 26
Rapid
20 ÷ 22
Semirapid reduced
16 ÷ 18
Semirapid
16 ÷ 18
Auxiliary
10 ÷ 14
Closed position
9)
Full position
1)
Reduced
rate position
FIG. 1
FIG. 2
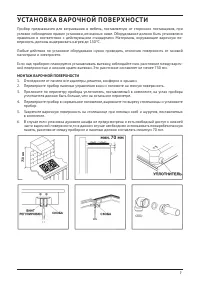
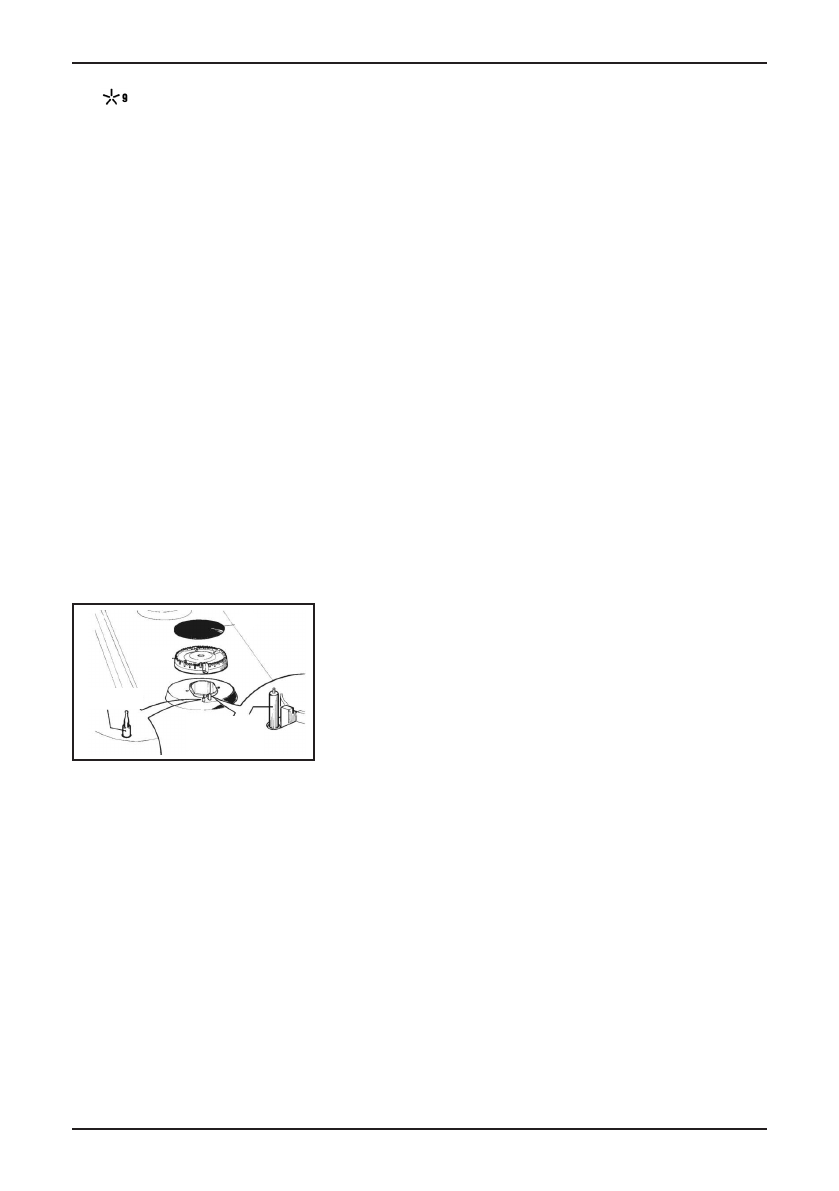
, удерживайте регулятор нажатым. Газовая поверхность оборудована системой электропод
-
жига и системой «газ-контроль». При нажатии на регулятор будет подаваться искра на конфорку,
которая воспламенит газ. Удерживайте регулятор около 5-7 секунд, чтобы датчик системы газ-
контроля нагрелся до рабочей температуры.
В Н И М А Н И Е! Н Е УД Е Р Ж И В А Й Т Е Р Е Г УЛ Я ТО Р В Н А Ж АТО М П О Л О Ж Е Н И И Б О Л Е Е 10
С Е К У Н Д.
В Н И М А Н И Е! РА Б О Ч И Й Д И А П А З О Н Р Е Г УЛ Я ТО РА Н А ХОД И ТС Я ОТ 9 ДО 1, ОТ
«
М А К
-
С И М А Л Ь Н О ГО П Л А М Е Н И» ДО
«
М И Н И М А Л Ь Н О ГО П Л А М Е Н И». П Е Р Е К Л Ю Ч А Й Т Е
Р Е Г УЛ Я ТО Р В Д А Н Н О М Д И А П А З О Н Е Д Л Я В Ы Б О РА Н Е О Б ХОД И М О ГО У Р О В Н Я И Н
-
Т Е Н С И В Н О СТ И П Л А М Е Н И.
Если конфорка не загорается в течение 10 секунд или гаснет после того, как вы отпустили регулятор
– поверните регулятор, в положение «Выключено», подождите некоторое время, пока конфорка не
остынет, и проверьте правильность установки рассекателя и крышки конфорки. Затем повторите
попытку. Если пламя не загорается – перейдите в раздел «Устранение неисправностей». Как только
пламя устойчиво разгорелось, выберите необходимую интенсивность, и вы можете приступать к
приготовлению.
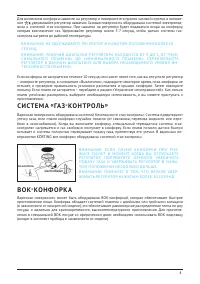
С И СТ Е М А
«
ГА З
-
КО Н Т Р ОЛ Ь
»
Варочная поверхность оборудована системой безопасности «газ-контроль». Система предотвратит
утечку газа, если пламя конфорки случайно погасло (от сквозняка, перелива жидкости или пере
-
боях в газоснабжении). Когда вы включаете конфорку, специальный термодатчик системы «газ-
контроля» нагревается и газ свободно поступает в конфорку. Если пламя погасло, датчик быстро
остывает и система полностью перекрывает подачу газа, препятствуя его утечке. В варочных по
-
верхностях KÖRTING все конфорки оборудованы системой «газ-контроль».
6
IMPORTANT:
Always disconnect the appliance from the gas
and electricity mains before carrying out any
cleaning operation.
2) HOT PLATE
I
t is very important to clean the surface soon after
every use, when the glass is still tepid.
Periodically wash the hot plate, the enamelled stell
pan support, the enamelled burner caps “A”, “B”
and “C” and the burner heads "T" (see fig. 6 - 6/A)
with lukewarm soapy water. They should also be
cleaned plugs "AC" and flame detection "TC" (see
fig. 6). Clean them gently with a small nylon brush
as shown (see fig. 7) and allow to dry fully.
Do not wash in the dishwasher.
Do not allow vinegar, coffee, milk, salted water,
lemon or tomato juice from remaining in contact
w i t h t h e e n a m e l l e d s u r f a c e s f o r l o n g p e r i o d s o f
time.
Do not use metallic sponges, powder abrasives or
corrosive sprays.
WARNINGS:
comply with the following instructions, before
remounting the parts:
- c h e c k t h a t b u r n e r h e a d s s l o t s ( s e e f i g . 6 -
6 / A ) h a v e n o t b e c o m e c l o g g e d b y f o r e i g n
bodies.
- Check that enamelled burner cap “A - B - C”
(fig. 6 - 6/A) have correctly positioned on the
burner head. It must be steady.
- T h e p a n s u p p o r t m u s t b e p l a c e d i n t h e
a p p r o p r i a t e c e n t e r i n g p i n s . Ve r i f y i n g t h e
perfect stability.
- Do not force the taps if they are difficult open
o r c l o s e . C o n t a c t t h e t e c h n i c a l a s s i s t a n c e
service for repairs.
- D o n ’ t u s e s t e a m j e t s f o r t h e e q u i p m e n t
cleaning.
CLEANING
FIG. 6
FIG. 6/A
FIG. 7
Warning:
d u r i n g o p e r a t i o n t h e w o r k s u r f a c e s o f t h e
cooking area become very hot: keep children
away!
Note: continuous use could cause the burners to
change colour due to the high temperature.
В Н И М А Н И Е! Е С Л И П Л А М Я К О Н Ф О Р К И П Р И Р О З
-
Ж И Г Е ГАС Н Е Т В М О М Е Н Т, К О ГД А В Ы ОТ П УС К А Е Т Е
Р Е Г УЛ Я ТО Р, П О П Р О Б У Й Т Е Н Е М Н О ГО У В Е Л И Ч И Т Ь
П ОД АЧ У ГА З А И УД Е Р Ж И В АТ Ь Р Е Г УЛ Я ТО Р В Н А Ж А
-
ТО М П О Л О Ж Е Н И И Н Е С К О Л Ь К О ДО Л Ь Ш Е.
В Н И М А Н И Е! П О М Н И Т Е О ТО М, Ч ТО Н Е Л Ь З Я УД Е Р
-
Ж И В АТ Ь Р Е Г УЛ Я ТО Р Н А Ж АТ Ы М Б О Л Е Е 10 С Е К У Н Д.
В О К
-
КО Н Ф О Р КА
Варочная поверхность может быть оборудована ВОК-конфоркой, которая обеспечивает быстрое
приготовление пищи. Конфорка обладает системой пламени с двойными или тройными кольцами
(в зависомости от конкретной модели), это обеспечивает равномерное распределение тепла по дну
посуды и идеально для кратковременного, высокотемпературного приготовления. Для приготов
-
ления в специальной ВОК посуде со сферическим дном необходимо использовать ВОК подставку
(входит в комплект прибора в заивсимости от модели).
ГАЗ-КОНТРОЛЬ
ЭЛЕКТРОПОДЖИГ
Характеристики

Остались вопросы?Не нашли свой ответ в руководстве или возникли другие проблемы? Задайте свой вопрос в форме ниже с подробным описанием вашей ситуации, чтобы другие люди и специалисты смогли дать на него ответ. Если вы знаете как решить проблему другого человека, пожалуйста, подскажите ему :)


