
Варочная панель Bosch PKN675DK1D - инструкция пользователя по применению, эксплуатации и установке на русском языке. Мы надеемся, она поможет вам решить возникшие у вас вопросы при эксплуатации техники.
Если остались вопросы, задайте их в комментариях после инструкции.
"Загружаем инструкцию", означает, что нужно подождать пока файл загрузится и можно будет его читать онлайн. Некоторые инструкции очень большие и время их появления зависит от вашей скорости интернета.


de
Ø
Montageanleitung
Das müssen Sie beachten
Elektrischer Anschluss:
nur durch konzessionierten Fach-
mann. Bei Falschanschluss erlischt die Garantie.
Einbau:
nur fachgerecht, bei Schäden haftet der Monteur.
Anschluss:
das Gerät entspricht der Schutzklasse I und darf
nur in Verbindung mit Schutzleiteranschluss betrieben werden.
Installation:
in der Installation muss ein allpoliger Trennschalter
mit 3 mm Kontaktöffnung vorhanden sein.
Unterbau:
keine Kühlgeräte, Geschirrspüler, unbelüftete Backö-
fen, Waschmaschinen unterbauen.
Modular- /Kompakt-Geschirrspüler der gleichen Marke können
untergebaut werden. Arbeitsplattendicke dann mindestens 40
mm.
Wird unter dem Kochfeld ein Backofen eingebaut, kann die
Arbeitsplattendicke von den Maßangaben in dieser Anleitung
abweichen. Beachten Sie die Hinweise in der Montageanleitung
des Backofens.
Zwischenboden:
wenn die Kochfeldunterseite berührbar ist,
muss ein Zwischenboden montiert werden.
Fragen Sie im Fachhandel nach einem Zwischenboden als
Zubehör.
Wenn Sie einen eigenen Zwischenboden verwenden, muss der
Mindestabstand zum Netzanschluss des Gerätes 10 mm betra-
gen.
Arbeitsplatte:
eben, waagrecht, stabil.
m
Träger von elektronischen Implantaten!
Das Gerät kann Permanentmagnete enthalten, die elektronische
Implantate wie z.B. Herzschrittmacher oder Insulinpumpen
beeinflussen können. Deshalb bei der Montage einen Mindest-
abstand von 10 cm zu elektronischen Implantaten einhalten.
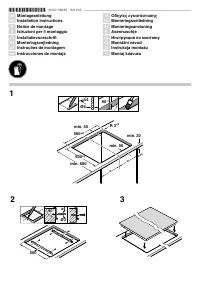
Möbel vorbereiten - Bild 1
Einbaumöbel:
mindestens 90°C temperaturbeständig.
Ausschnitt:
Mindestabstand zu seitlichen Wänden: 90 mm.
Nach Ausschnittarbeiten Späne entfernen.
Schnittflächen:
hitzebeständig versiegeln.
Befestigungsschienen anbringen - Bild 2
Geflieste Arbeitsplatten:
untere Schraublöcher verwenden.
Arbeitsplatten aus Stein-Werkstoffen:
Befestigungsschienen
ankleben.
Kochfeld anschließen und einsetzen - Bild 3
Vor Geräteanschluss Hausinstallation überprüfen.
Nur nach Anschlussbild anschließen. Bei Bedarf beiliegende
Kupferbrücken montieren. Netzanschlussleitung: Typ H05 VV-F
oder höherwertig; erforderlichen Adernquerschnitt entspechend
der Strombelastung bestimmen. Ein Querschnitt < 1,5 mm
2
ist
nicht zulässig!
Einsetzen:
Anschlussleitung nicht einklemmen, nicht über
scharfe Kanten führen. Bei untergebautem Backofen Leitung an
den hinteren Ecken des Backofens zur Anschlussdose führen.
Hinweis:
erscheint im Display des Gerätes
—…‹‹
ist es falsch
angeschlossen. Gerät vom Netz trennen, Anschluss überprüfen.
Geflieste Arbeitsplatten:
Fliesenfugen mit Silikonkautschuk
abdichten.
Kochfeld ausbauen:
Das Gerät spannungslos machen. Koch-
feld von unten herausdrücken.
en
Ú
Installation instructions
The following must be noted
Electrical connection:
To be carried out only by a licensed
expert. Incorrect connection will invalidate the warranty.
Installation:
To be carried out only by a professional. The fitter
is liable for any damage.
Connection:
The appliance fulfils the requirements of protection
class I and may only be operated in conjunction with an earth
conductor.
Installation:
An all-pole isolating switch with a contact gap of at
least a 3 mm must be included in the installation.
Under-fitting:
Do not install refrigerators, dishwashers, non-
ventilated ovens or washing machines underneath the
appliance.
Modular/compact dishwashers of the same brand can be
installed underneath. The work surface must be at least 40 mm
thick.
If an oven is being installed underneath the hob, the work
surface thickness may differ from the dimensions given in these
instructions. Observe the information in the oven's installation
instructions.
Intermediate floor:
If the underside of the hob can be touched,
an intermediate floor must be fitted.
Ask your specialist retailer for an intermediate floor as an
accessory.
If you use your own intermediate floor, the minimum distance to
the appliance's mains connection must be 10 mm.
Work surface:
Level, horizontal, stable.
m
Wearers of electronic implants!
The appliance may contain permanent magnets which may
affect electronic implants, e.g. heart pacemakers or insulin
pumps. Therefore, during installation, wearers of electronic
implants must maintain a minimum distance of 10 cm from the
appliance.
Preparing the units - Figure 1
Fitting unit:
Heat resistant to at least 90°C.
Cut-out:
Minimum distance to the side walls: 90 mm.
After the cutting out work is complete, remove the shavings.
Cut surfaces:
Seal with heat-resistant material.
Attaching securing rails - Fig. 2
Tiled work surfaces:
Use the lower screw holes.
Stone material work surfaces:
Affix securing rails.
Connecting and fitting the hob - Fig. 3
Before connecting the appliance, check the household
installation.
Only connect the hob as shown in the connection diagram. If
necessary, fit the copper bridges supplied. Power cord: Type
H05 VV-F or higher; determine the required wire cross-section
depending on the current rating. A cross-section of < 1.5 mm
2
is
not permissible.
Installing:
Do not trap the power cable and do not route it over
sharp edges. If the oven is a built-under type, route the cable on
the rear corners of the oven to the socket.
Note:
If
—…‹‹
appears in the display, the appliance has not
been connected correctly. Disconnect the appliance from the
mains and check the connection.
Tiled work surfaces:
Seal the tile joints with silicone rubber.
Removing the hob:
Disconnect the appliance from the power
supply. Push out the hob from below.
fr
Þ
Notice de montage
Consignes à respecter
Branchement électrique :
uniquement par un spécialiste agréé.
Toute erreur de branchement annule la garantie.
Encastrement :
uniquement selon les règles de l'art,
l'installateur est responsable en cas de dommages.
Raccordement :
d'appareil correspond à la classe de
protection I et ne doit être utilisé qu'avec un raccordement à la
terre.
Installation :
l'installation électrique doit comporter un
interrupteur omnipolaire avec une ouverture de contact d'au
moins 3 mm.
Sous le plan de travail :
ne pas installer d'appareil réfrigérant ni
de lave-vaisselle, de four non ventilé ni de lave-linge.
Il est possible d'installer sous le plan de travail un lave-vaisselle
compact/modulaire de la même marque. Épaisseur minimale
du plan de travail 40 mm.
Si un four est encastré sous la table de cuisson, l'épaisseur du
plan de travail peut différer des indications dimensionnelles
contenues dans. cette notice. Respectez les consignes de la
notice de montage du four.
Plancher intermédiaire :
si'il est possible de toucher le dessous
de la table de cuisson, il faut monter un plancher de séparation.
Des planchers intermédiaires sont disponibles en tant
qu'accessoires dans le commerce spécialisé.
Si vous utilisez votre propre plancher intermédiaire, la distance
minimale par rapport à la prise secteur de l'appareil doit être de
10 mm.
Plan de travail :
plat, horizontal, stable.
Характеристики

Остались вопросы?Не нашли свой ответ в руководстве или возникли другие проблемы? Задайте свой вопрос в форме ниже с подробным описанием вашей ситуации, чтобы другие люди и специалисты смогли дать на него ответ. Если вы знаете как решить проблему другого человека, пожалуйста, подскажите ему :)


