
Утюги BRAYER BR4000 - инструкция пользователя по применению, эксплуатации и установке на русском языке. Мы надеемся, она поможет вам решить возникшие у вас вопросы при эксплуатации техники.
Если остались вопросы, задайте их в комментариях после инструкции.
"Загружаем инструкцию", означает, что нужно подождать пока файл загрузится и можно будет его читать онлайн. Некоторые инструкции очень большие и время их появления зависит от вашей скорости интернета.


10
11
EN
EN
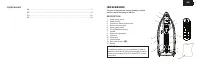
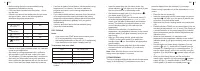
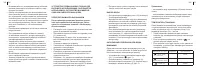
on, the indicator will glow yellow (see the table of
temperatures and indicator colours).
• Disconnect the power plug from the mains socket
and wait until the iron soleplate (11) cools down
completely.
ATTENTION!
If steam is not supplied during the operation, check
whether the temperature «•••» or «max» and the steam
supply knob (3) are set properly and whether there is
water in the water tank (10).
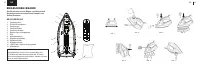
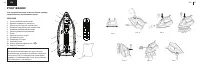
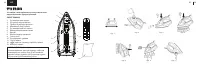
WATER SPRAY
• Make sure that there is enough water in the water
tank (10).
• Press the water spray button (5) to dampen the
fabrics (pic. 3).
BURST OF STEAM
• The burst of steam is useful for ironing folds and can
be used only in the high temperature ironing mode
«•••» or «max».
• When pressing the burst of steam button (4) steam
will go out of the iron soleplate (11) openings
intensively (pic. 4).
Note:
to avoid water leakage from the soleplate (11)
openings, press the burst of steam button (4) with 4-5
sec. intervals.
VERTICAL STEAMING
• Vertical steaming of fabrics or interior objects can be
performed only in the high temperature ironing mode
«•••» or «max».
• Hold the iron vertically at the distance of 5-20 cm from
the clothes or interior objects and press the burst of
steam button (4) with 4-5 second intervals, steam will
be released from the soleplate (11) openings intensively
(pic. 5).
ATTENTION!
- To avoid fabric melting, do not touch it with the iron
soleplate (11) while steaming.
- Do not steam clothes on a person. Use a clothes hanger
or a coat rack.
•
After you finish ironing, switch the iron off and unplug it,
wait until the iron soleplate (11) cools down completely,
then open the water inlet lid (2), turn over the iron and
drain the remaining water.
AUTOMATIC SWITCH OFF
•
The iron has 2 automatic switch off modes.
- If the iron remains still for 30 seconds in horizontal
position, the iron heating element will switch off and
the indicator on the control/indication panel (6) will be
flashing yellow.
- If you set the iron in vertical position on the base (9)
and leave it for 8 minutes, the heating element of the
iron will switch off and the indicator on the control/
indication panel (6) will be flashing yellow.
To resume ironing, set the iron from horizontal position
to vertical or vice versa, wait until the iron soleplate (11)
heats up and continue ironing.
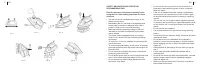
STEAM CHAMBER CLEANING
• Regularly clean the steam chamber of the iron,
especially in the regions with «hard» tap water.
• Set the continuous steam supply knob (3) to the
position «
» (steam supply is off) (pic. 1).
•
Open the lid (2), fill the tank with water up to the
maximal mark «max» and close the lid (2) (pic. 2).
• Place the iron on its base (9).
• Insert the power plug into the mains socket, the
yellow indicator « » will light up on the panel (6) and
the iron will switch on in the standby mode.
• Press the button «TEMP» on the control panel (6)
to set the required temperature of the soleplate (11)
«max». The flashing of a red indicator on the control
panel (6) will confirm the set temperature (see the
table of temperature and indicator colors).
• When the iron soleplate (11) reaches the set
temperature, the temperature indicator on the control/
indication panel (6) will glow constantly, and you can
cleaning the steam chamber of the iron.
• Remove the power plug from the mains socket.
• Hold the iron above the sink horizontally, press and
hold down the button (13) «
» (pic. 6).
• Boiling water and steam with scale will be intensively
released from the soleplate (11) openings.
• Slightly sway the iron back and forth, until all the water
leaves the water tank (10).
• Place the iron on its base (9) and let the soleplate (11)
cool down completely.
• After the soleplate (11) cools down, wipe it with a dry
cloth.
• Before taking the iron away for storage make sure that
the water tank (10) is empty, andthe iron soleplate (11)
is dry.
CLEANING AND MAINTENANCE
•
Before cleaning make sure that the iron is switched off
and cold and the power plug is not connected to the
mains socket.
• Open the water inlet lid (2), turn over the iron and drain
any remaining water (pic. 7).
• Wipe the iron body with a slightly damp cloth and then
wipe it dry.
• You can remove the mineral deposit from the iron
soleplate (11) with a cloth soaked in table vinegar.
• •After removing the mineral deposit polish the soleplate
(11) surface with a dry clean cloth.
• Do not use abrasives or solvents to clean the iron
soleplate (11) and body.
• Avoid contact of the iron soleplate (11) with sharp metal
objects, as well as with metal buttons, zippers etc.
• Do not immerse the iron, the power cord and the power
plug into water or any other liquids.
Характеристики

Остались вопросы?Не нашли свой ответ в руководстве или возникли другие проблемы? Задайте свой вопрос в форме ниже с подробным описанием вашей ситуации, чтобы другие люди и специалисты смогли дать на него ответ. Если вы знаете как решить проблему другого человека, пожалуйста, подскажите ему :)


