
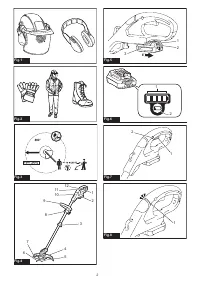
Триммеры Makita UR100DWAEX - инструкция пользователя по применению, эксплуатации и установке на русском языке. Мы надеемся, она поможет вам решить возникшие у вас вопросы при эксплуатации техники.
Если остались вопросы, задайте их в комментариях после инструкции.
"Загружаем инструкцию", означает, что нужно подождать пока файл загрузится и можно будет его читать онлайн. Некоторые инструкции очень большие и время их появления зависит от вашей скорости интернета.


13 ENGLISH
WARNING:
Never disable the lock function or
tape down the lock-off button.
NOTICE:
Do not pull the switch trigger forcibly
without pressing the lock-off button.
The switch
may break.
►
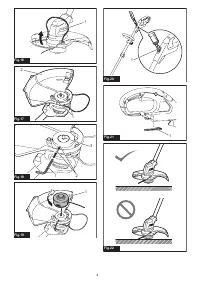
Fig.7:
1.
Switch trigger
2.
Lock-off button
To prevent the switch trigger from being accidentally
pulled, a lock-off button is provided.
To start the tool, press the lock-off button and pull the
switch trigger. Release the switch trigger to stop. The
lock-off button can be pressed from either the right or
left side.
Indication lamp
Running the tool allows the indication lamp to show the
battery cartridge capacity status.
►
Fig.8:
1.
Lamp
When the tool is also overloaded and has stopped
during operation, the lamp lights up in red. Refer to the
following table for the status and action to be taken for
the indication lamp.
Indication lamp
Status
Action to be taken
The lamp blinks
in red.
This indicates the
appropriate time to
replace the battery
cartridge when
the battery power
becomes low.
Recharge the
battery cartridge.
The lamp lights up
in red. (Note 1)
This function works
when the battery
power is almost
used up. At this
time, tool stops
immediately.
Recharge the
battery cartridge.
The lamp lights up
in red. (Note 1)
Autostop due to
overload.
Turn off the tool.
Note 1: The time at which the indication lamp lights up varies by
the temperature around the work area and the battery cartridge
conditions.
Nylon cutting head
NOTICE:
Do not bump the tool to the concrete or
asphalt surface. Bumping to this kind of objects
may cause the tool damage.
NOTE:
If the nylon cord does not feed out while
bumping the head, rewind or replace the nylon cord
by following the procedures in this manual.
NOTE:
The bump and feed mechanism will not work
properly if the nylon cutting head is not rotating.
►
Fig.9:
1.
Nylon cutting head
2.
Cutter
The nylon cutting head has a bump and feed mecha-
nism. To feed the nylon cord, bump the cutting head
against the ground while the tool is running. As the
nylon cord is feeding out, it will automatically be cut to
the proper length by the cutter.
Adjusting the position of the handle
and front grip
CAUTION:
Before adjusting the shaft length,
be sure to switch off the tool and remove the
battery cartridge from the tool.
Failure to do so may
cause a personal injury.
Adjust the length of the shaft so that you can hold the
handle when lowering your right hand.
►
Fig.10:
1.
Handle
To adjust the shaft length, open the lock lever, then
adjust the length of the shaft, and then close the lock
lever.
►
Fig.11:
1.
Lock lever
Adjust the position of the front grip so that you can hold
the front grip when lowering your left hand.
►
Fig.12:
1.
Front grip
ASSEMBLY
CAUTION:
Always be sure that the tool is
switched off and the battery cartridge is removed
before carrying out any work on the tool.
CAUTION:
Never start the tool unless it is
completely assembled.
Operation of the tool in a
partially assembled state may result in serious per-
sonal injury from accidental start-up.
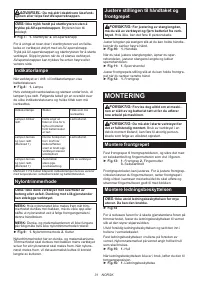
Installing the front grip
Attach the front grip to the front grip holder and secure
it with a hex bolt and the thumb nut as shown in the
figure.
►
Fig.13:
1.
Front grip
2.
Thumb nut
3.
Hex bolt
The front grip angle is adjustable. To adjust the front
grip angle, loosen the thumb nut, set the front grip at an
proper angle according to your work and then tighten
the thumb nut clockwise firmly.
Installing the wire guard
NOTICE:
Do not expand the wire guard outward
too much. Otherwise it may break.
►
Fig.14
To reduce the risk of damaging the objects in front of the
cutting head, attach the wire guard to the protector so
that it controls the cutting range.
Slightly expand the wire guard outward and then insert
it into the holes of the protector.
Attach the wire guard to the holes on the front side of
the protector. The nylon cord mark on the protector
indicates the hole to be used.
►
Fig.15:
1.
Hole
When wire guard is not in use, lift it for the idle position.
►
Fig.16:
1.
Wire guard
Содержание
- 72 Декларация о соответствии ЕС; МЕРЫ БЕЗОПАСНОСТИ; ВАЖНЫЕ ИНСТРУКЦИИ ПО; Сохраните брошюру с инструк
- 74 СОХРАНИТЕ ДАННЫЕ
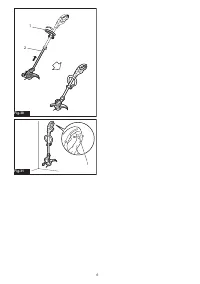
- 75 Важные правила техники; ОПИСАНИЕ ДЕТАЛЕЙ; Наименование деталей (в
- 76 ОПИСАНИЕ РАБОТЫ
- 77 Индикаторная лампа; СБОРКА; Установка передней ручки
- 78 ЭКСПЛУАТАЦИЯ
- 79 ОБСЛУЖИВАНИЕ
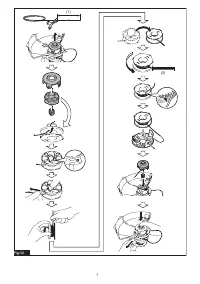
- 80 Замена нейлонового шнура; ПОИСК И УСТРАНЕНИЕ НЕИСПРАВНОСТЕЙ
- 81 ДОПОЛНИТЕЛЬНЫЕ ПРИНАДЛЕЖНОСТИ


