
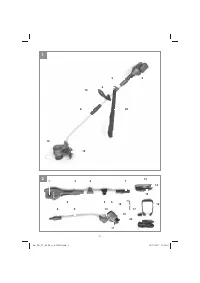
Триммеры Einhell PXC GE-CT 36/30 Li E-solo 3411300 - инструкция пользователя по применению, эксплуатации и установке на русском языке. Мы надеемся, она поможет вам решить возникшие у вас вопросы при эксплуатации техники.
Если остались вопросы, задайте их в комментариях после инструкции.
"Загружаем инструкцию", означает, что нужно подождать пока файл загрузится и можно будет его читать онлайн. Некоторые инструкции очень большие и время их появления зависит от вашей скорости интернета.


GB
- 25 -
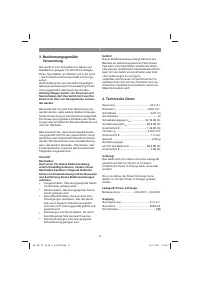
Reduce noise generation and vibration to a
minimum!
•
Use only equipment that is in perfect condi-
tion.
•
Maintain and clean the equipment regularly.
•
Adapt your way of working to the equipment.
•
Do not overload the equipment.
•
Have the equipment checked if necessary.
•
Switch off the equipment when not in use.
•
Wear gloves.
5. Before using the equipment
The equipment is supplied without batteries and
without a charger!
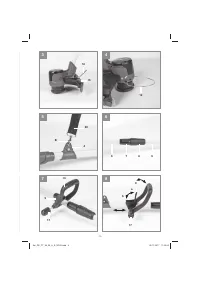
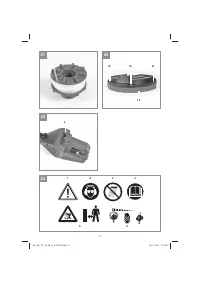
5.1 Fitting the guard hood (Fig. 3)
Remove the socket head screw from the guard
hood. Push the guard hood (15) onto the mount
on the motor housing as far as it will go and screw
it securely in place with the previously removed
socket head screw (Fig. 3). A blade (Fig. 2/ Item
14) on the underside of the guard hood automa-
tically cuts the cutting line to the optimum length.
This is provided with a safety guard. Remove the
safety guard before starting work.
5.2 Fitting the edge guide (Fig. 4)
Pull the ends of the edge guide (Item 12) slightly
apart and insert the ends in the holes provided on
the left and right in the motor housing.
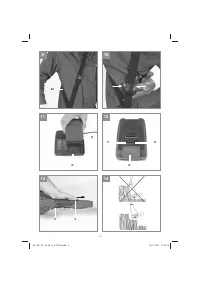
5.3 Fitting the harness (Fig. 5)
Hook the carabiner (B) of the harness (20) into
the strap attachment (4).
5.4 Fitting the long handle (Fig. 6)
Slot the top part of the long handle (6) into the
bottom part of the long handle (9). Screw the
handle connecting piece (7) to the bottom part of
the long handle with the union nut (8) on the top
part of the long handle.
5.5 Fitting the additional handle (Fig. 7)
Attach the additional handle (16) to the attach-
ment (5) and screw both parts together with the
handle screw (17).
5.6 Adjusting the additional handle (Fig. 8)
a) Adjusting the tilt
Undo the handle screw (17). Set the desired
tilt of the additional handle (16). Tighten the
handle screw (17) again.
b) Shifting the additional handle
Open (a) the lock (C) and move the additional
handle to the desired position. Close (b) the
lock (C).
5.7 Using the harness
The harness is intended to help you work safely
and ergonomically. Always switch o
ff
the equip-
ment before you release the harness – risk of
injury.
1. Hook the carabiner (Fig. 5/Item B) into the
strap attachment.
2. Slip the harness over your left shoulder (Fig.
9).
3. Set the length of the harness in such a way
that the cutting head runs parallel to the
ground. To establish the optimum length of
the harness, you should then make a few
swinging movements without starting the
equipment.
4. The harness is equipped with a buckle. Press
the hooks together (Fig. 10) if you need to put
down the equipment quickly.
Each time before use, check the following :
•
That the equipment is in perfect condition and
that the safety devices and cutting devices
are complete.
•
That all screws are securely fastened.
•
That all moving parts move smoothly.
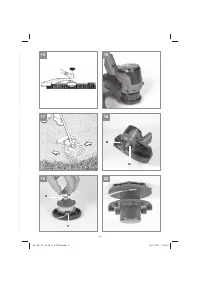
5.8 Installing the battery
Push the rechargeable batteries into the batte-
ry mounts provided on the left and right on the
equipment (Fig. 2/Item 1). The battery will be
heard to click into place when it has been pushed
fully in (Fig. 1). To take out the battery, press the
pushlock button (Fig. 12/Item K) and remove the
battery.
5.9 Charging the battery (Fig. 11)
1. Take the battery pack out of the equipment.
Do this by pressing the side pushlock buttons.
2. Check that your mains voltage is the same as
that marked on the rating plate of the battery
charger. Insert the power plug of the charger
(8) into the mains socket outlet. The green
LED will then begin to
fl
ash.
3. Insert the battery pack (7) into the battery
charger (8).
Anl_GE_CT_36_30_Li_E_SPK9.indb 25
Anl_GE_CT_36_30_Li_E_SPK9.indb 25
03.11.2017 11:25:47
03.11.2017 11:25:47


