Термопоты Brayer BR1092 (MULTI) - инструкция пользователя по применению, эксплуатации и установке на русском языке. Мы надеемся, она поможет вам решить возникшие у вас вопросы при эксплуатации техники.
Если остались вопросы, задайте их в комментариях после инструкции.
"Загружаем инструкцию", означает, что нужно подождать пока файл загрузится и можно будет его читать онлайн. Некоторые инструкции очень большие и время их появления зависит от вашей скорости интернета.


8
EN
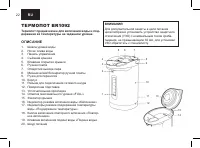
• After long water boiling the thermopot will switch to
the keep warm mode, the indicator (16) «Boiling» will
go out and the keep warm mode indicator (17) «Keep
warm» will glow constantly.
Notes:
the thermopot uses a long boiling technology
which significantly reduces the chlorine level in water.
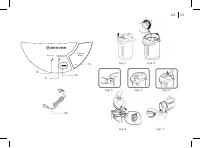
• To avoid burns by hot steam, do not bend over the
steam release openings (7) in the thermopot lid (4).
Do not block the steam release openings (7) with any
objects.
•
Drain the water after the first boiling. Hot water
resulting from the first boiling is not recommended to
consume, you may use it for domestic needs.
ATTENTION!
Be careful when pouring out water to avoid burns
by hot water.
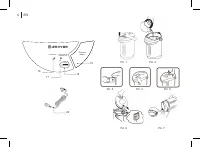
• To drain the water you can do the following:
First option:
place a suitable bowl, for instance, a cup
under the spout for pouring water (2) and press
• the water dispense button with a rim of the cup (pic.
3).
Second option:
place a suitable bowl under the spout
for pouring water (2) and press the water dispense
button (19) «Water dispense» (pic. 4).
Third option:
- in case of power cut use the hand pump (6);
- remove the hand pump lock by setting the block (8) to
the position « »;
- place a suitable bowl under the spout for pouring water
(2);
- press the hand pump (6), the water will be pouring
from the spout (2);
- after you finish pouring water, set the block (8) to the
position « » (pic. 5).
•
To switch the thermopot off disconnect the power
cord (20) plug from the mains socket.
• Open the thermopot lid (4) and wait until it cools
down completely.
• Always drain the remaining water from the thermopot
flask, to do this remove the lid (4).
• Before removing the lid (4) open it, press on the lock
(15) above, take the button (5) and remove the lid (4)
by pulling it towards the control panel (3) (pic. 6).
• Carefully tilt the thermopot to drain the remaining
water (pic. 7).
• Install the lid (4) back to its place. To do this, set the
lid (4) at a small angle, press the lock (15) and insert
the lid (4) to its installation place. Release the lock
(15). Before using the thermopot make sure that the
lid (8) is fixed properly with the lock (15).
Характеристики

Остались вопросы?Не нашли свой ответ в руководстве или возникли другие проблемы? Задайте свой вопрос в форме ниже с подробным описанием вашей ситуации, чтобы другие люди и специалисты смогли дать на него ответ. Если вы знаете как решить проблему другого человека, пожалуйста, подскажите ему :)


