
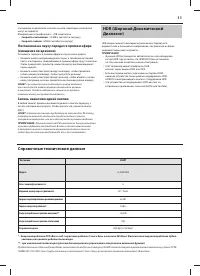
Телевизоры Sharp LC-40UG7252E - инструкция пользователя по применению, эксплуатации и установке на русском языке. Мы надеемся, она поможет вам решить возникшие у вас вопросы при эксплуатации техники.
Если остались вопросы, задайте их в комментариях после инструкции.
"Загружаем инструкцию", означает, что нужно подождать пока файл загрузится и можно будет его читать онлайн. Некоторые инструкции очень большие и время их появления зависит от вашей скорости интернета.


EN
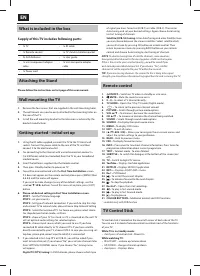
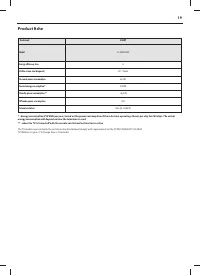
What is included in the box
Supply of this TV includes following parts:
• 1x
TV
• 1x
RF
cable
•
1x Remote control
•
1x TV stand installation packet
•
2x AAA batteries
•
1x User guide
•
1x mini component adapter
cable
•
1x mini composite adapter
cable
•
1x Power cord
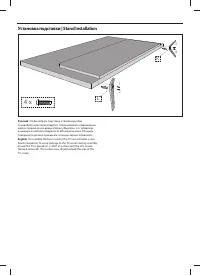
Attaching the Stand
Please follow the instructions on last page of this user manual.
Wall mounting the TV
1.
Remove the four screws that are supplied in the wall mounting holes.
2.
The wall mount can now be easily attached to the mounting holes on
the rear of the TV.
3.
Install the wall mounting bracket to the television as advised by the
bracket manufacturer.
Getting started - initial set up
1.
Using the RF cable supplied, connect the TV to the TV Aerial wall
socket. Connect the power cable to the rear of the TV, and then
connect it to the electrical outlet.
2.
For connecting to the Internet with a wired connection connect a
Cat 5/Ethernet cable (not included) from the TV to your broadband
modem/router.
3.
Insert the batteries supplied into the Remote control.
4.
Then press Standby button to power on TV.
5.
You will be now welcomed with the
First Time Installation
screen.
If it does not appear, on the remote control, please press [MENU] then
8-8-8-8 and the menu will appear.
If you wish to make changes to any of the default settings, use the
scroll
▲/▼/◄/►
buttons. To exit this menu at anytime, press [EXIT ]
button.
6. Please set desired settings in First Time Installation screen.
STEP 1
- Set the TV Menu language.
STEP 2
- set your country
STEP 3
- Set type of network connection. If you wish to skip this step
and connect TV to network later, please choose Skip Network Setting
STEP 4
- Select the location of TV. For home use, please select Home.
For shop demonstration mode, set Store.
STEP 5
- choose if your TV has stand, or if it is mounted on the wall. TV
will set optimal audio settings for selected option.
STEP 6
- choose input source which you want to use. If you have
connected RF cable directly to TV, choose DTV. If you have satellite
directly connected to your TV, choose DVB-S. In case you are using set-
top-box, please pick correct input to which it is connected.
7.
If you selected in last step DTV or DVB-S2, you will be asked if you
want to tune channels. If you choose “No”, you can tune channels later
from SETTINGS/CHANNEL menu. If you choose “Yes”, tuning menu
will appear.
Digital TV (DTV) tuning:
In DVB Antenna, please choose which type
of signal you have. Terrestrial (DVB-T ) or Cable (DVB-C). Then enter
Auto tuning and set your desired settings. Again choose Auto tuning
to start tuning of channels.
Satellite (DVB-S2) tuning:
Enter Auto Tuning and enter Satellite. Here
you can choose between the various satellites. Select satellite which
you wish to tune by pressing OK button on remote control. Then
return to previous menu by pressing BACK button on your remote
control and choose Auto tuning to start tuning of channels.
NOTE
: To shorten tuning time of satellite channels, some countries
have preinstalled channel list for most popular satellite in that region.
If this is the case for your selected country, you will be asked if you
wish to load preinstalled channel list. If you choose “Yes”, satellite
channel list will be imported to your TV within few seconds.
TIP:
If you are missing channels, the reason for this is likely to be signal
strength, you should consider connecting signal booster and re-tuning the TV.
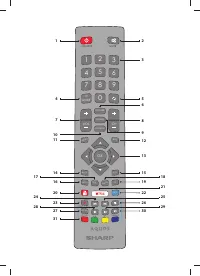
Remote control
1.
ON/OFF –
Switch on TV when in standby or vice versa.
2.
MUTE –
Mute the sound or vice versa.
3. 0 – 9 –
to select a TV channel directly.
4. TV GUIDE –
Opens the 7 Day TV Guide (Digital mode).
5.
–
To return to the previous channel viewed.
6. PICTURE
–
Scrolls through picture mode options.
7. VOL
▲/▼
–
To increase / decrease the sound level.
8. CH
▲/▼
–
To increase or decrease the channel being watched.
9. SOUND
–
Scrolls through sound mode options.
10. SOURCE –
To display the input/source menu.
11. MENU –
To display OSD menu.
12. EXIT –
To exit all menus.
13. (
▲/▼/◄/►
/ OK) –
Allows you to navigate the on-screen menus and
adjust the system settings to your preference.
14. BACK –
Back to previous menu.
15. FAV –
To display favourites menu.
16. INFO –
Press once for now/next channel information. Press twice for
programme information about current programme.
17. TEXT –
Teletext mode - To enter Teletext
18. SUBTITLE –
To switch the dialogue at the bottom of the screen (on/
off ).
19. TV –
Switch to digital TV source.
20. YouTube –
Displays YouTube application
21. NETFLIX –
Displays NETFLIX application
22. NET+ –
Displays AQUOS NET+ menu.
23. Rec
1
–
PVR Record
24.
–
To restart the current chapter
25.
–
To advance forward to the next chapter
26.
–
To stop the playback
27. Rec List
1
–
Opens the list of recordings.
28.
–
To play in fast rewind mode.
29.
–
To play in fast forward mode.
30.
–
To play/pause
31. COLOUR BUTTONS
–
Additional teletext and OSD functions
1
- available only with PVR function
TV Control Stick
TV control stick is located on the lower left corner of back side of the TV.
You can use it instead of remote control to control most of the functions
of your TV.
While TV is in standby mode:
•
short press of control stick - Power On
While watching TV:
•
RIGHT/LEFT – volume up/volume down
•
UP/DOWN – changes channel up/down
•
short press – Displays Menu


