
Сушильные машины Korting KD 60T8 - инструкция пользователя по применению, эксплуатации и установке на русском языке. Мы надеемся, она поможет вам решить возникшие у вас вопросы при эксплуатации техники.
Если остались вопросы, задайте их в комментариях после инструкции.
"Загружаем инструкцию", означает, что нужно подождать пока файл загрузится и можно будет его читать онлайн. Некоторые инструкции очень большие и время их появления зависит от вашей скорости интернета.


7
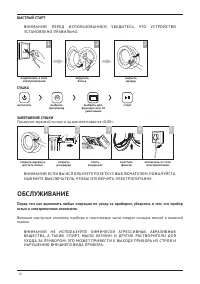
УСТАНОВКА
Перед установкой убедитесь, что в помещение подведена электроэнергия. Убедитесь в целостности
шлангов (для моделей с возможностью слива конденсата) и электрокабеля. Температура в помеще
-
нии не должна опускаться ниже 3°C.
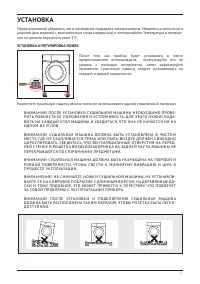
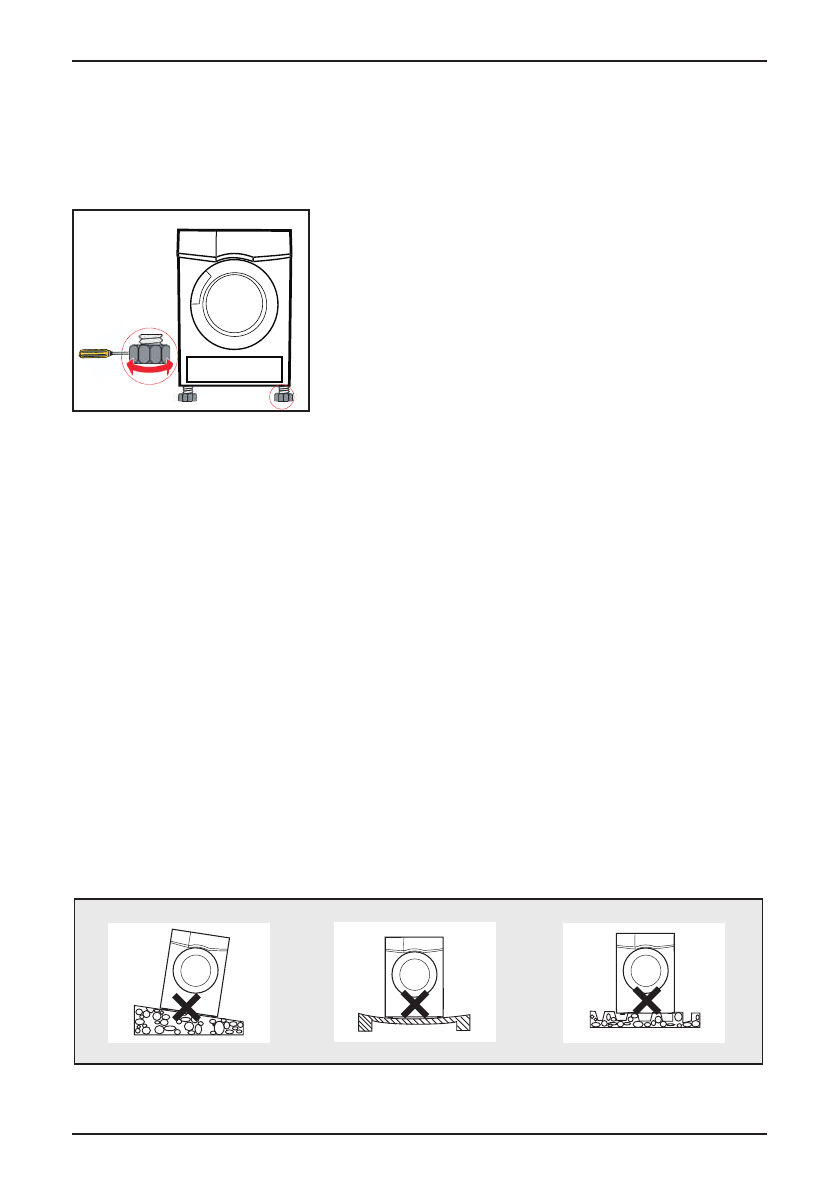
УСТАНОВКА И РЕГУЛИРОВКА НОЖЕК
После того как прибор будет установлен в место
предполагаемого использования, отрегулируйте его по
уровню с помощью инструмента, затем зафиксируйте
положение. Сушильную машину следует устанавливать на
твердой и ровной поверхности.
Разместите сушильную машину вблизи места ее использования удалив упаковочный материал.
В Н И М А Н И Е! П О С Л Е УСТА Н О В К И СУ Ш И Л Ь Н О Й М А Ш И Н Ы Н Е О Б ХОД И М О П Р О В Е
-
Р И Т Ь Р О В Н О СТ Ь Е Е П О Л О Ж Е Н И Я И УСТО Й Ч И В О СТ Ь. Д Л Я ЭТО ГО Н У Ж Н О Н А Д А
-
В И Т Ь Н А К А Ж Д Ы Й У ГО Л М А Ш И Н Ы И У Б Е Д И Т Ь С Я, Ч ТО О Н А Н Е К АЧ А Е ТС Я Н И Н А
ОД Н О М И З У Г Л О В.
В Н И М А Н И Е! СУ Ш И Л Ь Н А Я М А Ш И Н А ДО Л Ж Н А Б Ы Т Ь УСТА Н О В Л Е Н А В Ч И СТО М
М Е СТ Е, ГД Е Н Е С К А П Л И В А Е ТС Я Г Р Я З Ь И Л И П Ы Л Ь. В О З ДУХ ДО Л Ж Е Н С В О Б ОД Н О
Ц И Р К УЛ И Р О В АТ Ь. У Б Е Д И Т Е С Ь, Ч ТО В Е Н Т И Л Я Ц И О Н Н Ы Е ОТ В Е Р СТ И Я Н А П Е Р Е Д
-
Н Е Й СТ Е Н К Е И Р Е Ш Е Т К А В О З ДУХО З А Б О Р Н И К А Н А З А Д Н Е Й Ч АСТ И М А Ш И Н Ы Н Е
П Е Р Е К Р Ы В А ЮТС Я П О СТО Р О Н Н И М И П Р Е Д М Е ТА М И.
В Н И М А Н И Е! СУ Ш И Л Ь Н А Я М А Ш И Н А ДО Л Ж Н А Б Ы Т Ь РА З М Е Щ Е Н А Н А Т В Е РДО Й И
Р О В Н О Й П О В Е РХ Н О СТ И, Ч ТО Б Ы С В Е СТ И К М И Н И М У М У В И Б РА Ц И Ю И Ш У М В
П Р О Ц Е СС Е Э К С П Л УАТА Ц И И.
В Н И М А Н Е Н И Е! Н Е С Н И М А Й Т Е Н О Ж К И СУ Ш И Л Ь Н О Й М А Ш И Н Ы. Н Е УСТА Н А В Л И
-
В А Й Т Е Е Е Н А К О В Р О В О Е П О К Р Ы Т И Е С Д Л И Н Н Ы М В О Р СО М, Н А Д Е Р Е В Я Н Н Ы Е ДО
-
С К И И ТО М У П ОДО Б Н О Е. ЭТО М О Ж Е Т П Р И В Е СТ И К П Е Р Е Г Р Е В У, Ч ТО П О В Л Е Ч Е Т
З А СО Б О Й П Р О Б Л Е М Ы С Э К С П Л УАТА Ц И Е Й П Р И Б О РА .
В Н И М А Н И Е! П О С Л Е УСТА Н О В К И И П ОД К Л Ю Ч Е Н И Я СУ Ш И Л Ь Н А Я М А Ш И Н А
ДО Л Ж Н А Б Ы Т Ь РАС П О Л О Ж Е Н А ТА К И М О Б РА З О М, Ч ТО Б Ы Р О З Е Т К А Б Ы Л А Л Е Г К О
-
ДО СТ У П Н О Й.
7
8
INSTALLATION
Accessories
The following parts are optional for specific models.
If your dryer has following parts, please wear gloves and
them
following the instruction below .
install
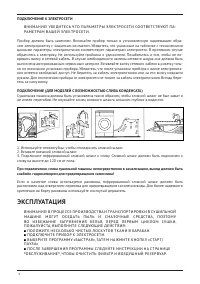
Hose holder(optional)
Condensing drain
hose(optional)
Use pliers to remove
the drain hose from
the hose connector.
Insert the
external
drainage
hose.
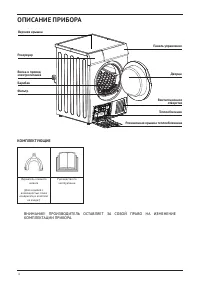
Container
Control Panel
Door
Drum
Power Cord
Handle
Maintenance cover
Air inlet
Top
board
Product Description
M
ax
.
12
0c
m
20
0c
m
Put the hose holder on the washing
basin or any other sink.
Installation
Lint filter
Transport
Move cautiously. Do not grasp any salient parts of machine. The machine
door can
not be used as the handle for delivery.
Installation Position
Level Adjusting
Once in its permanent operating position,
check that the dryer is absolutely level with the aid
of a spirit level. If it is not, adjust the feet with a tool.
Power Supply Connection
1.It is recommended that, for your convenience, the machine is positioned close
your washing machine.
2.The tumble dryer must be installed in a clean place, where dirt does not build up.
Air must be able to circulate freely all round the appliance. Do not obstruct the
front air inlet or the air intake grilles at the back of the machine.
3.To keep vibration and noise to a minimum when the dryer is in use, it should be
placed on a firm and level surface.
4.The feet must never be removed. Do not restrict the floor clearance through
deep pile carpets, strips of wood or similar. This might cause heat built-up which
would interfere with the operation of the appliance.
to
1.Make sure that the voltage of the power supply is the same as the electric specification
2.Do not connect the dryer with the power connection board, the universal plug or socket.
of the dryer.
INSTALLATION
7
8
INSTALLATION
Accessories
The following parts are optional for specific models.
If your dryer has following parts, please wear gloves and
them
following the instruction below .
install
Hose holder(optional)
Condensing drain
hose(optional)
Use pliers to remove
the drain hose from
the hose connector.
Insert the
external
drainage
hose.
Container
Control Panel
Door
Drum
Power Cord
Handle
Maintenance cover
Air inlet
Top
board
Product Description
M
ax
.
12
0c
m
20
0c
m
Put the hose holder on the washing
basin or any other sink.
Installation
Lint filter
Transport
Move cautiously. Do not grasp any salient parts of machine. The machine
door can
not be used as the handle for delivery.
Installation Position
Level Adjusting
Once in its permanent operating position,
check that the dryer is absolutely level with the aid
of a spirit level. If it is not, adjust the feet with a tool.
Power Supply Connection
1.It is recommended that, for your convenience, the machine is positioned close
your washing machine.
2.The tumble dryer must be installed in a clean place, where dirt does not build up.
Air must be able to circulate freely all round the appliance. Do not obstruct the
front air inlet or the air intake grilles at the back of the machine.
3.To keep vibration and noise to a minimum when the dryer is in use, it should be
placed on a firm and level surface.
4.The feet must never be removed. Do not restrict the floor clearance through
deep pile carpets, strips of wood or similar. This might cause heat built-up which
would interfere with the operation of the appliance.
to
1.Make sure that the voltage of the power supply is the same as the electric specification
2.Do not connect the dryer with the power connection board, the universal plug or socket.
of the dryer.
INSTALLATION
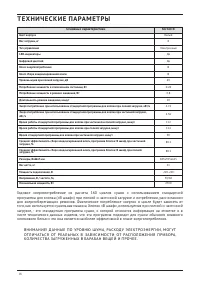
Характеристики

Остались вопросы?Не нашли свой ответ в руководстве или возникли другие проблемы? Задайте свой вопрос в форме ниже с подробным описанием вашей ситуации, чтобы другие люди и специалисты смогли дать на него ответ. Если вы знаете как решить проблему другого человека, пожалуйста, подскажите ему :)


