Строительные пылесосы Karcher WD 4 V-20/5/22 1.628-201.0 - инструкция пользователя по применению, эксплуатации и установке на русском языке. Мы надеемся, она поможет вам решить возникшие у вас вопросы при эксплуатации техники.
Если остались вопросы, задайте их в комментариях после инструкции.
"Загружаем инструкцию", означает, что нужно подождать пока файл загрузится и можно будет его читать онлайн. Некоторые инструкции очень большие и время их появления зависит от вашей скорости интернета.


8
English
Initial startup
Inserting the filter bag
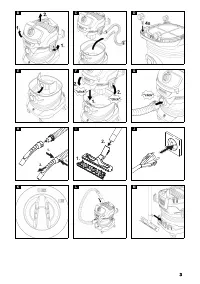
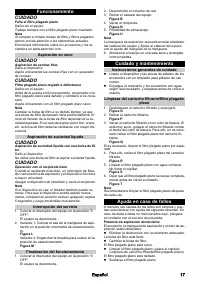
1. Fully unfold the filter bag.
2. Attach the filter bag to the device connection and
press it on firmly.
Illustration E
3. Fit and lock the device head.
Illustration F
Note
We recommend using a filter bag to vacuum fine dust.
Installing the hose, pipes, floor nozzle
1. Connect the suction hose.
Illustration G
2. Connect the suction hose to the handle.
Illustration H
Note
For convenient vacuuming in confined spaces, the han-
dle can be removed, and the accessories plugged di-
rectly onto the suction hose.
To release the handle, the grey areas on both sides of
the handle must be pressed, and the handle pulled from
the hose.
3. Install the floor nozzle.
Install the insert in the floor nozzle.
Connect the floor nozzle to the suction pipes.
Illustration I
Starting up the device
1. Plug the mains plug into the socket.
Illustration J
2. Set the trigger into the desired position.
Illustration K
Position "1 ON": The device is switched on.
Position "0 OFF": The device is switched off.
Note
Limited for Switzerland only: The socket outlet shall on-
ly be used during operation in dry condition.
Operation
ATTENTION
Flat pleated filter missing
Device damage
Always work with the flat pleated filter inserted.
Note
Pay attention to the latest part numbers when purchas-
ing and installing filter bags and flat pleated filters.
Information on accessories and spare parts can be
found at www.kaercher.com.
Dry vacuuming
ATTENTION
Vacuuming cold ashes
Device damage
Only vacuum cold ash with an ash pre-separator.
ATTENTION
Defective or wet flat pleated filter
Device damage
Before initial startup, check the flat pleated filter for
damage and replace it if necessary.
Only vacuum with a dry flat pleated filter.
Note
Replace the filter bag in good time, as a filter bag that is
too full could be damaged. The fill degree of the filter
bag depends on the amount of dirt vacuumed. The filter
bag should be replaced more frequently when vacuum-
ing fine dust, sand, etc.
Wet vacuuming
ATTENTION
Wet vacuuming with a filter bag
Device damage
Do not use a filter bag when vacuuming wet.
ATTENTION
Operation with full container
When the container is full, a float switch closes the suc-
tion opening and the device runs at a higher speed.
Switch off the device immediately and empty the con-
tainer.
Note
If the device falls over, the float can also close. To make
the device capable of vacuuming again, set up the de-
vice, switch it off, wait 5 seconds and then switch it on
again.
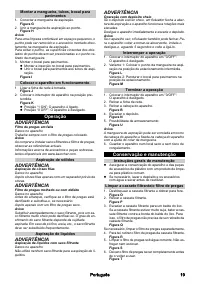
Interrupting operation
1. Set the trigger to "0 OFF".
The device is switched off.
2. Variant 1: Place the handle of the suction hose in the
intermediate parking position.
Illustration L
Variant 2: Attach the floor nozzle in the parking po-
sition.
Illustration M
Ending operation
1. Set the trigger to "0 OFF".
The device is switched off.
2. Pull out the mains plug.
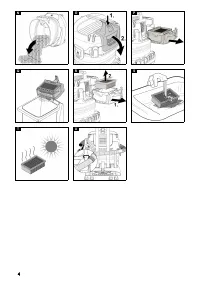
3. Remove the device head.
Illustration B
4. Empty the container.
Illustration N
5. Storage possibility:
Illustration U
Note
The suction hose can be wrapped around the device
head and attached to the device head with the help of
the hose collar.
6. Store the device in a dry and frost-proof room.
Care and service
General care instructions
Clean the device and plastic accessory parts with a
commonly available plastic cleaner.
Rinse the container and accessories with water, as
necessary, and dry them before further use.
Clean the filter box / flat pleated filter
1. Unlock the filter box and fold it out.
Illustration O
2. Remove the filter box.
Illustration P
3. Empty the filter box into a waste container. In the
case of heavy soiling, tap the filter box against the
edge of the waste container. The flat pleated filter
does not have to be removed from the filter box.
Illustration Q
If necessary, clean the flat pleated filter separately.
4. To do this, remove the flat pleated filter from the filter
box.
Illustration R
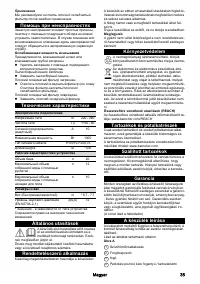
Характеристики

Остались вопросы?Не нашли свой ответ в руководстве или возникли другие проблемы? Задайте свой вопрос в форме ниже с подробным описанием вашей ситуации, чтобы другие люди и специалисты смогли дать на него ответ. Если вы знаете как решить проблему другого человека, пожалуйста, подскажите ему :)


