
Стиральная машина Korting KWMT 1070 - инструкция пользователя по применению, эксплуатации и установке на русском языке. Мы надеемся, она поможет вам решить возникшие у вас вопросы при эксплуатации техники.
Если остались вопросы, задайте их в комментариях после инструкции.
"Загружаем инструкцию", означает, что нужно подождать пока файл загрузится и можно будет его читать онлайн. Некоторые инструкции очень большие и время их появления зависит от вашей скорости интернета.


4
15
SM3130
NOTES AND ADVICE FOR THE USER
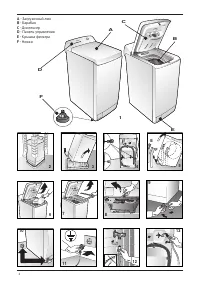
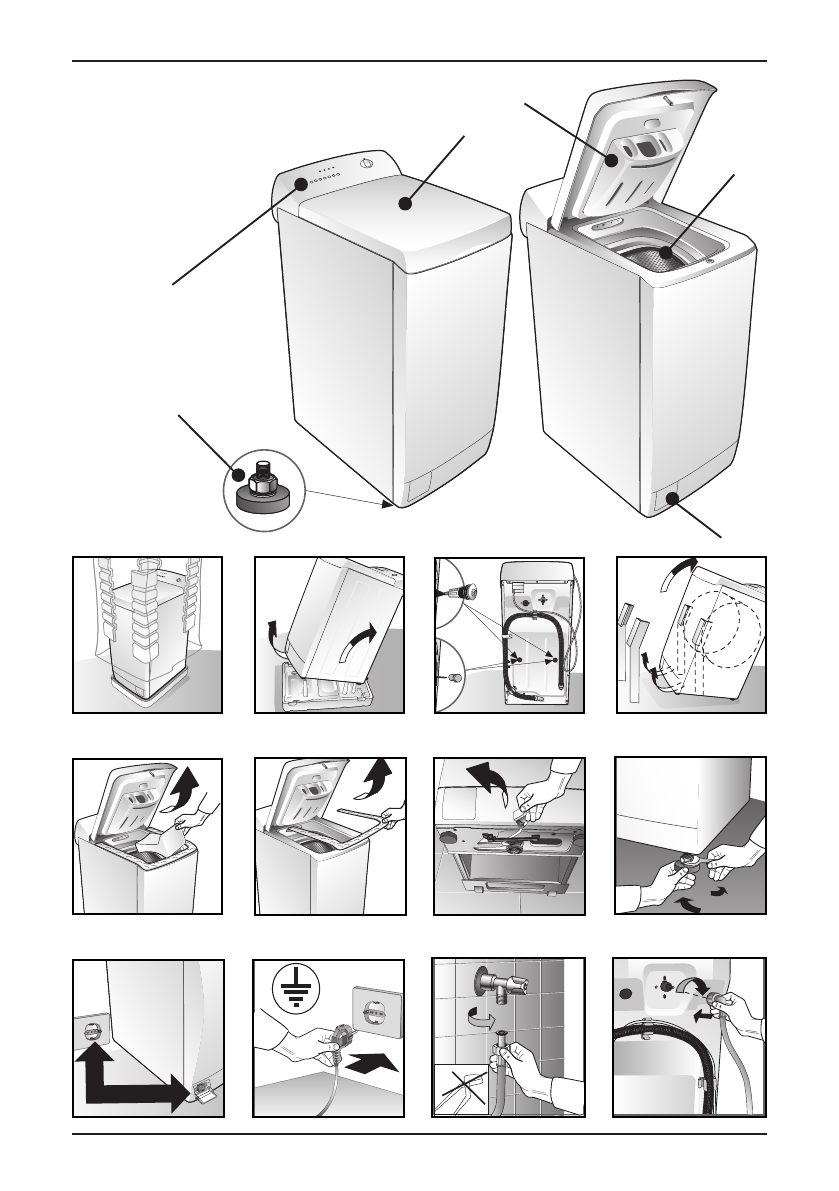
DESCRIPTION OF THE APPLIANCE
A
- Top cover
B
- Drum
C
- Detergent compartment
D
- Control panel
E
- Filter door
F
- Feet
EN
Unplug the washing ma-
chine from the power
supply before servicing
and cleaning.
Do not plug-in or un-
plug the machine with
wet hands.
The power supply sock-
et must be earthed and
must comply with the
safety requirements.
Extension leads or mul-
tiple adapters must not
be used to connect the
washing ma chine to
the mains supply..
After the end of each
washing cycle it is ad-
visable to unplug the
machine and shut-off
the water supply.
The washing machine
c a n b e o p e n e d o n ly
after the led or display
indicate the end of the
cycle. On some models,
this is indicated by the
start button flashing.
To disconnect the ma-
chine from the power
supply, pull the plug and
not the cable.
Do not expose the ap-
pliance to atmospheric
agents.
1
A
B
C
D
E
F
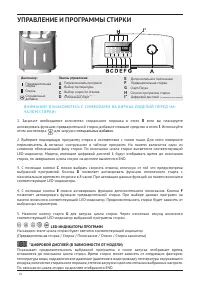
A
- Загрузочный люк
B
- Барабан
C
- Диспенсер
D
- Панель управления
E
- Крышка фильтра
F
- Ножки
16
SM3130
For transportation, the machine’s oscillating parts are
blocked by two spacers with screws.
Remove these spacers and screws before starting the
machine.
Preserve them for any future moves.
Close the holes with the caps provided inside of the document bag.
INSTALLING THE MACHINE
The machine must be installed by qualified personnel following the manufacturer’s
instructions. Incorrect installation can lead to injuries for persons and damage to
objects.
When deciding where to install the washing machine, consider the following advice:
▼
The room must have a water and electrical system. (Remember that cables
and hoses at the back of the washing machine must not be crushed).
▼
The washing machine must be placed on a flat and solid surface.
▼
Do not install the machine in a room where the temperature could go below
3°C.
▼
Place the machine in the chosen location and remove external packaging (fig.
2).
▼
Lift the washing machine and remove the polystyrene base and the plastic
spacer (fig. 3).
This appliance is intended to be used in household and similar applications such as:
▼
Staff kitchen areas in shops, offices and other working environments;
▼
Farm houses;
▼
By clients in hotels, motels and other residential type environments;
▼
Bed and breakfast type environments.
EN
3
4
2
5
▼
Incline the washing machine and extract the two internal polystyrene corner
pieces (if present) by pulling the two cardboard strips, first E and then F (fig.5).
▼
Remove the polystyrene spacer (fig. 6).
F
E
6
UNPACKING AND UNBLOCKING THE MACHINE
17
SM3130
EN
INSTALLING THE MACHINE
9
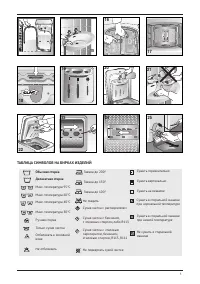
LEVELLING THE WASHING MACHINE
WHERE PROVIDED
, use the handling wheel to help moving. To use it, push the lever
on the bottom right moving it to the other side. Move the lever back to the original
position after moving (fig.8).
UNPACKING AND UNBLOCKING THE MACHINE
8
7
▼
Remove the polystyrene spacer (fig. 7).
10
11
CONNECTING TO THE POWER SUPPLY
Make sure that the voltage indicated on the identification plate
attached to the inside of the filter door corresponds to that of the
mains supply (fig. 10)
All cut-outs, electric wiring and mains sockets must have a rating such that
enables them to support the maximum load indicated on the identification plate.
Once the appliance has been installed, it must be connected to the mains supply
through a single-pole switch.
The mains supply to which the appliance is connected must be fitted with an
earthing system. If this is not the case, the manufacturer will not be held liable
for any incidents that may occur (fig. 11).
If the mains socket to which the appliance is connected is faulty or unsuitable,
it must be replaced by a qualified electrician.
The washing machine must not be connected to the mains supply using indirect
methods such as extension leads or multiple adapters.
During maintenance work, the washing machine must be disconnected from
the mains electricity supply.
Having chosen the adapt place, set the adjustable feet well so that the machine is
level (Fig. 9).
Pay particular attention to the choice of the position, to levelling the washing machine
and to securing the counternuts.
If the washing machine is not levelled correctly, it will be instable
and make noise when operating causing damage.
If the machine is placed on a rug, make sure that air circulates freely between the
washing machine and the floor.
17
SM3130
EN
INSTALLING THE MACHINE
9
LEVELLING THE WASHING MACHINE
WHERE PROVIDED
, use the handling wheel to help moving. To use it, push the lever
on the bottom right moving it to the other side. Move the lever back to the original
position after moving (fig.8).
UNPACKING AND UNBLOCKING THE MACHINE
8
7
▼
Remove the polystyrene spacer (fig. 7).
10
11
CONNECTING TO THE POWER SUPPLY
Make sure that the voltage indicated on the identification plate
attached to the inside of the filter door corresponds to that of the
mains supply (fig. 10)
All cut-outs, electric wiring and mains sockets must have a rating such that
enables them to support the maximum load indicated on the identification plate.
Once the appliance has been installed, it must be connected to the mains supply
through a single-pole switch.
The mains supply to which the appliance is connected must be fitted with an
earthing system. If this is not the case, the manufacturer will not be held liable
for any incidents that may occur (fig. 11).
If the mains socket to which the appliance is connected is faulty or unsuitable,
it must be replaced by a qualified electrician.
The washing machine must not be connected to the mains supply using indirect
methods such as extension leads or multiple adapters.
During maintenance work, the washing machine must be disconnected from
the mains electricity supply.
Having chosen the adapt place, set the adjustable feet well so that the machine is
level (Fig. 9).
Pay particular attention to the choice of the position, to levelling the washing machine
and to securing the counternuts.
If the washing machine is not levelled correctly, it will be instable
and make noise when operating causing damage.
If the machine is placed on a rug, make sure that air circulates freely between the
washing machine and the floor.
18
SM3130
INSTALLING THE MACHINE
EN
WATER CONNECTION
The mains water pressure must be between 0.05 and 1.00 MPa
(0,5 - 10 bar.)
▼
Before connection, open the tap and let the water run in order to clean the pipes
from impurities like sand and rust. (This operation is very important when the
washing machine has been inactive for a long time or when connected to new
piping).
▼
The water supply hose must be connected to the cold water outlet with a 3/4”
threaded opening.
▼
Connect the supply hose (fig. 12/13).
Use the new hose provided with the machine. Do not reuse the
old one.
Do not connect to the hot water supply.
▼
The water supply tap must be completely open during washing.
▼
Connect the drain hose to a drain piping or wall drain between 60 and 90 cm
from the ground without squeezing it (fig.14).
▼
If the water drains directly into the drain piping, the free end of the machine
hose must be inserted in the piping with an inside diameter no smaller than 40
mm.
▼
If water is drained into the washbasin or another drain, the free end of the hose
must be previously reinforced at the bending with an appropriate hook, provided
with the washing machine. Then place the hose at the edge of the washbasin
and fix the hook to prevent the hose from falling (fig. 15). The washbasin must
have its drain clean to allow water to drain freely.
12
13
14
15
INSTALLING THE MACHINE
Do not insert or remove the plug from the mains socket with wet hands.
If the power supply cable is damaged in any way, contact the appropriate specialised service centre.
The plug used to connect the machine to the power supply must never be fixed behind the machine,
but must be in a position easily accessible in an emergency.
Характеристики

Остались вопросы?Не нашли свой ответ в руководстве или возникли другие проблемы? Задайте свой вопрос в форме ниже с подробным описанием вашей ситуации, чтобы другие люди и специалисты смогли дать на него ответ. Если вы знаете как решить проблему другого человека, пожалуйста, подскажите ему :)


