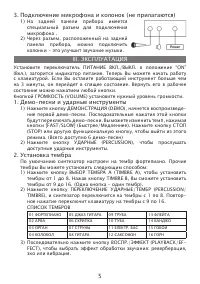
Синтезаторы Elenberg MS-4940 - инструкция пользователя по применению, эксплуатации и установке на русском языке. Мы надеемся, она поможет вам решить возникшие у вас вопросы при эксплуатации техники.
Если остались вопросы, задайте их в комментариях после инструкции.
"Загружаем инструкцию", означает, что нужно подождать пока файл загрузится и можно будет его читать онлайн. Некоторые инструкции очень большие и время их появления зависит от вашей скорости интернета.

15
3. Auto Rhythm and Rhythm Programming
1) Press one of the rhythm buttons and the rhythm will automatically
be performed. Press “FAST/SLOW” button and you can have 51-level
tempo control.
RHYTHM LIST
01 DISCO
02 8 BEAT
03 ROCK ROLL 04 RHUMBA
05 TANGO
06 MARCH
07 COUNTRY
08 BOSSANWA 09 WALTE
10 CHACHA
2) In the state of rhythm, press “FILL-IN” button and 1-2 bars of special
sound will be filled in while the rhythm is going on.
3) After pressing “RHYTHM PROGRAMMING” button, you can press the
buttons of percussion to edit a group of rhythms as you like (16 per-
cussion sounds can be stored in the RAM ). Press the “PLAYBACK/EF-
FECT” button, and the self-edited percussion rhythm will be played in
circle. When you want to re-program, please repeat the above steps.
4) Pressing “STOP” button or any other function button, the system will
quit this function.
4. Record / Playback
The system will enter the recording mode after the “RECORD” button is
pressed. The notes of the pressed keys will all be recorded in the mem-
ory (The max notes is 40). Pressing the “PLAYBACK/EFFECT” button, the
stored notes will start to play. If you want to listen to it again, just press
the “PLAYBACK/EFFECT” button again.
If you want to have a new recording, please repeat the above steps.
Press “STOP” button, and the system will quit the function.
5. Guide Function
1) Press the “GUIDE” button and then press the white key to select the
melody in performance. At this time, the main melody will be shield-
ed. The main melody will be regained if you don’t play the instrument
for three seconds.
2) Press “ONE KEY” button and then press the white key to select a
melody, by pressing any of the keys, the main melody will be per-
formed with the accompany repeated. That is the mode for one key
one note.
3) You can press “PERCUSSION” button to practice the percussion when
the music is playing. Press the “STOP” button to quit this function.
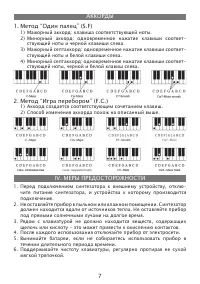
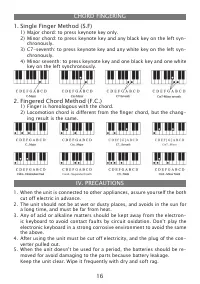
6. Chord
1) When the rhythm starts, press “SINGLE FINGER CHORD” button and you
can carry on the accompanying of the single finger chord according to
the different fingering in the chord-key part (Keys 1-18). The fingering
is shown as Fig.3.
2) When the rhythm starts, press “FINGERED CHORD” button and you can
carry on the accompanying of the fingered chord according to the differ-
ent fingering in the chord-key part. The fingering is shown as Fig.4.

