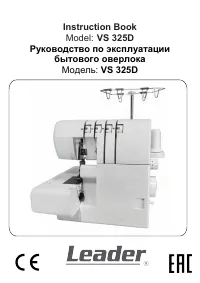
Швейная машина Leader VS325D - инструкция пользователя по применению, эксплуатации и установке на русском языке. Мы надеемся, она поможет вам решить возникшие у вас вопросы при эксплуатации техники.
Если остались вопросы, задайте их в комментариях после инструкции.
"Загружаем инструкцию", означает, что нужно подождать пока файл загрузится и можно будет его читать онлайн. Некоторые инструкции очень большие и время их появления зависит от вашей скорости интернета.


* Be sure that the electrical voltage of the electric outlet (wall receptacle) is the same as the rated voltage of
the motor.
* Use this machine only for its intended use as described in this Operator’s Guide. Use only attachments
recommended by the manufacturer as contained in the Operator’s Guide.
* To disconnect, turn all controls to the off (“0”) position, then remove plug from outlet.
* Disconnect the power line plug from the socket outlet or switch the machine off when making any adjustments
in the needle area, such as threading needle and loopers, changing needle, changing throat plate or
changing presser foot, etc.
* Always unplug the machine from the electrical outlet when removing covers, lubricating, or when making
any other user servicing adjustments mentioned in the Operator’s Guide.
* Do not attempt to adjust the motor belt. Contact your nearest Service Center should any adjustment be
required.
* Do not unplug by pulling on cord. To unplug, grasp the plug, not the cord.
* Handle the foot controller with care and avoid dropping it on the floor. Be sure not to place anything on top
of it.
* Always use the proper throat plate. The wrong plate can cause the needle to break.
* Do not use bent needles.
* When sewing, keep fingers away from all moving parts. Special care is required around the sewing
machine needle.
* Do not pull or push fabric while stitching. It may deflect the needle causing it to break.
* Use only the handle to lift and move the machine.
* Never operate the machine if it has a damaged cord or plug, if it is not working properly, if it has been
dropped or damaged, or dropped into the water. Return the machine to the nearest authorized dealer or
Service Center for examination, repair, electrical, or mechanical adjustment.
* Never operate the machine with any air openings blocked. Keep ventilation openings of the machine and
foot controller free from the accumulation of lint, dust and loose cloth.
* Never drop or insert any object into any opening.
2
When using this machine, basic safety precautions should always be followed including the following.
Read all instructions before using the machine.
DANGER
– To reduce the risk of electric shock:
WARNING
– To reduce the risk of burns, fire, electric shock or injury to persons:
IMPORTANT SAFETY INSTRUCTIONS
* The machine should never be left unattended when plugged in. Always unplug the machine from the
electric outlet immediately after using and before cleaning.
Содержание
- 54 ВАЖНЫЕ ПРАВИЛА ТЕХНИКИ БЕЗОПАСНОСТИ; ОПАСНОСТЬ; Для снижения риска электрического удара:; ПРЕДУПРЕЖДЕНИЕ; для снижения риска ожогов, пожара, электрического удара или
- 55 СОХРАНИТЕ ЭТИ ИНСТРУКЦИИ
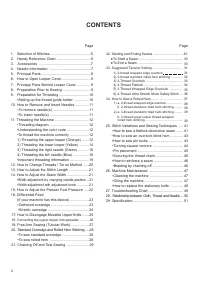
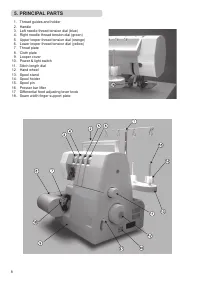
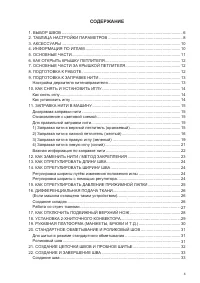
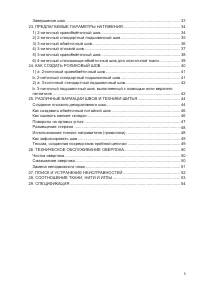
- 56 СОДЕРЖАНИЕ
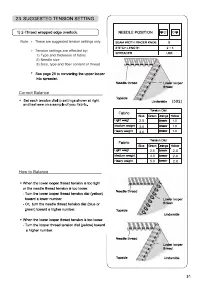
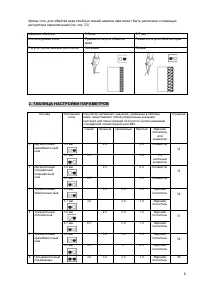
- 60 ТАБЛИЦА НАСТРОЙКИ ПАРАМЕТРОВ
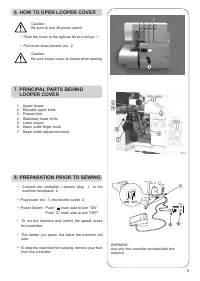
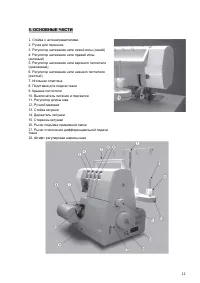
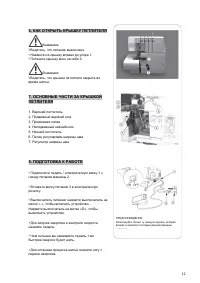
- 64 КАК ОТКРЫТЬ КРЫШКУ ПЕТЛИТЕЛЯ; Убедитесь, что крышка петлителя закрыта во; ОСНОВНЫЕ ЧАСТИ ЗА КРЫШКОЙ; Неподвижный нижний нож; ПОДГОТОВКА К РАБОТЕ; • Подключите педаль / электрическую вилку 1 к
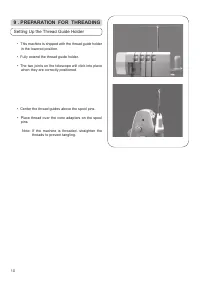
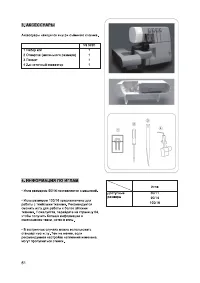
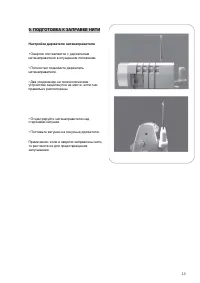
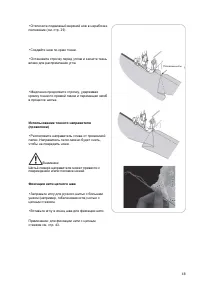
- 65 ПОДГОТОВКА К ЗАПРАВКЕ НИТИ; Настройка держателя нитенаправителя; Оверлок поставляется с держателем
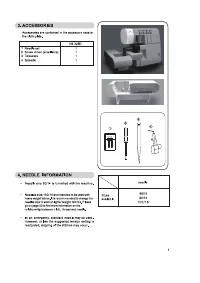
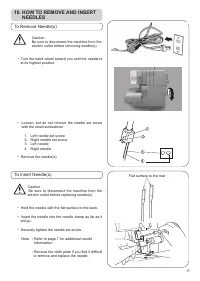
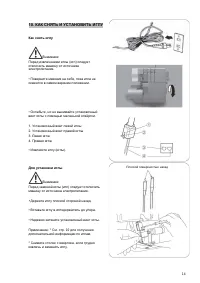
- 66 КАК СНЯТЬ И УСТАНОВИТЬ ИГЛУ; Как снять иглу; отключить машину от источника; Для установки иглы; Перед заменой иглы (игл) следует отключить
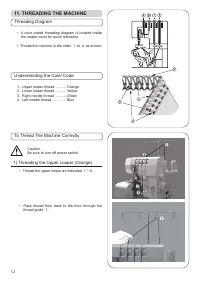
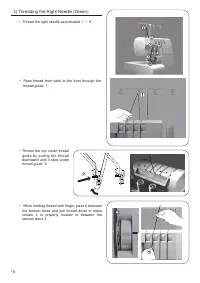
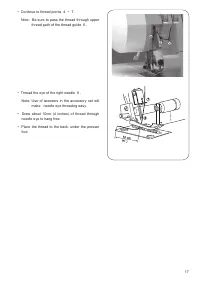
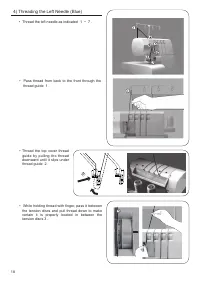
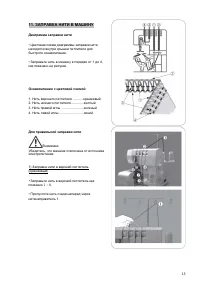
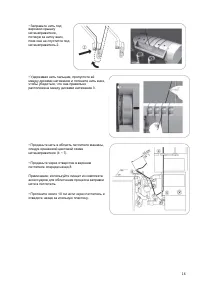
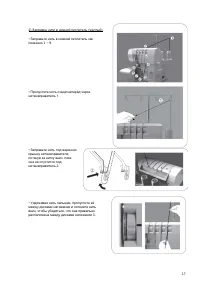
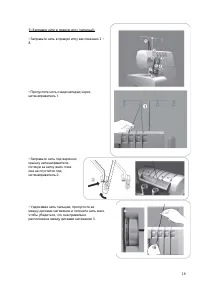
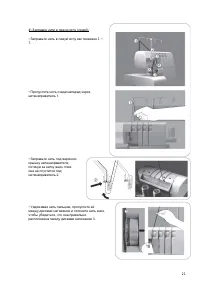
- 67 ЗАПРАВКА НИТИ В МАШИНУ; Диаграмма заправки нити; Ознакомление с цветовой схемой; Убедитесь, что машина отключена от источника
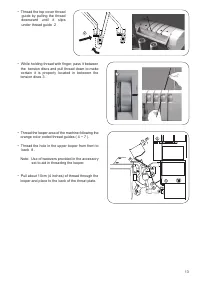
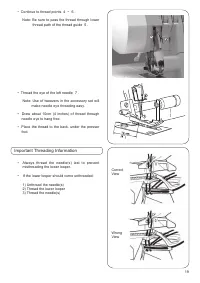
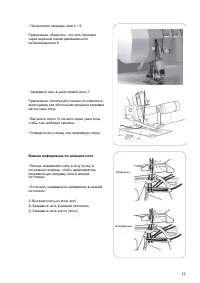
- 74 Важная информация по заправке нити
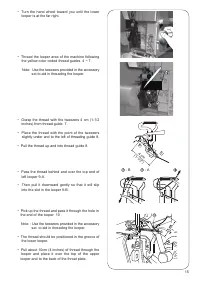
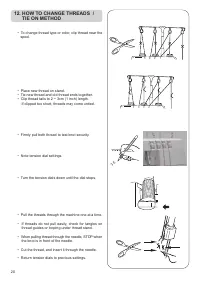
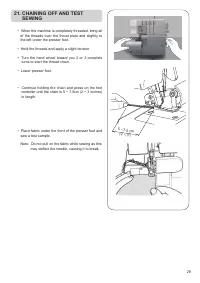
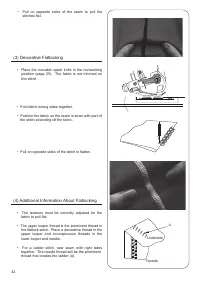
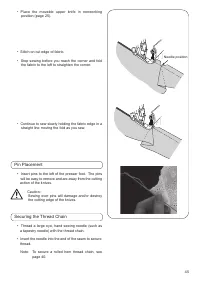
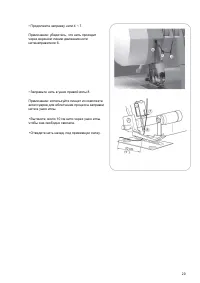
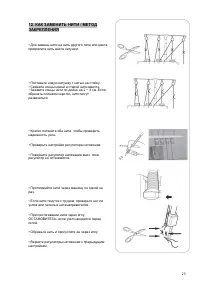
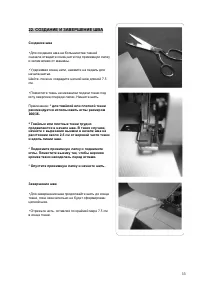
- 75 ЗАКРЕПЛЕНИЯ; • Свяжите концы новой и старой нити вместе.
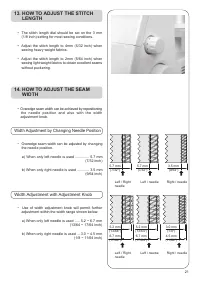
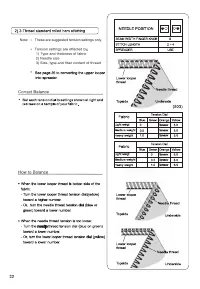
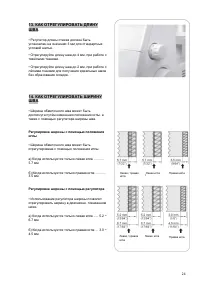
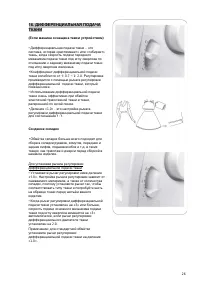
- 76 Регулировка ширины с помощью положения
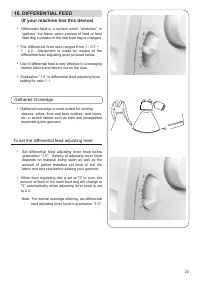
- 78 (Если машина оснащена таким устройством)
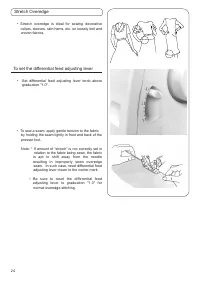
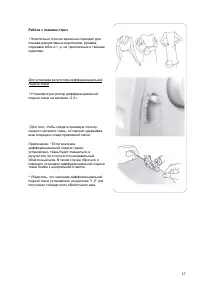
- 79 Работа с тканями стреч
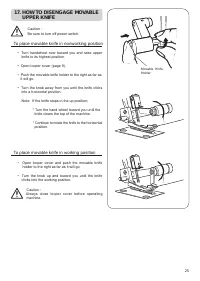
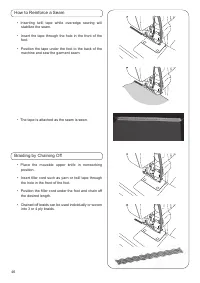
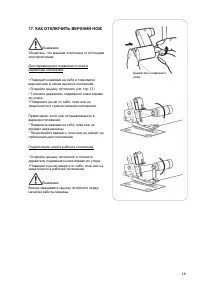
- 80 КАК ОТКЛЮЧИТЬ ВЕРХНИЙ НОЖ
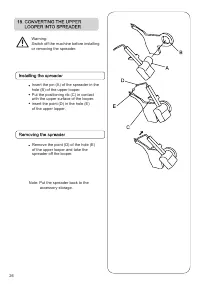
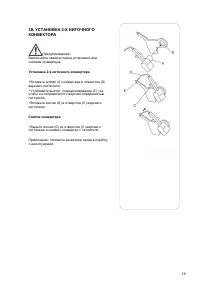
- 81 Выключайте оверлок перед установкой или; Установка 2-х ниточного конвертера; чтобы он соприкасался с верхней поверхностью; Снятие конвертера
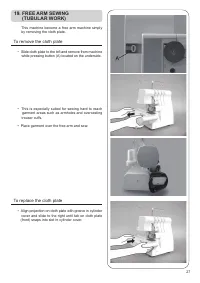
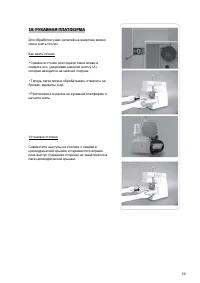
- 82 РУКАВНАЯ ПЛАТФОРМА
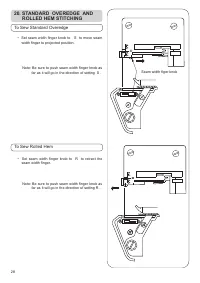
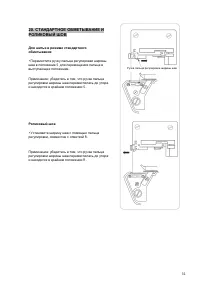
- 83 Для шитья в режиме стандартного
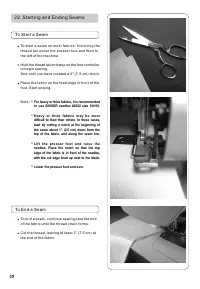
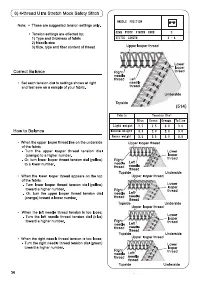
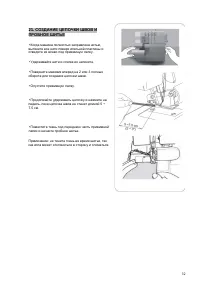
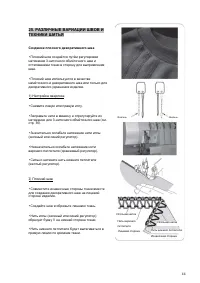
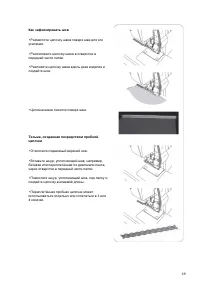
- 85 СОЗДАНИЕ И ЗАВЕРШЕНИЕ ШВА
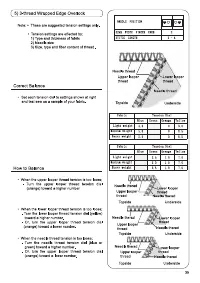
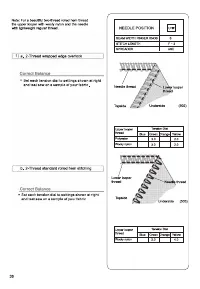
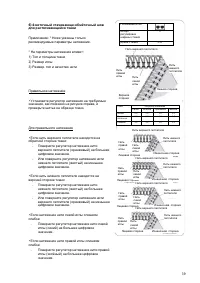
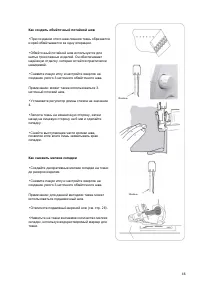
- 86 ниточный краеобмёточный шов
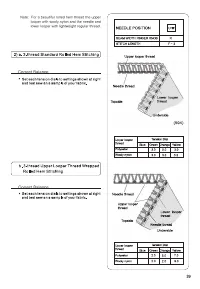
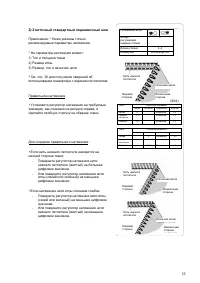
- 87 ниточный стандартный подшивочный шов
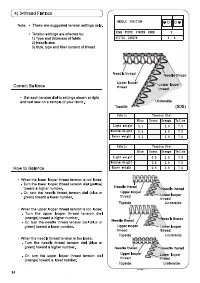
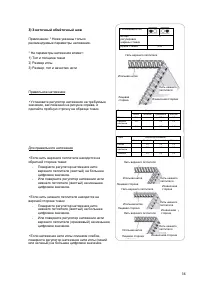
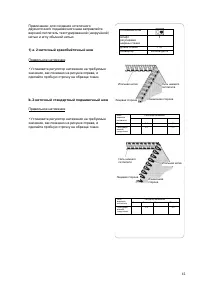
- 88 ниточный обмёточный шов
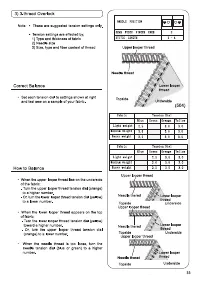
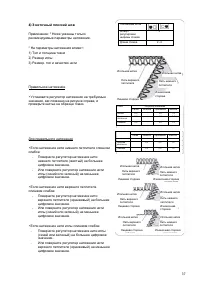
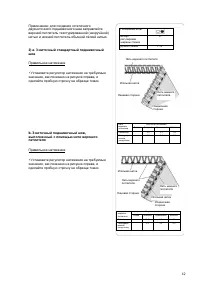
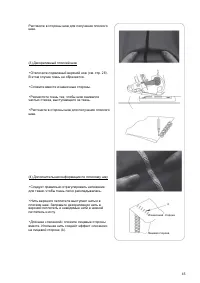
- 89 ниточный плоский шов
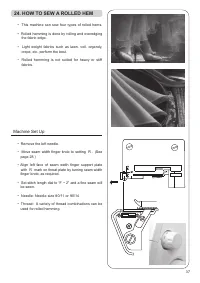
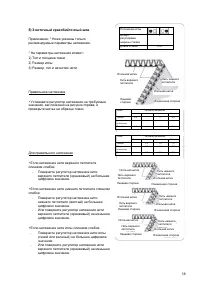
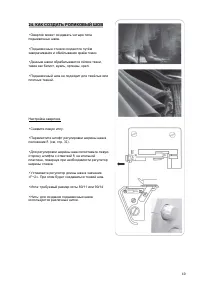
- 92 КАК СОЗДАТЬ РОЛИКОВЫЙ ШОВ
- 96 Создание плоского декоративного шва
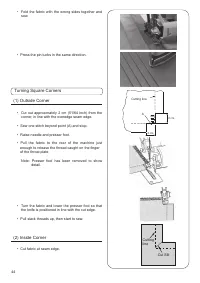
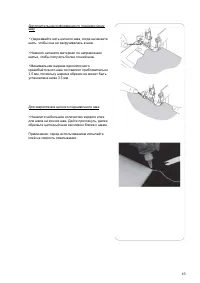
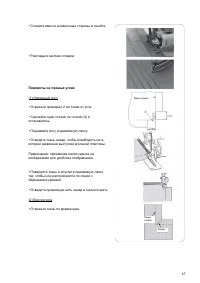
- 99 Повороты на прямых углах
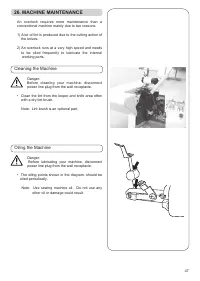
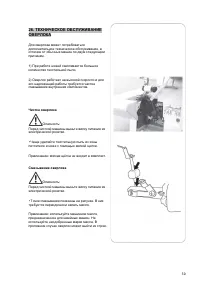
- 102 Чистка оверлока
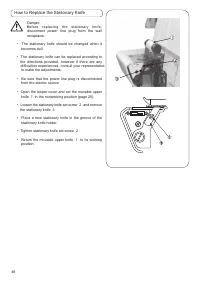
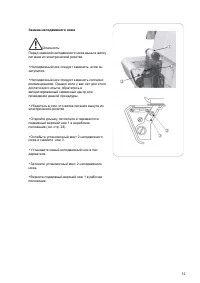
- 103 Замена неподвижного ножа
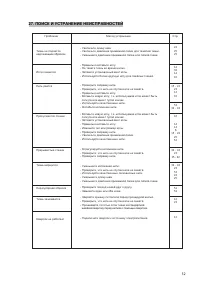
- 104 ПОИСК И УСТРАНЕНИЕ НЕИСПРАВНОСТЕЙ
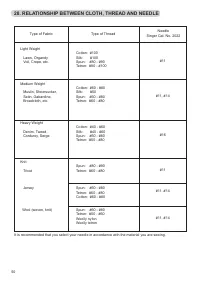
- 105 СООТНОШЕНИЕ ТКАНИ, НИТИ И ИГЛЫ
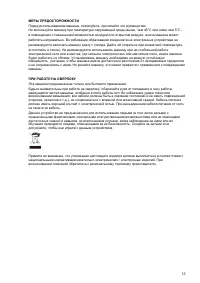
- 107 МЕРЫ ПРЕДОСТОРОЖНОСТИ; допускайте, чтобы они играли с данным устройством.
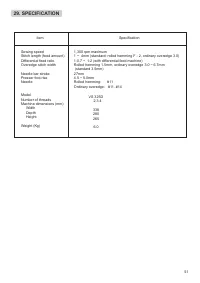
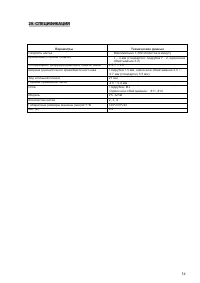
Характеристики

Остались вопросы?Не нашли свой ответ в руководстве или возникли другие проблемы? Задайте свой вопрос в форме ниже с подробным описанием вашей ситуации, чтобы другие люди и специалисты смогли дать на него ответ. Если вы знаете как решить проблему другого человека, пожалуйста, подскажите ему :)


