
Шуруповерты Stanley STDC18LHBK - инструкция пользователя по применению, эксплуатации и установке на русском языке. Мы надеемся, она поможет вам решить возникшие у вас вопросы при эксплуатации техники.
Если остались вопросы, задайте их в комментариях после инструкции.
"Загружаем инструкцию", означает, что нужно подождать пока файл загрузится и можно будет его читать онлайн. Некоторые инструкции очень большие и время их появления зависит от вашей скорости интернета.


8
ENGLISH
(Original instructions)
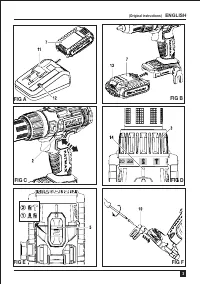
Selecting the operating mode or torque (FIG. D)
This tool is fitted with a collar to select the operating mode
and to set the torque for tightening screws. Large screws
and hard workpiece materials require a higher torque setting
than small screws and soft workpiece materials. The collar
has a wide range of settings to suit your application.
• For drilling in wood, metal and plastics, set the collar (3)
to the drilling position by aligning the symbol with the
marking (14).
• For screwdriving, set the collar to the desired setting. If
you do not yet know the appropriate setting, proceed as
follows:
- Set the collar (3) to the lowest torque setting.
- Tighten the first screw.
- If the clutch ratchets before the desired result is
achieved, increase the collar setting and continue
tightening the screw. Repeat until you reach the correct
setting. Use this setting for the remaining screws.
Drilling in masonry (FIG. D & E)
• For drilling in masonry, set the collar (3) to the hammer
drilling position by aligning the symbol with the marking
(14).
• Slide the speed selector (5) towards the front of the tool
(2nd gear).
Speed selector (FIG. E)
• For drilling in steel and for screwdriving applications,
slide the speed selector (5) towards the rear of the tool
(1st gear).
• For drilling in materials other than steel, slide the speed
selector (5) towards the front of the tool (2nd gear).
Drilling/screwdriving
• Select forward or reverse rotation using the
forward/reverse slider (2).
• To switch the tool on, press the switch (1). The tool
speed depends on how far you press the switch.
• To switch the tool off, release the switch.
LED work light
The LED work light (8) is activated automatically when the
trigger is depressed. The LED work light will illuminate when
the trigger is partially depressed, before the unit begins
running.
State of charge indicator
The tool is fitted with a state of charge indicator. This can be
used to display the current level of charge in the battery
during use.
• Press the state of charge indicator button (9).
Hints for optimum use
Drilling
• Always apply a light pressure in a straight line with the
drill bit.
• Just before the drill tip breaks through the other side of
the workpiece, decrease pressure on the tool.
• Use a block of wood to back up workpieces that may
splinter.
• Use spade bits when drilling large diameter holes in
wood.
• Use HSS drill bits when drilling in metal.
• Use masonry bits when drilling in soft masonry.
• Use a lubricant when drilling metals other than cast iron
and brass.
• Make an indentation using a centre punch at the centre of
the hole to be drilled in order to improve accuracy.
Screwdriving
• Always use the correct type and size of screwdriver bit.
• If screws are difficult to tighten, try applying a small
amount of washing liquid or soap as a lubricant.
• Always hold the tool and screwdriver bit in a straght line
with the screw.
Accessories
The performance of your tool depends on the accessory
used. Stanley accessories are engineered to high quality
standards and designed to enhance the performance of your
tool. By using these accessories you will get the very best
from your tool.
Maintenance
Your Stanley tool has been designed to operate over a long
period of time with a minimum of maintenance. Continuous
satisfactory operation depends upon proper tool care and
regular cleaning. Your charger does not require any
maintenance apart from regular cleaning.
Warning!
Before performing any maintenance on the tool,
remove the battery from the tool. Unplug the charger before
cleaning it.
• Regularly clean the ventilation slots in your tool and
charger using a soft brush or dry cloth.
• Regularly clean the motor housing using a damp cloth.
• Do not use any abrasive or solvent-based cleaner.
• Regularly open the chuck and tap it to remove any dust
from the interior.


