Шуруповерты Sparky BVR 54E - инструкция пользователя по применению, эксплуатации и установке на русском языке. Мы надеемся, она поможет вам решить возникшие у вас вопросы при эксплуатации техники.
Если остались вопросы, задайте их в комментариях после инструкции.
"Загружаем инструкцию", означает, что нужно подождать пока файл загрузится и можно будет его читать онлайн. Некоторые инструкции очень большие и время их появления зависит от вашей скорости интернета.


7
Original instructions
EN
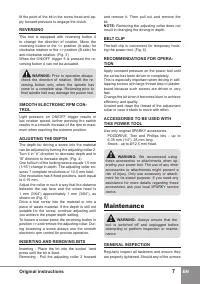
fit the point of the bit in the screw head and ap
-
ply forward pressure to engage the clutch.
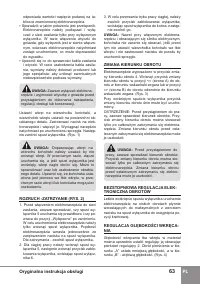
REVERSING
This tool is equipped with reversing button 4
to change the direction of rotation. Move the
reversing button to the <= position (A side) for
clockwise rotation or the => position (B side) for
anti-clockwise rotation. (Fig. 3)
When the ON/OFF trigger 5 is pressed the re
-
versing button 4 can not be actuated.
WARNING:
Prior to operation always
check the direction of rotation. Shift the re-
versing button only when the spindle has
come to a complete stop. Reversing prior to
final spindle halt may damage the power tool.
SMOOTH ELECTRONIC RPM CON-
TROL
Light pressure on ON/OFF trigger results in
low rotation speed, further pressing the switch
results in a smooth increase of the rpm to maxi-
mum when reaching the extreme position.
ADJUSTING THE DEPTH
The depth for driving a screw into the material
can be adjusted by turning the adjusting collar 2.
Turn it in “A” direction to decrease depth and in
“B” direction to increase depth. (Fig. 4)
One full turn of the locking sleeve equals 1.5 mm
(1/16”) change in depth. The adjusting collar en-
sures 7 complete revolutions or 10.5 mm total.
One revolution has 8 fixed positions, each equal
to 0.19 mm.
Adjust the collar in such a way that the distance
between the cap face and the screw head is
1 mm (3/64”) approximately 1 mm (3/64”), as
shown on (Fig. 5)
Drive a trial screw into the material or into a
piece of waste material. If the depth is still not
suitable for the screw, continue adjusting until
you achieve the proper depth setting.
To loosen a screw press the reversing button in
position => and remove the adjusting collar. Dur-
ing loosening a screw always use the smooth
electronic rpm control for precise operation.
INSERTING AND REMOVING BITS
Inserting - Place the bit into the socket 1and
press until the bit is fixed.
Removing - Pull the adjusting collar 2 forward
and remove it. Then pull out and remove the
bit.
NOTE:
Removing the adjusting collar does not
result in changing the driving-in depth.
BELT CLIP
The belt clip is convenient for temporary hook-
ing the power tool. (Fig. 6)
RECOMMENDATIONS fOR OPERA-
TION
Apply constant pressure on the power tool until
the screw has been driven in completely.
This is especially important when driving in self-
tapping screws with large thread step in plaster-
board because such screws are driven in very
fast.
Change the bit when it becomes blunt to achieve
efficiency and quality.
Unwind and clean the thread of the adjustment
collar in case it starts to move with effort.
ACCESSORIES TO BE USED WITH
THIS POWER TOOL
Use only original SPARKY accessories.
POZIDRIVE, Torx and Phillips bits - up to
6,35 mm (1/4“), 25 mm long.
Srews - up to Ø12,5 mm head.
WARNING:
We recommend using
these accessories or attachments when op-
erating your power tool. The use of any other
accessories or attachments might present a
risk of injury. Only use accessory or attach-
ment for its stated purpose. If you need any
assistance for more details regarding these
accessories, ask your local SPARKY service
centre.
Maintenance
WARNING:
Always ensure that the
tool is switched off and unplugged before
attempting to perform inspection or mainte-
nance.
GENERAL INSPECTION
Regularly inspect all fasteners and ensure they
are properly tightened. Should any of the screws
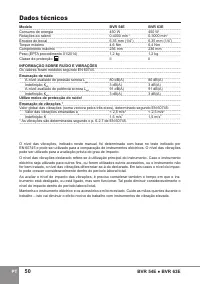
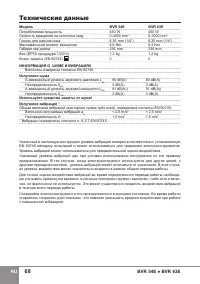
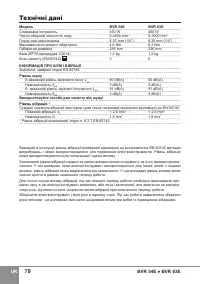
Характеристики

Остались вопросы?Не нашли свой ответ в руководстве или возникли другие проблемы? Задайте свой вопрос в форме ниже с подробным описанием вашей ситуации, чтобы другие люди и специалисты смогли дать на него ответ. Если вы знаете как решить проблему другого человека, пожалуйста, подскажите ему :)


