
Шуруповерты Makita DTD157RTJ - инструкция пользователя по применению, эксплуатации и установке на русском языке. Мы надеемся, она поможет вам решить возникшие у вас вопросы при эксплуатации техники.
Если остались вопросы, задайте их в комментариях после инструкции.
"Загружаем инструкцию", означает, что нужно подождать пока файл загрузится и можно будет его читать онлайн. Некоторые инструкции очень большие и время их появления зависит от вашей скорости интернета.


9 ENGLISH
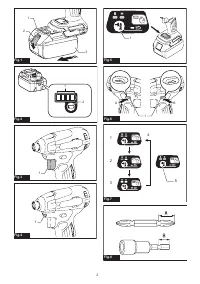
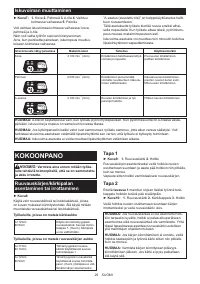
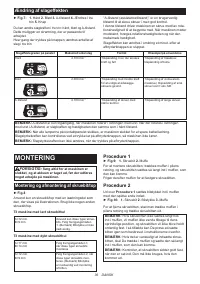
Installing hook
CAUTION:
When installing the hook, always
secure it with the screw firmly.
If not, the hook
may come off from the tool and result in the personal
injury.
CAUTION:
Use the hanging/mounting parts
for their intended purposes only.
Using for unin-
tended purpose may cause accident or personal
injury.
►
Fig.11:
1.
Groove
2.
Hook
3.
Screw
The hook is convenient for temporarily hanging the tool.
This can be installed on either side of the tool. To install
the hook, insert it into a groove in the tool housing on
either side and then secure it with a screw. To remove,
loosen the screw and then take it out.
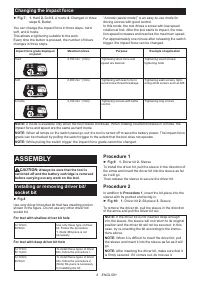
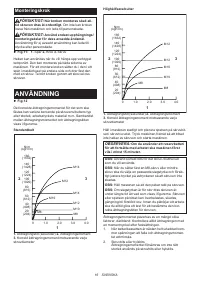
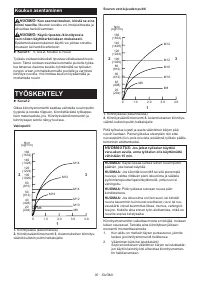
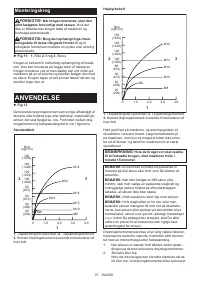
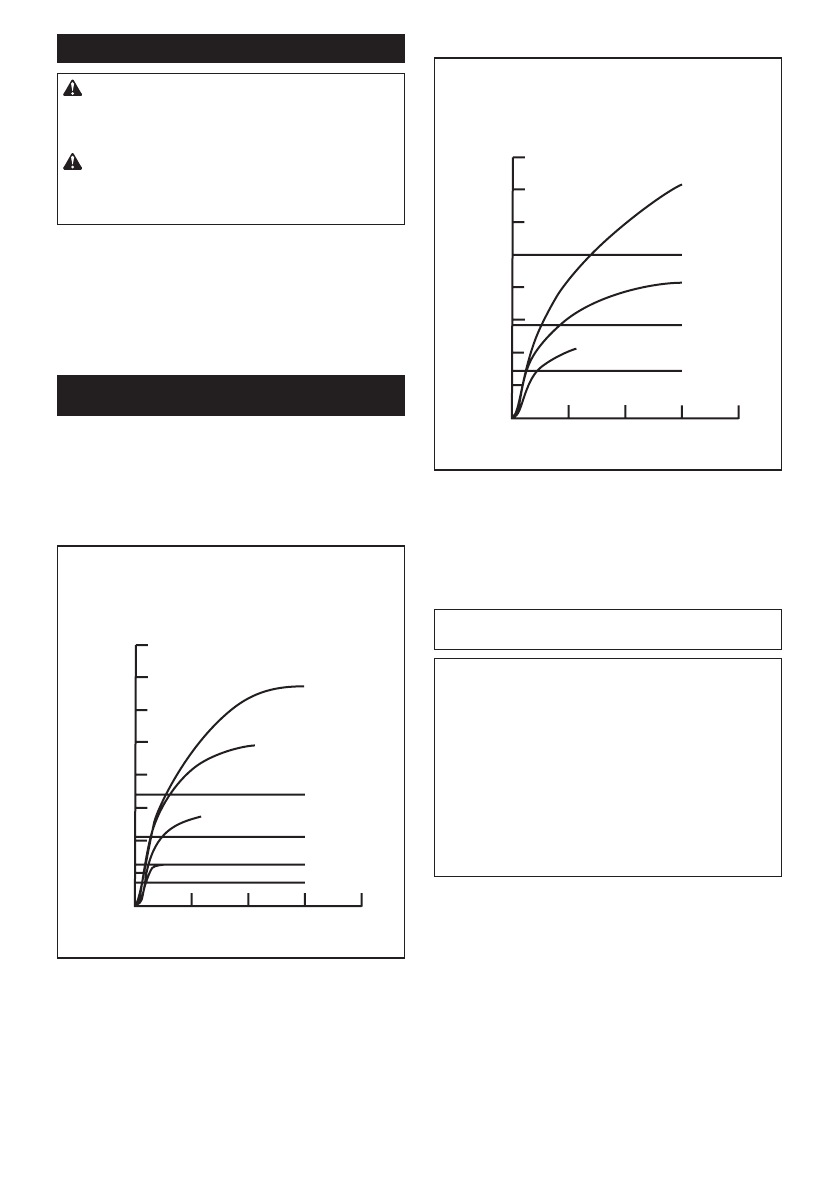
OPERATION
►
Fig.12
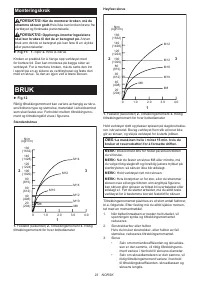
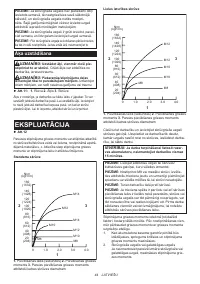
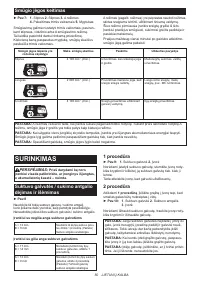
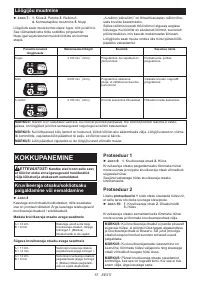
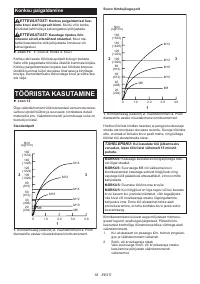
The proper fastening torque may differ depending upon
the kind or size of the screw/bolt, the material of the
workpiece to be fastened, etc. The relation between fas-
tening torque and fastening time is shown in the figures.
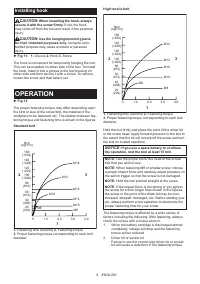
Standard bolt
2
1
N•m
(kgf•cm)
160
(1632)
140
(1428)
120
(1224)
100
(1020)
80
(816)
60
(612)
40
(408)
20
(204)
0
M14
M14
M12
M12
M10
M10
M8
M8
2.0
3.0
4.0
1.0
3
1.
Fastening time (second)
2.
Fastening torque
3.
Proper fastening torque corresponding to each bolt
diameter
High tensile bolt
2
3
1
N•m
(kgf•cm)
160
(1632)
140
(1428)
120
(1224)
100
(1020)
80
(816)
60
(612)
40
(408)
20
(204)
0
M12
M12
M10
M10
M8
M8
2.0
3.0
4.0
1.0
1.
Fastening time (second)
2.
Fastening torque
3.
Proper fastening torque corresponding to each bolt
diameter
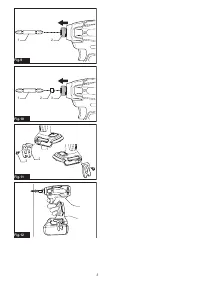
Hold the tool firmly and place the point of the driver bit
in the screw head. Apply forward pressure to the tool to
the extent that the bit will not slip off the screw and turn
the tool on to start operation.
NOTICE:
If you use a spare battery to continue
the operation, rest the tool at least 15 min.
NOTE:
Use the proper bit for the head of the screw/
bolt that you wish to use.
NOTE:
When fastening M8 or smaller screw, choose
a proper impact force and carefully adjust pressure on
the switch trigger so that the screw is not damaged.
NOTE:
Hold the tool pointed straight at the screw.
NOTE:
If the impact force is too strong or you tighten
the screw for a time longer than shown in the figures,
the screw or the point of the driver bit may be over
-
stressed, stripped, damaged, etc. Before starting your
job, always perform a test operation to determine the
proper fastening time for your screw.
The fastening torque is affected by a wide variety of
factors including the following. After fastening, always
check the torque with a torque wrench.
1. When the battery cartridge is discharged almost
completely, voltage will drop and the fastening
torque will be reduced.
2. Driver bit or socket bit
Failure to use the correct size driver bit or socket
bit will cause a reduction in the fastening torque.
Содержание
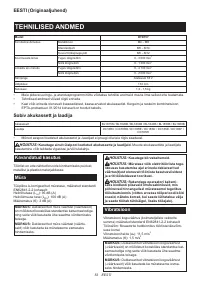
- 60 ТЕХНИЧЕСКИЕ ХАРАКТЕРИСТИКИ; Подходящий блок аккумулятора и зарядное устройство; Вибрация
- 61 МЕРЫ БЕЗОПАСНОСТИ; Сохраните брошюру с инструк
- 62 СОХРАНИТЕ ДАННЫЕ
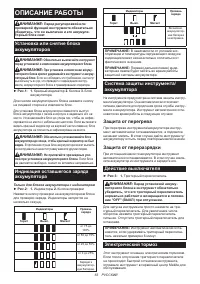
- 63 ОПИСАНИЕ РАБОТЫ; Защита от перегрева
- 64 Включение передней лампы
- 65 СБОРКА; Установка или снятие насадки для; ЭКСПЛУАТАЦИЯ
- 67 ОБСЛУЖИВАНИЕ
Характеристики

Остались вопросы?Не нашли свой ответ в руководстве или возникли другие проблемы? Задайте свой вопрос в форме ниже с подробным описанием вашей ситуации, чтобы другие люди и специалисты смогли дать на него ответ. Если вы знаете как решить проблему другого человека, пожалуйста, подскажите ему :)


