
Шуруповерты Makita DF332DWAE - инструкция пользователя по применению, эксплуатации и установке на русском языке. Мы надеемся, она поможет вам решить возникшие у вас вопросы при эксплуатации техники.
Если остались вопросы, задайте их в комментариях после инструкции.
"Загружаем инструкцию", означает, что нужно подождать пока файл загрузится и можно будет его читать онлайн. Некоторые инструкции очень большие и время их появления зависит от вашей скорости интернета.


8 ENGLISH
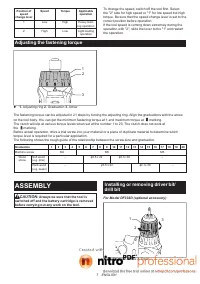
Turn the sleeve counterclockwise to open the chuck
jaws. Place the driver bit/drill bit in the chuck as far
as it will go. Turn the sleeve clockwise to tighten the
chuck. To remove the driver bit/drill bit, turn the sleeve
counterclockwise.
Installing or removing driver bit/
socket bit
For Model DF032D (optional accessory)
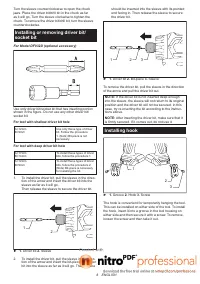
Use only driver bit/socket bit that has inserting portion
shown in the figure. Do not use any other driver bit/
socket bit.
For tool with shallow driver bit hole
A=12mm
B=9mm
Use only these type of driver
bit. Follow the procedure
1. (Note) Bit-piece is not
necessary.
For tool with deep driver bit hole
A=17mm
B=14mm
To install these types of driver
bits, follow the procedure 1.
A=12mm
B=9mm
To install these types of driver
bits, follow the procedure 2.
(Note) Bit-piece is necessary
for installing the bit.
1.
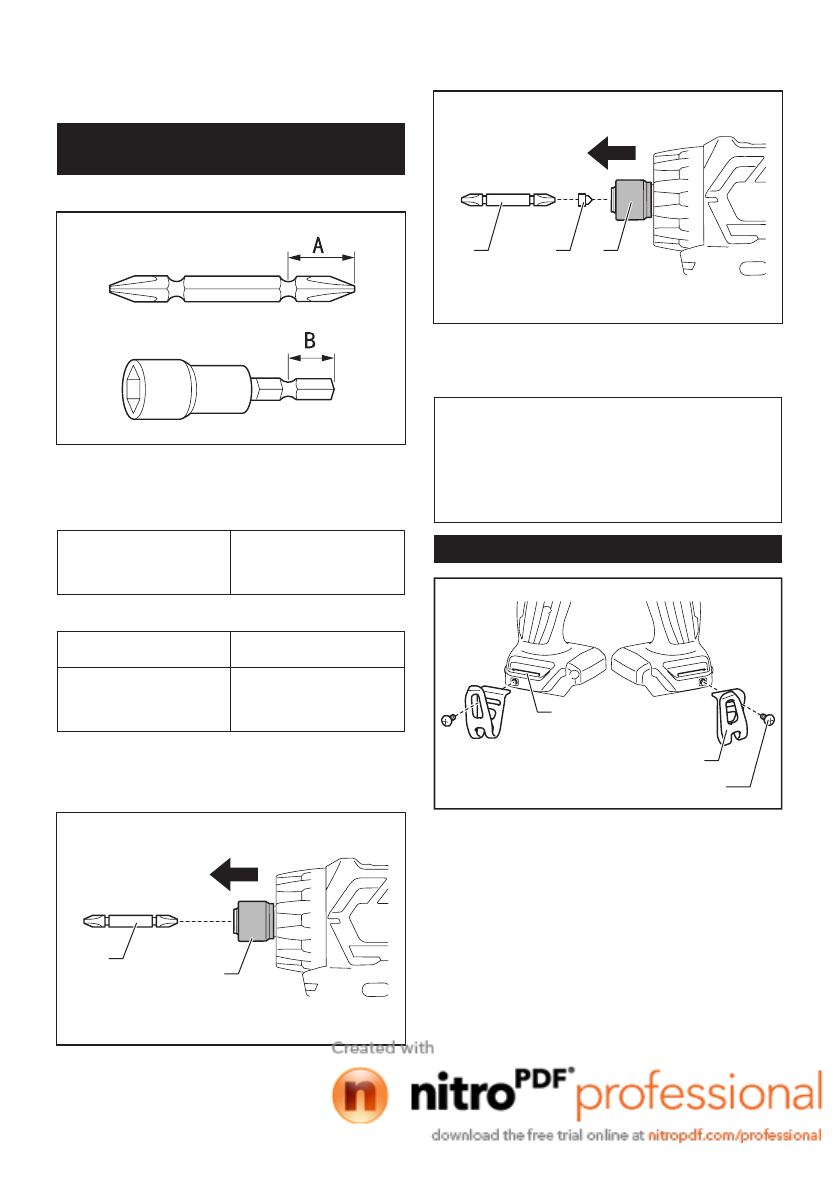
To install the driver bit, pull the sleeve in the direc-
tion of the arrow and insert the driver bit into the
sleeve as far as it will go.
Then release the sleeve to secure the driver bit.
2
1
►
1.
Driver bit
2.
Sleeve
2.
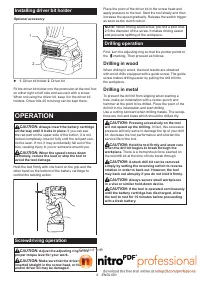
To install the driver bit, pull the sleeve in the direc-
tion of the arrow and insert the bit-piece and driver
bit into the sleeve as far as it will go. The bit-piece
should be inserted into the sleeve with its pointed
end facing in. Then release the sleeve to secure
the driver bit.
1
2
3
►
1.
Driver bit
2.
Bit-piece
3.
Sleeve
To remove the driver bit, pull the sleeve in the direction
of the arrow and pull the driver bit out.
NOTE:
If the driver bit is not inserted deep enough
into the sleeve, the sleeve will not return to its original
position and the driver bit will not be secured. In this
case, try re-inserting the bit according to the instruc-
tions above.
NOTE:
After inserting the driver bit, make sure that it
is firmly secured. If it comes out, do not use it.
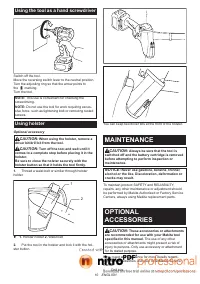
Installing hook
1
2
3
►
1.
Groove
2.
Hook
3.
Screw
The hook is convenient for temporarily hanging the tool.
This can be installed on either side of the tool. To install
the hook, insert it into a groove in the tool housing on
either side and then secure it with a screw. To remove,
loosen the screw and then take it out.


