
Шуруповерты Makita BTP141RFE - инструкция пользователя по применению, эксплуатации и установке на русском языке. Мы надеемся, она поможет вам решить возникшие у вас вопросы при эксплуатации техники.
Если остались вопросы, задайте их в комментариях после инструкции.
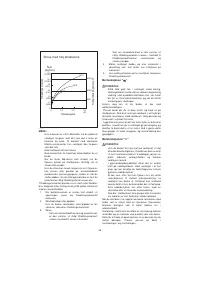
"Загружаем инструкцию", означает, что нужно подождать пока файл загрузится и можно будет его читать онлайн. Некоторые инструкции очень большие и время их появления зависит от вашей скорости интернета.


6
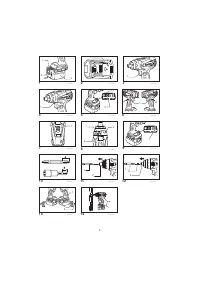
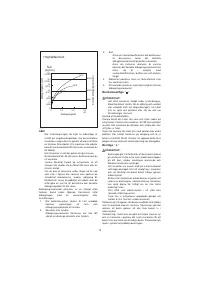
Switch action
Fig.3
CAUTION:
•
Before installing the battery cartridge into the tool,
always check to see that the switch trigger actuates
properly and returns to the "OFF" position when
released.
To start the tool, simply pull the switch trigger. The tool
speed is increased by increasing pressure on the switch
trigger. Release the switch trigger to stop.
NOTE:
•
The tool will stop three minutes after pulling the
switch trigger.
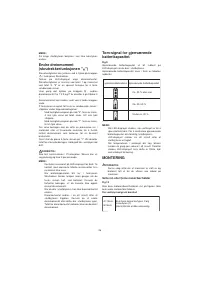
Lighting up the front lamp
CAUTION:
•
Do not look in the lamp or see the source of lamp
directly.
Fig.4
Fig.5
Every time the lamp button
on the LED display is
pressed, the lamp status is alternatively changed from
the ON to the OFF and from the OFF to the ON.
With the lamp button in the ON status, pull the switch
trigger to turn on the lamp. To turn off, release it and the
lamp goes out approximately 10 seconds after releasing.
With the lamp button in the OFF status, even if the trigger
is pulled, the lamp will not light on.
NOTE:
•
To make sure the status of lamp, pull the trigger.
When the lamp lights up by pulling the switch
trigger, the lamp switch is in the ON status. When
the lamp does not come on, the lamp switch is in
the OFF status.
•
During the operation of switch trigger, the lamp
status cannot be changed.
•
For approximately 10 seconds after releasing the
switch trigger, the lamp status can be switched.
Reversing switch action
Fig.6
This tool has a reversing switch to change the direction of
rotation. Depress the reversing switch lever from the A
side for clockwise rotation or from the B side for
counterclockwise rotation.
When the reversing switch lever is in the neutral position,
the switch trigger cannot be pulled.
CAUTION:
•
Always check the direction of rotation before
operation.
•
Use the reversing switch only after the tool comes
to a complete stop. Changing the direction of
rotation before the tool stops may damage the tool.
•
When not operating the tool, always set the
reversing switch lever to the neutral position.
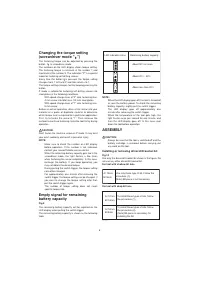
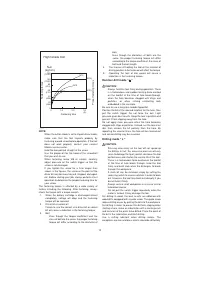
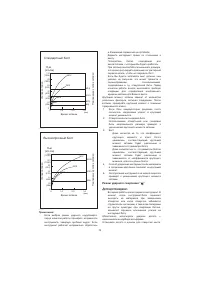
Speed change
Fig.7
NOTICE:
•
Always set the speed change lever fully to the
correct position. If you operate the tool with the
speed change lever positioned halfway between
the "1" side and "2" side, the tool may be damaged.
•
Do not use the speed change lever while the tool is
running. The tool may be damaged.
•
Do not force the lever to "1" side with impact driver
mode. The tool may be damaged.
To change the speed, first switch off the tool and then
slide the speed change lever to the "2" side for high
speed or "1" side for low speed. Be sure that the speed
change lever is set to the correct position before
operation. Use the right speed for your job.
When turning the action mode changing ring to impact
driver mode, set the speed change lever to the "2" side.
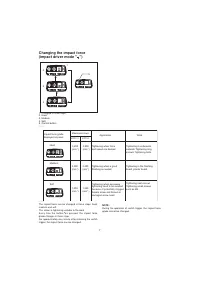
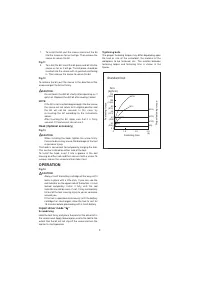
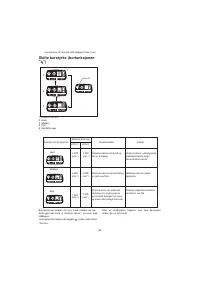
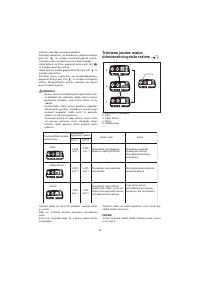
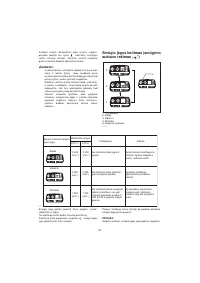
Selecting the action mode
Fig.8
This tool employs an action mode changing ring. Select
one of the 4 modes suitable for your work need by turning
this ring.
When driving wood screws or bolts, point the arrow at the
mark for impact driver mode. The impact force can be
adjusted on the LED display.
When drilling into concrete or tiles, point the arrow at the
mark for hammer drill mode.
When drilling into wood or metal, point the arrow at the
mark for drill mode.
When driving small wood screws or machine screws,
point the arrow at the
mark for screwdriver mode. The
fastening torque can be adjusted on the LED display.
CAUTION:
•
Always set the arrow correctly to either mode mark.
If you operate the tool with the action mode
changing ring positioned halfway between the
mode marks, the tool may be damaged.
•
When turning the action mode changing ring, make
sure that the tool stops. If the ring does not easily
move, pull the switch trigger slightly to rotate the
spindle and then move the ring.
•
In the hammer drill mode or drill mode, the blowing
force or torque is not adjustable. In those modes,
the number on the LED display will be off.


