
Шуруповерты Makita BTP141RFE - инструкция пользователя по применению, эксплуатации и установке на русском языке. Мы надеемся, она поможет вам решить возникшие у вас вопросы при эксплуатации техники.
Если остались вопросы, задайте их в комментариях после инструкции.
"Загружаем инструкцию", означает, что нужно подождать пока файл загрузится и можно будет его читать онлайн. Некоторые инструкции очень большие и время их появления зависит от вашей скорости интернета.


9
1.
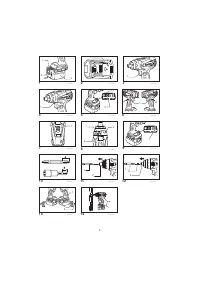
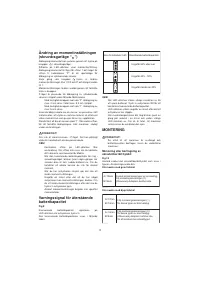
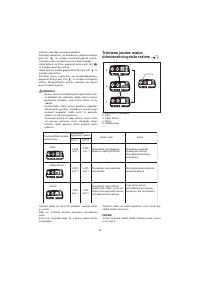
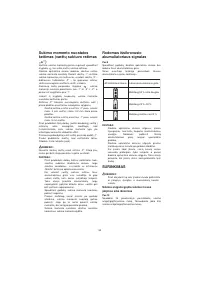
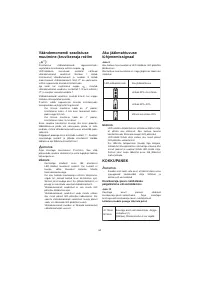
To install the bit, pull the sleeve and insert the bit
into the sleeve as far as it will go. Then release the
sleeve to secure the bit.
Fig.11
2.
To install the bit, insert the bit-piece and bit into the
sleeve as far as it will go. The bit-piece should be
inserted into the sleeve with its pointed end facing
in. Then release the sleeve to secure the bit.
Fig.12
To remove the bit, pull the sleeve in the direction of the
arrow and pull the bit out firmly.
CAUTION:
•
Do not touch the drill bit shortly after operating as it
gets hot. Replace the drill bit after cooling it down.
NOTE:
•
If the bit is not inserted deep enough into the sleeve,
the sleeve will not return to its original position and
the bit will not be secured. In this case, try
re-inserting the bit according to the instructions
above.
•
After inserting the bit, make sure that it is firmly
secured. If it comes out, do not use it.
Hook (Optional accessory)
Fig.13
CAUTION:
•
When installing the hook, tighten the screw firmly.
Failure to do so may cause the breakage of the tool
or personal injury.
The hook is convenient for temporarily hanging the tool.
This can be installed on either side of the tool.
To install the hook, insert it into a groove in the tool
housing on either side and then secure it with a screw. To
remove, loosen the screw and then take it out.
OPERATION
Fig.14
CAUTION:
•
Always insert the battery cartridge all the way until it
locks in place with a little click. If you can see the
red indicator on the upper side of the button, it is not
locked completely. Install it fully until the red
indicator cannot be seen. If not, it may accidentally
fall out of the tool, causing injury to you or someone
around you.
•
If the tool is operated continuously until the battery
cartridge has discharged, allow the tool to rest for
15 minutes before proceeding with a fresh battery.
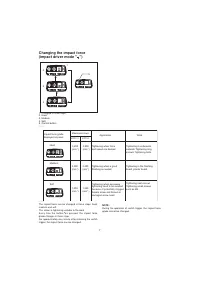
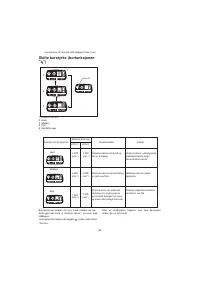
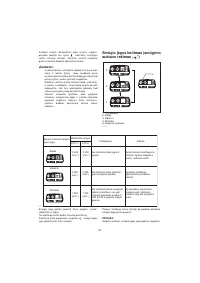
Impact driver mode "
"
Screwdriving
Hold the tool firmly and place the point of the driver bit in
the screw head. Apply forward pressure to the tool to the
extent that the bit will not slip off the screw and turn the
tool on to start operation.
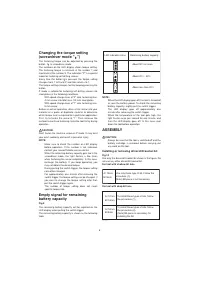
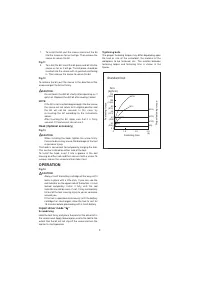
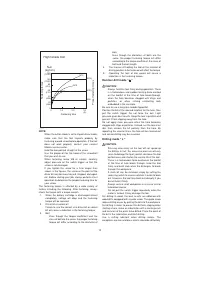
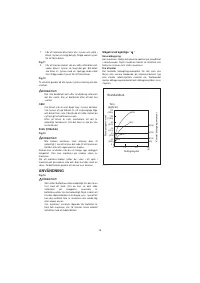
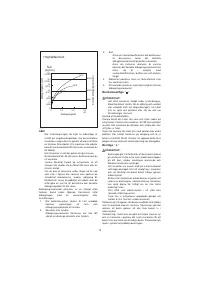
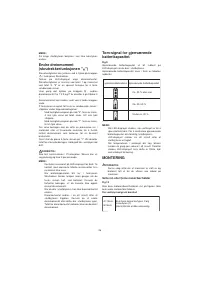
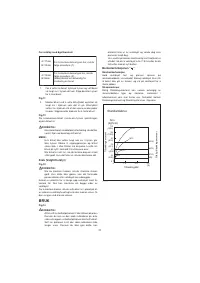
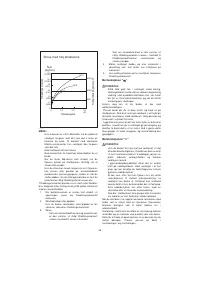
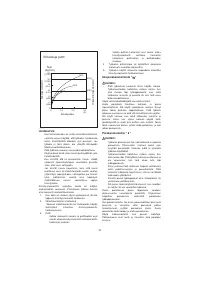
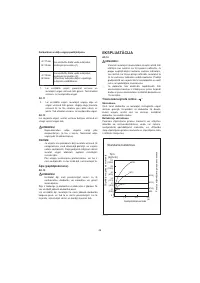
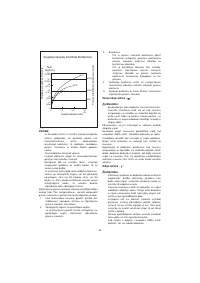
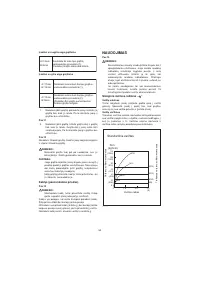
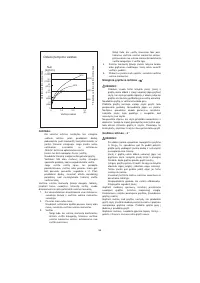
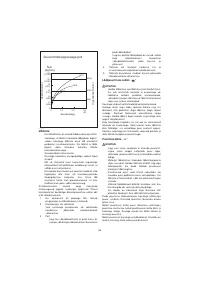
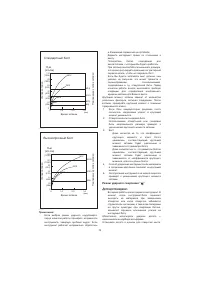
Tightening bolts
The proper fastening torque may differ depending upon
the kind or size of the screw/bolt, the material of the
workpiece to be fastened, etc. The relation between
fastening torque and fastening time is shown in the
figures.
120
100
80
60
40
20
Standard bolt
N m
Fastening torque
Fastening time
Proper fastening torque
(kgf cm)
(1224)
(1020)
(816)
(612)
(408)
(204)
(S)
0
1.0
2.0
3.0
(M14)
(M12)
(M10)
(M8)
0
M14
M12
M10
M8
012423


