
Шуруповерты Hitachi DV14DJL-RF - инструкция пользователя по применению, эксплуатации и установке на русском языке. Мы надеемся, она поможет вам решить возникшие у вас вопросы при эксплуатации техники.
Если остались вопросы, задайте их в комментариях после инструкции.
"Загружаем инструкцию", означает, что нужно подождать пока файл загрузится и можно будет его читать онлайн. Некоторые инструкции очень большие и время их появления зависит от вашей скорости интернета.


English
9
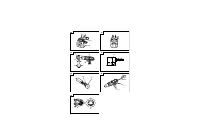
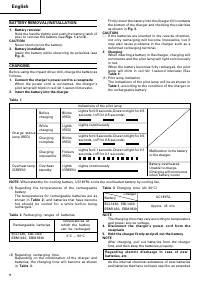
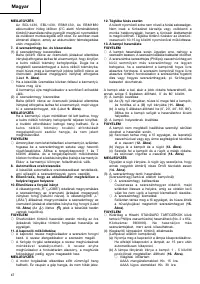
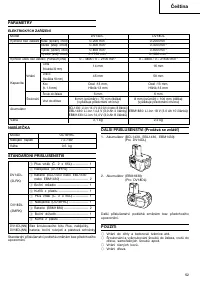
BATTERY REMOVAL/INSTALLATION
1. Battery removal
Hold the handle tightly and push the battery latch (2
pcs.) to remove the battery (see
Figs. 1
and
2
).
CAUTION
Never short-circuit the battery.
2. Battery installation
Insert the battery while observing its polarities (see
Fig. 2
).
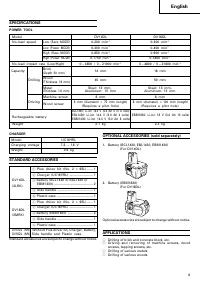
CHARGING
Before using the impact driver drill, charge the battery as
follows.
1. Connect the charger’s power cord to a receptacle
When the power cord is connected, the charger’s
pilot lamp will blink in red (At 1-second intervals).
2. Insert the battery into the charger
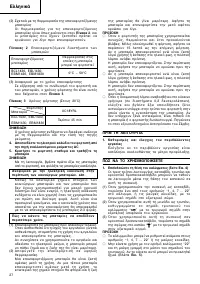
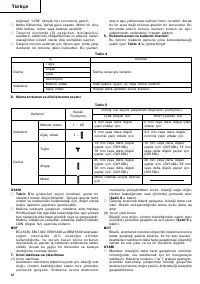
(2) Regarding the temperatures of the rechargeable
battery
The temperatures for rechargeable batteries are as
shown in
T a b l e 2
, and batteries that have become
hot should be cooled for a while before being
recharged.
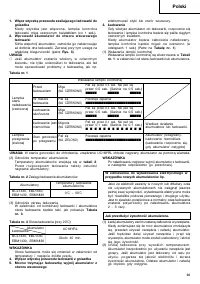
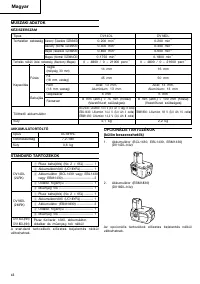
Table 2
Recharging ranges of batteries
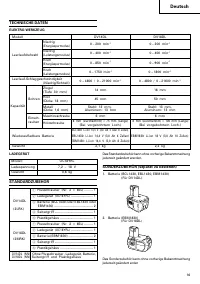
(3) Regarding recharging time
Depending on the combination of the charger and
batteries, the charging time will become as shown
in
Table 3
.
Table 3
Charging time (At 20°C)
NOTE
The charging time may vary according to temperature
and power source voltage.
4. Disconnect the charger’s power cord from the
receptacle
5. Hold the charger firmly and pull out the battery
NOTE
After charging, pull out batteries from the charger
first, and then keep the batteries properly.
R e g a r d i n g e l e c t r i c d i s c h a r g e i n c a s e o f n e w
batteries, etc.
As the internal chemical substance of new batteries
and batteries that have not been used for an extended
Charger
UC18YRL
Battery
BCL1430, EBL1430
EBM1430, EBM1830
Approx. 45 min.
Temperatures at
Rechargeable batteries
which the battery
can be recharged
BCL1430, EBL1430
EBM1430, EBM1830
0°C – 50°C
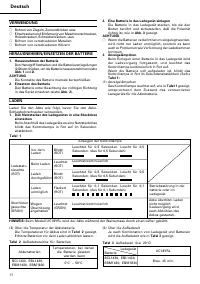
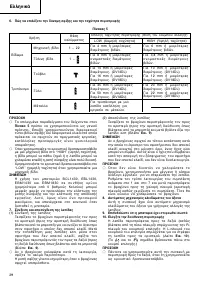
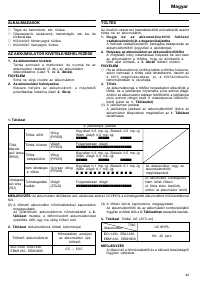
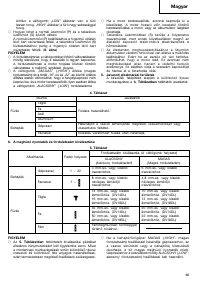
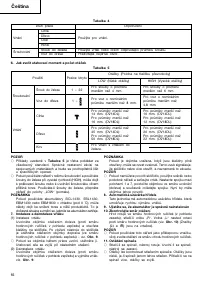
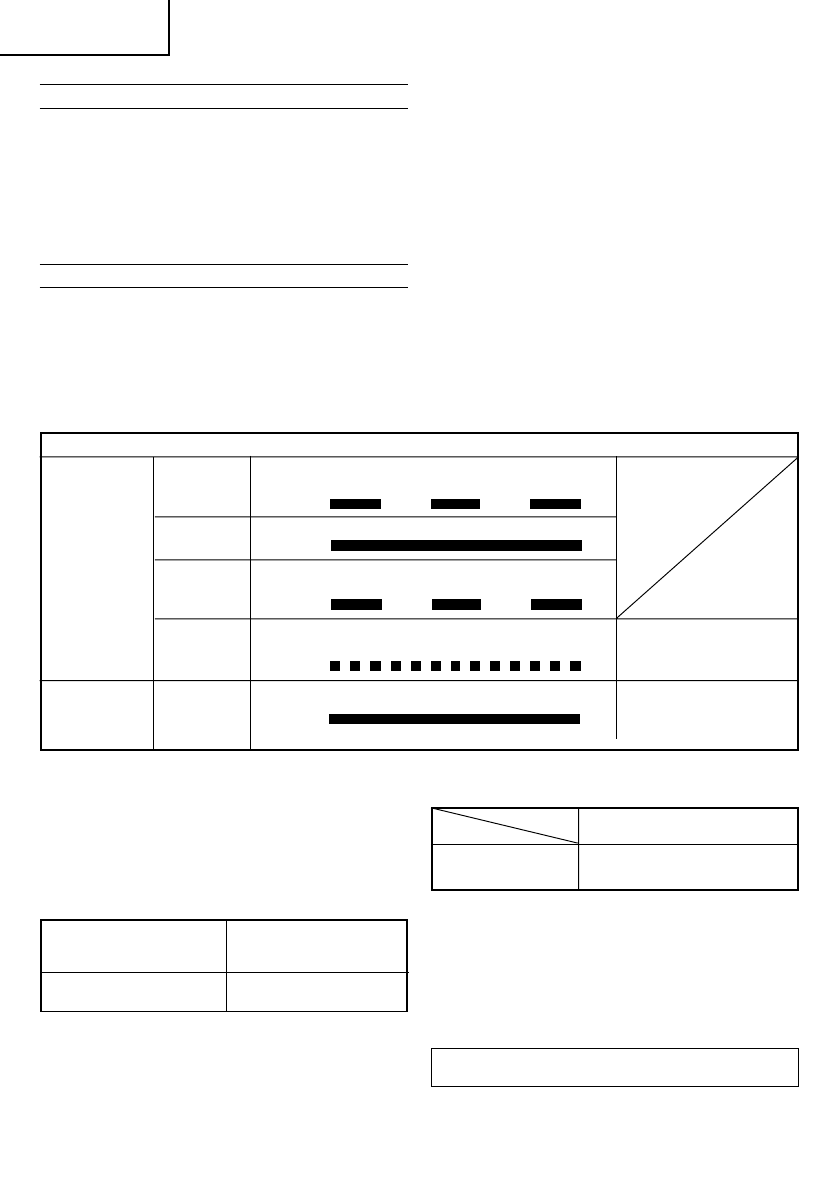
Lights for 0.5 seconds. Does not light for 0.5
seconds. (off for 0.5 seconds)
Lights continuously
Lights for 0.5 seconds. Does not light for 0.5
seconds. (off for 0.5 seconds)
Lights for 0.1 seconds. Does not light for 0.1
seconds. (off for 0.1 seconds)
Lights continuously
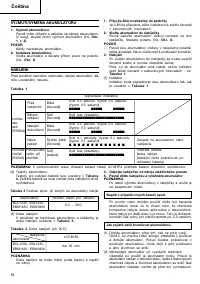
Before
charging
While
charging
Charging
complete
Charging
impossible
Blinks
(RED)
Lights
(RED)
Blinks
(RED)
Flickers
(RED)
Lights
(GREEN)
Malfunction in the battery
or the charger.
Battery overheated.
Unable to charge.
(Charging will commence
when battery cools)
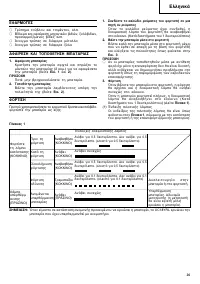
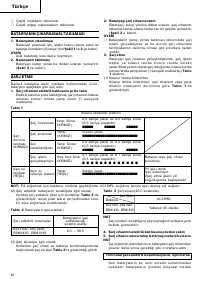
Table 1
Indications of the pilot lamp
Overheat lamp
(GREEN)
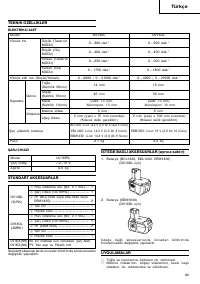
Firmly insert the battery into the charger till it contacts
the bottom of the charger and checking the polarities
as shown in
Fig. 3
.
CAUTION
䡬
If the batteries are inserted in the reverse direction,
not only recharging will become impossible, but it
may also cause problems in the charger such as a
deformed recharging terminal.
3. Charging
When inserting a battery in the charger, charging will
commence and the pilot lamp will light continuously
in red.
When the battery becomes fully recharged, the pilot
lamp will blink in red (At 1-second intervals) (See
Table 1
).
(1) Pilot lamp indication
The indications of the pilot lamp will be as shown in
Table 1
, according to the condition of the charger or
the rechargeable battery.
Overheat
standby
Charge status
lamp (RED)
NOTE:
When standby for cooling battery, UC18YRL cools the overheated battery by cooling fan.


