
Шуруповерты Felisatti D13/700GE - инструкция пользователя по применению, эксплуатации и установке на русском языке. Мы надеемся, она поможет вам решить возникшие у вас вопросы при эксплуатации техники.
Если остались вопросы, задайте их в комментариях после инструкции.
"Загружаем инструкцию", означает, что нужно подождать пока файл загрузится и можно будет его читать онлайн. Некоторые инструкции очень большие и время их появления зависит от вашей скорости интернета.


5
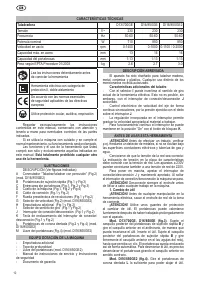
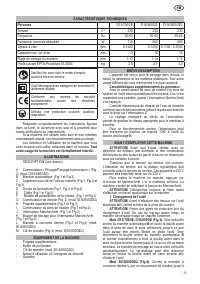
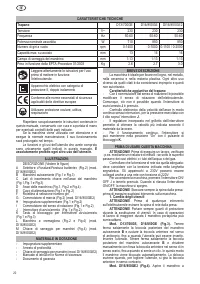
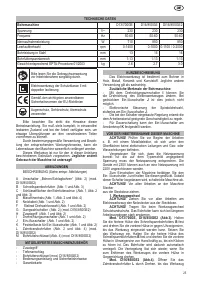
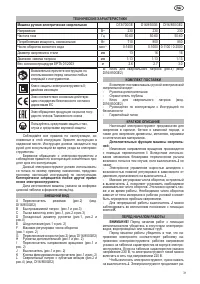
TECHNICAL DATA
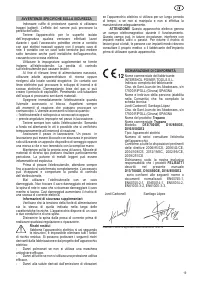
Read the instruction manual completely and
carefully before using the power tool.
Protection category II power tool; double
insulated
In accordance with essential applicable safety
standards of European directives
Wear eye, ear and breath protection
Follow very carefully the instructions in this manual,
save it and keep it close at hand, ready to carry out any
inspection of parts that may be necessary.
If the tool is used with care and normal maintenance is
carried out, it will work well for a long time.
The functions and use of the tool you have
bought shall be only those described in this manual.
Any other use of the tool is strictly forbidden.
ILLUSTRATIONS
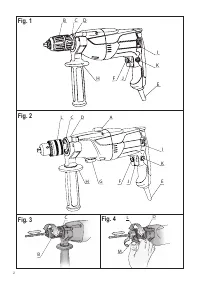
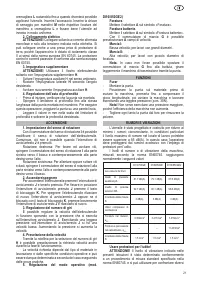
DESCRIPTION (See figures)
A “Drilling/Impact Drilling” selector switch (Fig.2) (mod.
DI16/850GE2)
B Keyless chuck (Fig.1 and Fig.3)
C Drill chuck shaft gap (Fig.1, Fig.2 and Fig.3)
D Machine neck (Fig.1, Fig.2 and Fig.4)
E Supply cord (Fig.1 and Fig.2)
F Thumbwheel for speed preselection (Fig.1 and Fig.2)
G Gear selector (Fig.2) (mod. DI16/850GE2)
H Auxiliary grip (Fig.1 and Fig.2)
I Rotational direction switch (Fig.1 and Fig.2)
J On-/off switch (Fig.1 and Fig.2)
K Retainer button (Fig.1 and Fig.2)
L Key type drill chuck (Fig.2 and Fig.4) (mod.
DI16/850GE2)
M Drill chuck key (Fig.4) (mod. DI16/850GE2)
EQUIPMENT
- Auxiliary handle
- Depth gauge
- Drill chuck key (mod. DI16/850GE2)
- Operating instructions with Safety instructions
- Warranty
BRIEF DESCRIPTION
The machine is intended for drilling in wood, metal,
ceramic and plastic. Any other use not mentioned is not
allowed.
Additional drill characteristics
- The rotational direction switch
I
is used to reverse the
rotational direction of the machine. However, this is not
possible with the On/Off switch
J
actuated.
- Electronic control of spindle speed, infinitely variable
by finger pressure on the On/off switch
J
.
- The electronic regulation built-in the switch trigger
F
allows to adjust the speed suitable for the material to be
worked.
- For continuous operation the On-/Off switch can be
locked in the “On” position by the button
K
.
BEFORE USING THIS TOOL
WARNING!
Before carrying out any work, check, for
instance, using a metal detector, that there are no electric
wires or gas or water pipes under the surfaces you wish to
work on.
Make sure the mains voltage is correct: it must be
the same as that on the specification label. Machines with
230V can also be connected to a 220V mains supply.
To turn the machine on, press the ON/OFF switch J
and keep it pressed down.
When the ON/OFF switch is released, the machine
stops.
WARNING!
Always disconnect the plug from the
socket before doing any work on the machine.
1. Changing the Tool
WARNING!
Before any work on the machine itself,
pull the mains plug.
WARNING!
Wear protective gloves when changing
the tool. The drill chuck can become very hot during longer
work periods.
For mod. D13/700GE, D16/850GE (fig.3). Hold the
rear sleeve of the keyless chuck
B
tight and turn the front
sleeve in opposite rotation direction shown on fig.3, until
the tool can be inserted. Insert the tool. Hold the rear
sleeve of the keyless chuck
B
tight and firmly tighten the
front sleeve by hand in direction as shown on fig.3, until
the locking action (click) is heard. The drill chuck is locked
automatically. The locking is released again to remove
the tool when the front sleeve is turned in the opposite
direction.
For mod. DI16/850GE2 (fig.4). Open the key type
drill chuck
L
by turning until the tool can be inserted. Insert
the tool. Insert the chuck key
M
into the corresponding
holes of the key type drill chuck
L
and clamp the tool
uniformly.
2. Mains connection
WARNING!
Connect only to a single-phase AC
current supply and only to the mains voltage specified
on the rating plate. Connection to sockets without earth
protection is possible as the appliance features protective
Drill
D13/700GE
D16/850GE
DI16/850GE2
Rated voltage
V~
230
230
230
Frequency
Hz
50-60
50-60
50-60
Rated power
W
710
850
850
No load speed
rpm
0-1400
0-1000
0-1100 / 0-2500
Max. steel capacity
mm
13
16
16
Chuck clamping range
mm
1-13
1-13
1-13
Weight according EPTA-Procedure 01/2003
kg
2.6
2.7
3.0


