
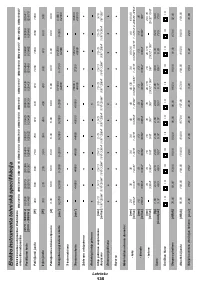
Шуруповерты DWT SBM-1050 DT 5.1.24 - инструкция пользователя по применению, эксплуатации и установке на русском языке. Мы надеемся, она поможет вам решить возникшие у вас вопросы при эксплуатации техники.
Если остались вопросы, задайте их в комментариях после инструкции.
"Загружаем инструкцию", означает, что нужно подождать пока файл загрузится и можно будет его читать онлайн. Некоторые инструкции очень большие и время их появления зависит от вашей скорости интернета.


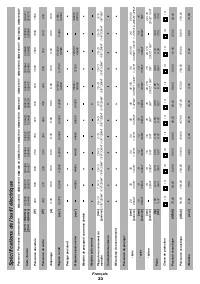


English
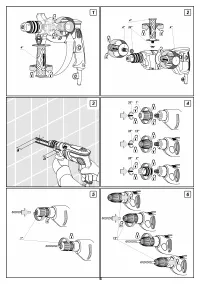
Replacing the sanding disc
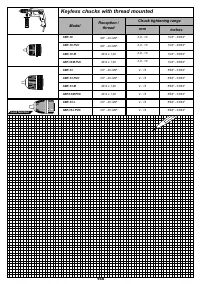
Move the clutch in the back part of keyless chuck (with
lock)
12
back until it clicks into position (see picture 6).
Move the cams of keyless chuck (with lock)
12
apart
With a screwdriver (not supplied with the power tool),
release screw
25
.
at the distance allowing an accessory to be mounted /
replaced. To do that, rotate the front part of keyless
Remove worn out sanding disc
23
.
chuck
12
counter-clockwise with your hand.
Install washer
24
and new sanding disc
23
onto screw
25
.
Mount / replace an accessory.
With a screwdriver (is not supplied with the power
Rotate the front part of keyless chuck (with lock)
12
tool), tighten screw
25
in the threaded opening of rubber
clockwise with your hand to lock the accessory sanding plate
22
.
mounted. Do not allow the accessory to become
distorted.
Assembling the rubber sanding plate (velcro-type)
To fix the lock, move the clutch in the back part of
keyless chuck (with lock)
12
forward until it clicks into
Press sanding disc (velcro-type)
27
tightly to the
position.
surface of rubber sanding plate (velcro-type)
26
, having
previously joined their edges (see picture 10).
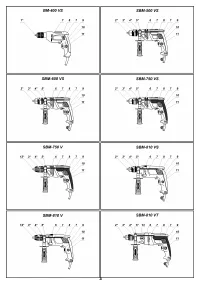
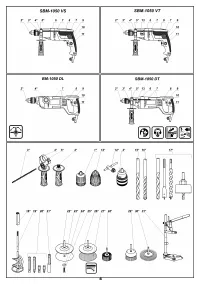
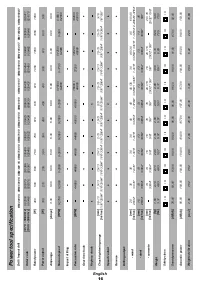
[SBM-500 VS, SBM-600 VS, SBM-750 VS, SBM-810 VS,
Mount rubber sanding plate (velcro-type)
26
as
SBM-810 VT, SBM-1050 VS, SBM-1050 VT, BM-1050 DL,
described above.
SBM-1050 DT]
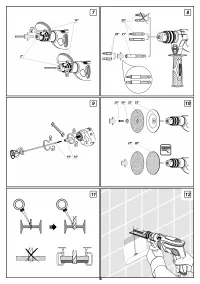
Replacing the sanding disc (velcro-type)
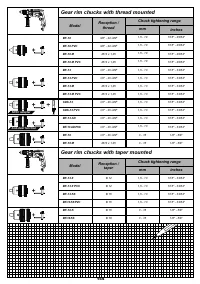
Release the cams grip with clamping wrench
14
, then
rotate the quill of gear rim chuck
2
counter-clockwise
Hock the edge of worn out sanding disc (velcro-type)
27
with your hand (see picture 7) until the cams move apart
and remove it by pulling it by the edges.
at the distance allowing an accessory to be mounted /
replaced.
Press new sanding disc (velcro-type)
27
tightly to the
Mount / replace an accessory.
surface of the rubber sanding plate (velcro-type)
26
,
having previously joined their edges.
Rotate the quill of gear rim chuck
2
clockwise with
your hand in order to lock the accessory mounted. Do
not allow the accessory to become distorted.
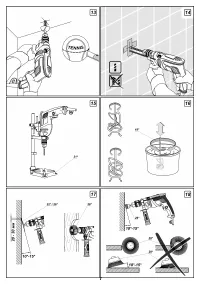
Initial operating
Tighten the cams of gear rim chuck
2
with clamping
wrench
14
applying a similar torque to each of the three
openings on the side surface of the chuck.
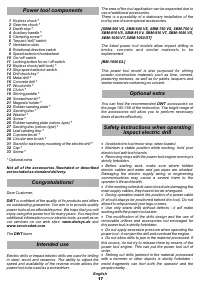
Always use the correct supply voltage: the power supply
voltage must match the information quoted on the tool
Screwdriver bit
identification plate.
When using the power tool as a screwdriver, use
magnetic holder
21
for reliable locking of screwdriver
Switching On / Off
bits
20
(see picture 8). A magnetic holder is not needed
for extended screwdriver bits
20
(specially purposed for
Short-term switching on / off
screwdrivers).
To switch on, press and hold on / off switch
10
, to switch
Mounting / dismounting the stirring paddle
off - release it.
[BM-1050 DL]
Long-term switching on / off
Dismount gear rim chuck
2
, as described above.
Switching on:
With a horn wrench (not supplied with the power tool)
Push on / off switch
10
and lock it in the position with
screw clutch
18
onto the power tool spindle (see picture 9).
locking button for on / off switch
11
.
Holding clutch
18
with a horn wrench (not supplied
Switching off:
with the power tool) screw stirring paddle
19
into it.
Push and release on / off switch
10
.
To dismount stirring paddle
19
, repeat the
aforementioned operations in reverse order.
Switching between operation modes
Assembling the rubber sanding plate
Switch
6
is purposed for switching between the following
Install washer
24
and sanding disc
23
onto screw
25
operation modes of the power tool:
(see picture 10).
drilling, screwing, unscrewing
- drilling without
With a screwdriver (is not supplied with the power
impact in wood, synthetic materials, metal. Screwing
tool), tighten screw
25
in the threaded opening of rubber
and unscrewing fastening components;
sanding plate
22
.
impact drilling
- impact drilling in brick, concrete,
Mount rubber sanding plate
22
as it is described
above.
natural stone.
19


