
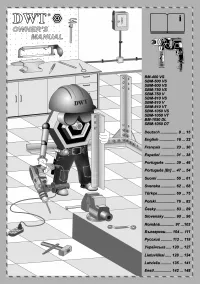
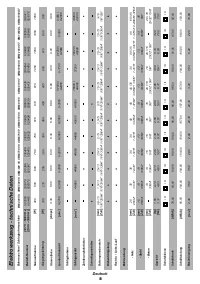
Шуруповерты DWT SBM-1050 DT 5.1.24 - инструкция пользователя по применению, эксплуатации и установке на русском языке. Мы надеемся, она поможет вам решить возникшие у вас вопросы при эксплуатации техники.
Если остались вопросы, задайте их в комментариях после инструкции.
"Загружаем инструкцию", означает, что нужно подождать пока файл загрузится и можно будет его читать онлайн. Некоторые инструкции очень большие и время их появления зависит от вашей скорости интернета.


English
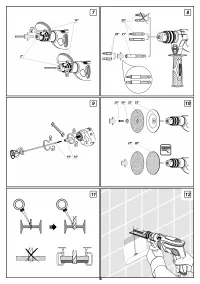
Avoid overheating your electric tool, when using it for
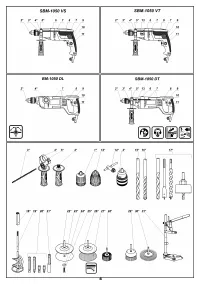
Lock keyless chuck
1
or
12
on the power tool spindle,
a long time.
having tightened screw
33
.
Attention: screw
33
has a
left-hand thread
. Prior to that, move the cams of
keyless chuck
1
or
12
apart at the distance allowing
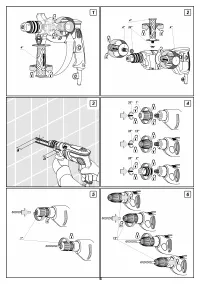
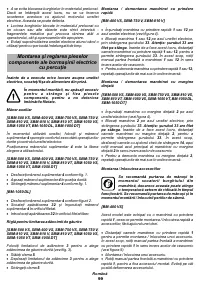
Mounting and adjustment of the
screw
33
to be tightened. To do that, rotate the front part
impact electric drill components
of keyless chuck
1
or
12
counter-clockwise with your
hand.
When keyless chuck
1
or
12
is being dismounted,
Before carrying out any works on the power tool it
repeat the aforementioned operations in reverse order.
must be disconnected from the mains.
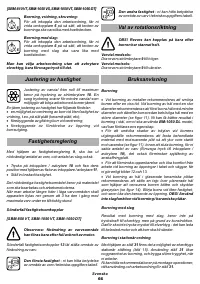
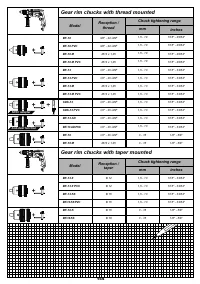
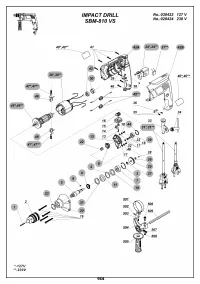
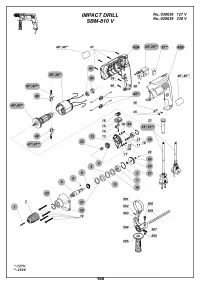
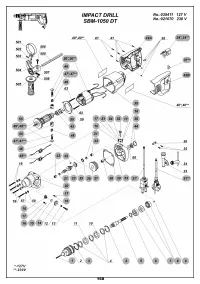
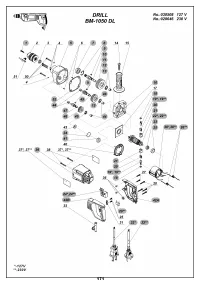
Mounting / dismounting of the gear rim chuck
W h e n i m p l e m e n t i n g t h e m o u n t i n g
operations, do not apply excessive force
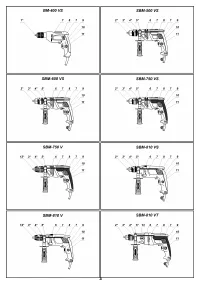
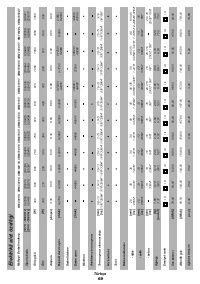
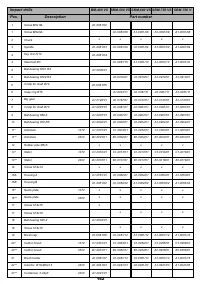
d u r i n g t h e t i g h t e n i n g f a s t e n i n g o f [SBM-500 VS, SBM-600 VS, SBM-750 VS, SBM-810 VS,
SBM-810 VT, SBM-1050 VS, SBM-1050 VT, BM-1050 DL,
components in order not to damage the
threaded connections.
SBM-1050 DT]
Auxiliary handle
Screw gear rim chuck
2
onto the power tool spindle
(see picture 4).
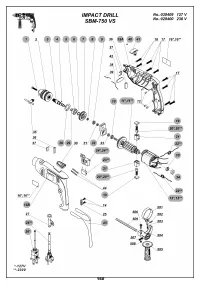
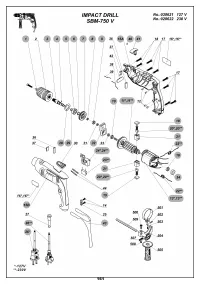
[SBM-500 VS, SBM-600 VS, SBM-750 VS, SBM-750 V,
Lock gear rim chuck
2
on the power tool spindle,
SBM-810 VS, SBM-810 V, SBM-810 VT, SBM-1050 VS,
having tightened screw
33
.
Attention: screw
33
has
SBM-1050 VT, BM-1050 DL, SBM-1050 DT]
left-a hand thread
. Prior to that move apart the cams of
gear rim chuck
2
at the distance allowing to tighten
When operating your tool hold additional handle
4
- it
screw
33
to be tightened. To do that, release the grip of
improves the operation performance comfort and the
the cams with clamping wrench
14
, then rotate the quill
electric tool control.
of gear rim chuck
2
counter-clockwise with your hand.
Additional handle
4
may be positioned as deemed
When gear rim chuck
2
is being dismounted, repeat
comfortable by the user.
the aforementioned operations in reverse order.
[SBM-500 VS, SBM-600 VS, SBM-750 VS, SBM-750 V,
Mounting / replacement of accessories
SBM-810 VS, SBM-810 V, SBM-810 VT, SBM-1050 VS,
SBM-1050 VT, SBM-1050 DT]
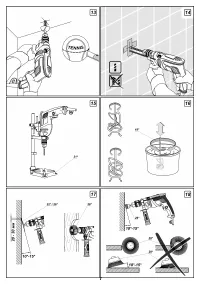
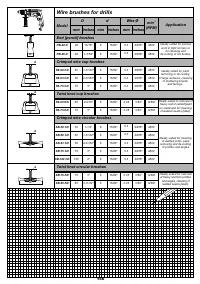
It is necessary to wear gloves when
extracting the drill from the chuck
Loose additional handle
4
as shown in fig. 1.
because the drill can become very hot due
Place additional handle
4
in desired position.
to long operation. Wearing gloves when
Tighten additional handle
4
as shown in fig. 1.
mounting / replacing wire brushes is also
recommended.
[BM-1050 DL]
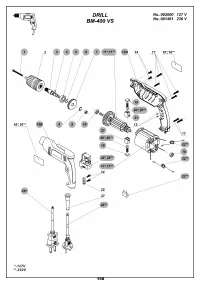
[BM-400 VS]
Release additional handle
4
as shown on picture 2.
Extract cork
32
and screw additional handle
4
into the
This model is equipped with keyless chuck
1
. This
threaded opening.
allows accessories to be mounted / replaced quickly and
Insert cork
32
into the freed threaded opening.
without a key.
Depth stop
Move the cams of keyless chuck
1
apart at the
distance allowing an accessory to be mounted /
[SBM-500 VS, SBM-600 VS, SBM-750 VS, SBM-750 V,
replaced. To do that, rotate the front part of keyless
SBM-810 VS, SBM-810 V, SBM-810 VT, SBM-1050 VS,
chuck
1
counter-clockwise with your hand (see picture 5).
SBM-1050 VT, SBM-1050 DT]
Mount / replace an accessory.
Use depth limiter
3
to set a required drilling depth (see fig. 3).
Rotate the front part of keyless chuck
1
clockwise with
Slacken clamp
5
.
your hand to lock the accessory mounted. Do not allow
Move depth limiter
3
to set a required drilling depth.
the accessory to become distorted.
Tighten clamp
5
.
[SBM-750 V, SBM-810 V]
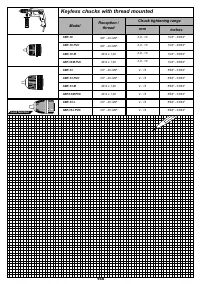
Mounting / dismounting of the keyless chuck
These models are equipped with keyless chuck (with
12
[BM-400 VS, SBM-750 V, SBM-810 V]
lock)
. This allows accessories to be mounted /
replaced quickly and without a key and provides more
Screw keyless chuck
1
or
12
onto the power tool reliable locking of the accessory compared to an
ordinary keyless chuck.
spindle (see picture 4).
18


