
Шуруповерты DEKO GCD20DU3 SET 5 063-4145 - инструкция пользователя по применению, эксплуатации и установке на русском языке. Мы надеемся, она поможет вам решить возникшие у вас вопросы при эксплуатации техники.
Если остались вопросы, задайте их в комментариях после инструкции.
"Загружаем инструкцию", означает, что нужно подождать пока файл загрузится и можно будет его читать онлайн. Некоторые инструкции очень большие и время их появления зависит от вашей скорости интернета.


The center position of the control buton locks the tool in the OFF position. When changing the
position of the control button, be sure the switch is released.
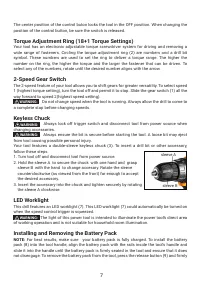
Torque Adjustment Ring (18+1 Torque Settings)
Your tool has an electronic adjustable torque screwdriver system for driving and removing a
wide range of fasteners. Circling the torque adjustment ring (2) are numbers and a drill bit
symbol. These numbers are used to set the ring to deliver a torque range. The higher the
number on the ring, the higher the torque and the larger the fastener that can be driven. To
select any of the numbers, rotate until the desired number aligns with the arrow.
2-Speed Gear Switch
The 2-speed feature of your tool allows you to shift gears for greater versatility. To select speed
1 (highest torque setting), turn the tool off and permit it to stop. Slide the gear switch (1) all the
way forward to speed 2(highest speed setting).
WARNING:
Do not change speed when the tool is running. Always allow the drill to come to
a complete stop before changing speeds.
Keyless Chuck
WARNING:
Always lock off trigger switch and disconnect tool from power source when
changing accessories.
WARNING:
Always ensure the bit is secure before starting the tool. A loose bit may eject
from tool causing possible personal injury.
Your tool features a double-sleeve keyless chuck (3). To insert a drill bit or other accessory,
follow these steps.
1. Turn tool off and disconnect tool from power source.
2. Hold the sleeve A to secure the chuck with one hand and grasp
sleeve B with the hand to change accesory. Rotate the sleeve
counterclockwise (as viewed from the front) far enough to accept
the desired accessory.
3. Insert the accessory into the chuck and tighten securely by rotating
the sleeve A clockwise.
LED Worklight
This drill features an LED worklight (7). This LED worklight (7) could automatically be turned on
when the speed control trigger is squeezed.
WARNING:
The light of this power tool is intended to illuminate the power tool’s direct area
of working operation and is not suitable for household room illumination.
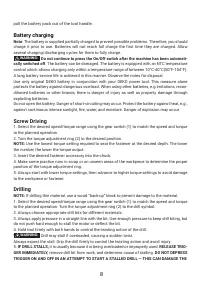
Installing and Removing the Battery Pack
NOTE:
For best results, make sure
your battery pack is fully charged. To install the battery
pack (8) into the tool handle, align the battery pack with the rails inside the tool’s handle and
slide it into the handle until the battery pack is firmly seated in the tool and ensure that it does
not disengage. To remove the battery pack from the tool, press the release button (9) and firmly
DRILL.
6. To minimize stalling or breaking through the material, reduce pressure on drill and ease the bit
through the last fractional part of the hole.
7. Keep the motor running when pulling the bit back out of a drilled hole. This will help prevent jam-
ming.
Residual risks
Even when the tool is used as prescribed it is not possible to eliminate all residual risk factors.
The following hazards may arise in connection with the tool’s construction and design:
1, Damage to lungs if an effective dust mask is not worn.
2, Damage to hearing if effective hearing protection is not worn.
3, Health defects resulting from vibration emission if the power tool is being used over longer
period of time or not adequately managed and properly maintained.
Maintenance and Cleaning
Before any work on the machine (e.g., maintenance, tool change, etc.) as well as during transport
and storage, set the rotational direction switch to the center position.Unintentional actuation of the
On/Off switch can lead to injuries.
For safe and proper working, always keep the machine and ventilation slots clean.
To ensure product SAFETY and RELIABILITY, repairs and any other maintenance or adjustment
should be performed by a qualified repair person, always using
DEKO
replacement parts.
Service Information
We provide 1-year quality warranty from purchasing date and friendly customer service. Our
after-sales service responds to your questions concerning maintenance and repair of our product
as well as spare parts. Please contact your local distributor or send emails to services@deko-
tools.com
Transport
The contained lithium-ion batteries are subject to the Dangerous Goods Legislation requirements.
The user can transport the batteries by road without further requirements. Dispatch batteries only
when the housing is undamaged. When being transported by third parties (e.g.: air transport or
forwarding agency), special requirements on packaging and la belling must be observed. For
preparation of the item being shipped, please observe possibly more detailed national regulations
and consult an expert for hazardous material.
The machine, rechargeable batteries, accessories
,
and packaging should be sorted for envi-
ronmental-friendly recycling. Do not dispose of power tools and batteries/rechargeable
batteries into household waste! Please recycle them at collection points provided for the
purpose. Ask your local authority for information about recycling.
Disposal
The machine is intended for driving in and loosening screws as well as for drilling in wood,
metal, ceramics and plastic.
DO NOT
use under wet conditions or in presence of flammable liquids or gases.
DO NOT
let children come into contact with the tool. Supervision is required when inexperi-
enced operators use this tool.
Variable Speed Control Trigger
To turn the tool on, squeeze the
speed on/off control trigger
(5). To turn the tool off, release
the trigger. The chuck will stop as soon as the trigger (5) is fully released.
NOTE:
Continuous use in variable speed range is not recommended. It may damage the switch
and should be avoided.
Forward/Reverse Switch
A forward/reverse switch (4) determines the direction of the tool and also serves as a lock-off
button.
To select forward rotation, release the switch and depress the forward/reverse control button
on the right side of the tool.
To select reverse, release the switch and depress the forward/reverse control button on the left
side of the tool.
9


