Шлифмашины VERTO 51G750 - инструкция пользователя по применению, эксплуатации и установке на русском языке. Мы надеемся, она поможет вам решить возникшие у вас вопросы при эксплуатации техники.
Если остались вопросы, задайте их в комментариях после инструкции.
"Загружаем инструкцию", означает, что нужно подождать пока файл загрузится и можно будет его читать онлайн. Некоторые инструкции очень большие и время их появления зависит от вашей скорости интернета.


8
WHEN OPERATING THE SANDER
•
Wear earmuff protectors and protection half-mask always when
using the sander.
•
Sander is not designed for wet operation.
•
Ensure the switch is in the OFF position before plugging the sander
to power supply.
•
Keep the power cord away from moving parts of the sander.
•
Use safety goggles or glasses when operating the sander above
head.
•
When operating the sander do not apply excessive pressure that
might stop the tool.
CAUTION! This device is designed to operate indoors.
The design is assumed to be safe, protection measures and
additional safety systems are used, nevertheless there is always
a small risk of operational injuries.
CONSTRUCTION AND USE
Orbital sanders are hand-operated power tools with insulation class II.
Tools are driven by single-phase commutator motors. Orbital sander
is designed for sanding and polishing surfaces of wood, metal, plastic
and similar materials, with the use of sanding paper with appropriate
gradation. Range of use covers repair and building works, and any
work from the range of individual, amateur activities (tinkering).
Do not use the sander for sanding surfaces that contain
magnesium or asbestos, or covered with gypsum.
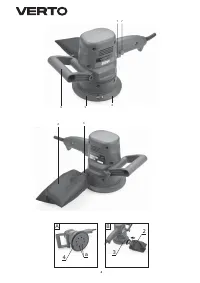
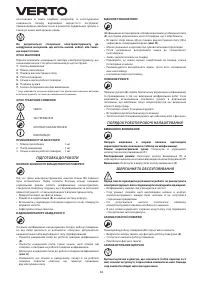
DESCRIPTION OF DRAWING PAGES
Below enumeration refers to the device elements depicted on the
drawing pages of this manual.
1.
Switch
2.
Dust bag
3.
Dust outlet
4.
Backing pad
5.
Pad cover ring
6.
Additional handle
7.
Switch lock button
* Slight differences may appear between the product and drawing
MEANING OF SYMBOLS
CAUTION
WARNING
ASSEMBLY/SETTINGS
INFORMATION
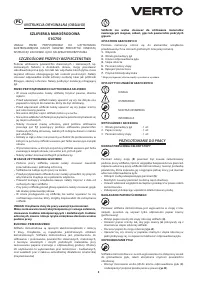
EQUIPMENT AND ACCESSORIES
1. Dust bag
- 1 pce
2
. Sanding paper
- 1 pce
3
. Pad cover ring
- 1 pce
PREPARATION FOR OPERATION
INSTALLATION OF PAD COVER RING
Pad cover ring (
5
) should be installed always whenever the sander is
in use. Apart from safety issues, the ring ensures proper operation of
orbital sander by forming air-cushion. It allows for full use of power
and proper dust extraction.
•
Unscrew the screw that secures the ring (
5
).
•
Open the ring and slide it onto the lower part of the tool casing.
•
Set accordingly to catches and turn clockwise to fix.
•
Secure by screwing the previously unscrewed screw.
INSTALLING SANDING PAPER
Orbital sander is equipped with pad with so called hook-and-loop,
only appropriate sanding paper should be used (perforated).
•
Put the sanding paper close to the sander backing pad (
4
).
•
Place the paper so its (
a
) holes match holes on the sander backing
pad.
•
Press the paper against the backing pad (
fig. A
).
•
Ensure that the holes on the sanding paper and backing pad fully
match; it ensures possibility of dust extraction.
DUST EXTRACTION
Equipment of orbital sander includes dust bag (
2
) to maintain the
processed surface clean.
•
Slide the dust bag (
2
) onto dust outlet (
3
) and secure by turning it
right (
fig. B
).
•
The dust bag is sealed with rubber o-ring.
•
When the dust bag is full, empty it to a special dust container.
•
Install the dust bag back in its place.
•
Gently pull the dust bag to ensure it is well fixed on the dust outlet.
•
It is recommended to empty the bag after it is half filled.
ADDITIONAL HANDLE
Additional handle (
6
) makes it easier to hold the sander and operate
when sanding.
It is possible to set the additional handle to a position comfortable for
the work being performed.
•
Loosen the handle wheel lock of the handle.
•
Install the handle in desired position.
•
Fasten the wheel lock of the handle, it will fix it firmly.
OPERATION / SETTINGS
SWITCHING ON / SWITCHING OFF
The mains voltage must match the voltage on the rating plate of
the sander.
Short operation:
Press the switch button (
1
) and hold.
Continuous operation:
Press the switch button (
1
) and lock it by
pressing the switch lock button (
7
).
Switching off:
Press the switch (
1
) and release.
OPERATION AND MAINTENANCE
Disconnect the tool from power supply network before starting
any adjustment, maintenance or repair.
•
Always keep the sander clean.
•
Remember to always keep the ventilation holes of the tool casing
pervious.
•
Never use any caustic agents for cleaning plastic elements.
•
In case of excessive commutator sparking check technical condition
of carbon brushes of the motor.
REPLACEMENT OF BACKING PAD
Damaged backing pad (
4
) must be replaced immediately.
•
Unscrew four screws that fix the backing pad (
4
).
•
Remove and replace the backing pad.
•
Screw the fixing screws.
Характеристики

Остались вопросы?Не нашли свой ответ в руководстве или возникли другие проблемы? Задайте свой вопрос в форме ниже с подробным описанием вашей ситуации, чтобы другие люди и специалисты смогли дать на него ответ. Если вы знаете как решить проблему другого человека, пожалуйста, подскажите ему :)
