Шлифмашины Bosch GSS 230 AE 0601292670 - инструкция пользователя по применению, эксплуатации и установке на русском языке. Мы надеемся, она поможет вам решить возникшие у вас вопросы при эксплуатации техники.
Если остались вопросы, задайте их в комментариях после инструкции.
"Загружаем инструкцию", означает, что нужно подождать пока файл загрузится и можно будет его читать онлайн. Некоторые инструкции очень большие и время их появления зависит от вашей скорости интернета.


14
| English
2 609 932 910 | (2.12.13)
Bosch Power Tools
one’s health. Touching or breathing-in the dusts can cause
allergic reactions and/or lead to respiratory infections of
the user or bystanders.
Certain dusts, such as oak or beech dust, are considered
as carcinogenic, especially in connection with wood-treat-
ment additives (chromate, wood preservative). Materials
containing asbestos may only be worked by specialists.
– As far as possible, use a dust extraction system suita-
ble for the material.
– Provide for good ventilation of the working place.
– It is recommended to wear a P2 filter-class respirator.
Observe the relevant regulations in your country for the
materials to be worked.
Prevent dust accumulation at the workplace.
Dusts can
easily ignite.
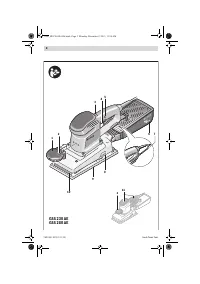
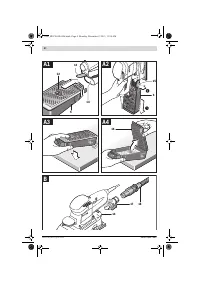
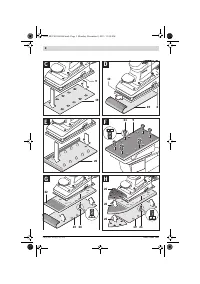
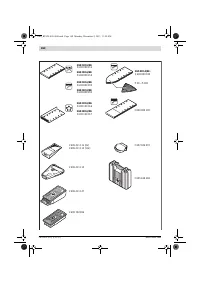
Integrated Dust Extraction with Dust Box
(see Fig. A1
–
A4)
Before assembling the dust box
6
, pull out the plastic slider
13
. Place the dust box
6
onto the extraction outlet
14
and al-
low it to engage. Make sure that the plastic slider
13
engages
in the holder
12
.
To empty the dust box
6
, press the latching levers
15
on the
side of the dust box (
). Pull off the dust box toward the bot-
tom (
).
Before opening the dust box
6
, it is recommended to loosen
the dust from the filter element by gently striking it against a
firm support (as shown in the figure).
Grasp the dust box
6
by the recessed grip, fold the filter ele-
ment
16
upward and empty the dust box. Clean the thin
plates of the filter element
16
with a soft brush.
External Dust Extraction (see figure B)
Slide the extraction adapter
17
onto the outlet piece
14
. En-
sure that the latching levers of the extraction adapter engage.
The extraction adapter
17
accepts a vacuum hose with a di-
ameter of 19 mm.
For removal of the extraction adapter
17
, press the latching
levers together at the rear and pull the extraction adapter off.
The vacuum cleaner must be suitable for the material being
worked.
When vacuuming dry dust that is especially detrimental to
health or carcinogenic, use a special vacuum cleaner.
Replacing the Sanding Sheet
When attaching a new sanding sheet, remove any dust or de-
bris from the sanding plate
9
(e. g. with a brush).
To ensure optimum dust extraction, pay attention that the
punched holes in the sanding sheet match with the holes in
the sanding plate.
Sanding Sheets with Velcro Backing (see figure C)
The sanding plate
9
is fitted with Velcro backing for quick and
easy fastening of sanding sheets with Velcro adhesion.
Before attaching the sanding sheet
19
, free the Velcro back-
ing of the sanding plate
9
from any debris by tapping against
it in order to enable optimum adhesion.
Position the sanding sheet
19
flush alongside one edge of the
sanding plate
9
, then lay the sanding sheet onto the sanding
plate and press firmly.
To remove the sanding sheet
19
, grasp it at one of the tips and
pull it off from the sanding plate
9
.
Sanding Sheets without Velcro Backing (see figure D)
Lightly lift and unlatch the sanding-sheet clamp
8
.
Guide the sanding sheet
19
under the opened rear clamping
bracket
10
to the stop and clamp the sanding sheet by rein-
serting the sanding-sheet clamp
8
.
Fold the sanding sheet
19
firmly around the sanding plate.
Guide the other end of the sanding sheet
19
under the open
front clamping bracket
10
and clamp the sanding sheet by re-
inserting the sanding-sheet clamp
8
.
Sanding sheets without holes, e. g. from rolls or by the meter,
can be punctured with the perforating tool
20
for use with
dust extraction. For this, press the machine with the mounted
sanding sheet onto the perforating tool (see figure E).
To remove the sanding sheet
19
, unlatch the sanding-sheet
clamp
8
and pull out the sanding sheet.
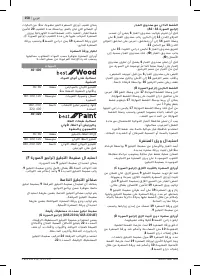
Selecting the Sanding Sheet
Depending on the material to be worked and the required rate
of material removal, different sanding sheets are available:
Replacing the Sanding Plate (see figure F)
The sanding plate
9
can be replaced, if required.
Unscrew the 6 screws
21
completely and remove the sanding
plate
9
. Attach the new sanding plate
9
and tighten the screws
again.
Grain size
40
–
400
For the working of all wooden
materials
For coarse-sanding, e. g. of
rough, unplaned beams and
boards
coarse
40, 60
For face sanding and planing
small irregularities
medium
80, 100, 120
For finish and fine sanding of
hard woods
fine
180, 240,
320, 400
40
–
320
For the working of paint/
enamel coats or primers and
fillers
For sanding off paint
coarse
40, 60
For sanding primer
medium
80, 100, 120
For final sanding of primers
before coating
fine
180, 240, 320
OBJ_BUCH-426-006.book Page 14 Monday, December 2, 2013 11:34 AM
Содержание
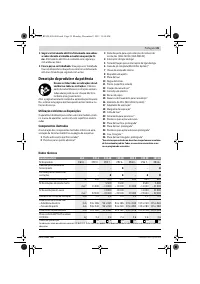
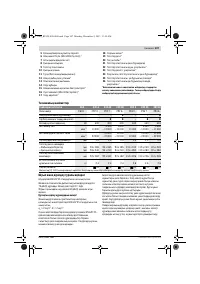
- 95 Описание продукта и услуг; Применение по назначению
- 96 Данные по шуму и вибрации; Заявление о соответствии; Сборка; Отсос пыли и стружки
- 97 Замена шлифовальной шкурки
- 98 Специальные шлифовальные плиты; Работа с инструментом; Включение электроинструмента; Указания по применению; Техобслуживание и сервис; Техобслуживание и очистка
- 99 Утилизация; Українська; Вказівки з техніки безпеки; Загальні застереження для електроприладів


