
Роботы-пылесосы VITEK 1806-VT-03 - инструкция пользователя по применению, эксплуатации и установке на русском языке. Мы надеемся, она поможет вам решить возникшие у вас вопросы при эксплуатации техники.
Если остались вопросы, задайте их в комментариях после инструкции.
"Загружаем инструкцию", означает, что нужно подождать пока файл загрузится и можно будет его читать онлайн. Некоторые инструкции очень большие и время их появления зависит от вашей скорости интернета.

14
ENGLISH
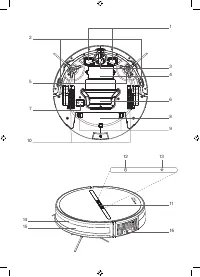
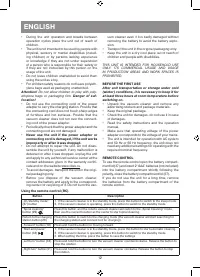
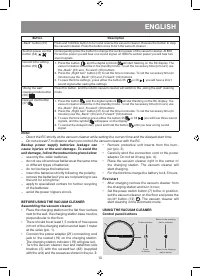
Buttons
Description
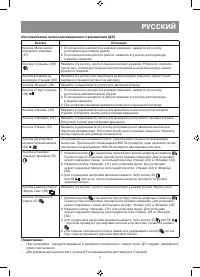
Indication
On/Off button (12) «
»
Press the button to start automatic cleaning The button (12) indicator is blue
The button (13)
indicator is off
Double pressing of the button starts the
„spiral“ cleaning
Press and hold the button to switch the unit
off
The button (12)
indicator is off
The button (13)
indicator is off
Return to the charging station
button (13) «
»
Press the button to start automatic charging The button (12) indicator is off
The button (13)
is flashing
Double pressing of the button starts the
cleaning „along the wall“
Long pressing of the button controls the
suction power
One sound signal means 800 Pa, two
sound signals - 1300 Pa
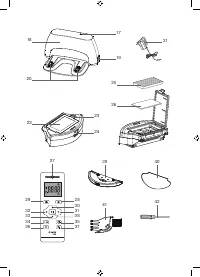
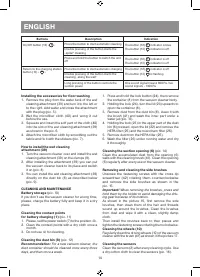
Installing the accessories for floor washing
1. Remove the plug from the water tank of the wet
cleaning attachment (39) and turn it to the left or
to the right. Add water and close the attachment
with the plug (pic. 5).
2. Wet the microfiber cloth (40) and wring it out
before the use.
3. Squeeze and insert the soft part of the cloth (40)
into the slot of the wet cleaning attachment (39)
as shown in the pic. 6.
4. Attach the microfiber cloth by smoothing out the
fabric and fix it with the stickers (pic. 7).
How to install the wet cleaning
attachment (39)
1. Turn the vacuum cleaner over and install the wet
cleaning attachment (39) on the clamps (9).
2. After installing the attachment (39) you can put
the vacuum cleaner back to its place and switch
it on (pic. 8).
3. You can install the wet cleaning attachment (39)
directly on the dust bin (8) as described below
(pic. 9).
CLEANING AND MAINTENANCE
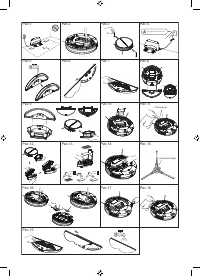
Battery storage (pic. 10)
If you don’t use the vacuum cleaner for a long time,
please, charge the battery fully and keep it in a dry
place.
Cleaning the contact points
for battery charging (1) (pic. 11)
1. Please, set the power switch (7) to the position «0».
2. Clean the contact points with a dry cloth once a
month.
3. Do not use oil for cleaning.
Cleaning the dust bin (8) (pic. 12)
Recommendation: For a new vacuum cleaner, the
dust container should be cleaned once every three
days, and then once a week.
1. Press and hold the lock button (24), then remove
the container (8) from the vacuum cleaner body.
2. Holding the lock (24), turn the lid (23) upwards to
open the container (8).
3. Remove dust from the dust bin (8), clean it with
the brush (41) and wash the inner part under a
water jet (pic. 13).
4. Holding the lock (23) in the upper part of the dust
bin (8) pressed, open the lid (22) and remove the
HEPA filter (25) and the microfoam filter (26).
5. Remove dust from the HEPA filter (25).
6. Wash the filter (26) under running water and dry
it thoroughly.
Cleaning the suction opening (6) (pic. 14)
Clean the accumulated dust from the opening (6)
walls with the cleaning brush (41). Clean the opening
(6) regularly after every use of the vacuum cleaner.
Removing and cleaning the side brushes
Unscrew the fastening screws with the cross-tip
screwdriver (42) rotating them counterclockwise
and remove the side brushes as shown in the
pic. 15.
Important! When removing the brushes, press and
hold them by the holder to avoid damaging the driv-
ing gear because of its rotation.
As shown in the picture 16, first remove the side
brushes, then clean them of the hair and threads
wound up around the brushes. Clean the brushes
from dust and wipe it with a clean, slightly damp
cloth.
Then install the brushes back to their places and
tighten the fastening screws rotating them clockwise.
Cleaning the wheels (10)
Regularly clean the driving wheels (10) of the vacuum
cleaner with the brush (41) as shown in the picture 17.
Cleaning the sensors
Clean the sensors (2) after every cleaning cycle. Use
a dry cotton cloth to clean the sensors (pic. 18).


