Роботы-пылесосы Sencor SRV9550BK - инструкция пользователя по применению, эксплуатации и установке на русском языке. Мы надеемся, она поможет вам решить возникшие у вас вопросы при эксплуатации техники.
Если остались вопросы, задайте их в комментариях после инструкции.
"Загружаем инструкцию", означает, что нужно подождать пока файл загрузится и можно будет его читать онлайн. Некоторые инструкции очень большие и время их появления зависит от вашей скорости интернета.

- 15 -
12/2020
Copyright © 2020, Fast ČR, a.s.
Note:
If the indicator is flashing or its colour is other than blue, please refer to
chapter GUIDE TO LIGHT INDICATORS.
If the indicator does not light up at all, the battery is completely flat.
In this case, pick up the vacuum cleaner and manually put it into the
charging station so that the charging contacts
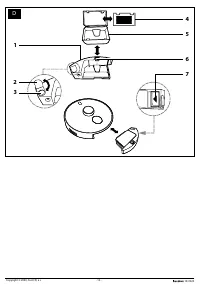
A9
on the underside of the
vacuum cleaner and the charging contacts
B3
on the charging station are
connected. When the contacts are connected, the charging process will
start. When the battery is charged to a given level, the vacuum cleaner
will turn on automatically.
■
Press button
A6
(
). The indicator light in buttons
A5
(
) and
A6
(
) will start
to slowly pulse in yellow colour. A voice message will be sounded and the vacuum
cleaner will automatically start to seek out the charging station. After docking in the
charging station, the charging cycle will commence.
■
During the charging process, the indicator light in buttons
A5
(
) and
A6
(
)
will slowly pulse in yellow colour.
■
When the battery is fully charged, the indicator light in buttons
A5
(
) and
A6
(
) will be permanently lit blue and the charging process will stop automatically.
The vacuum cleaner is now ready for use.
Note:
Further details about automatic or manual charging of the robotic
vacuum cleaner are found in chapter CHARGING THE ROBOTIC VACUUM
CLEANER
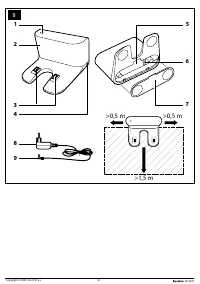
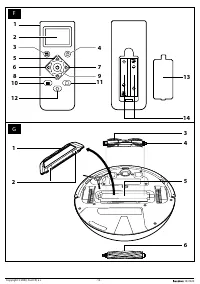
INSERTING AND REPLACING BATTERIES IN THE REMOTE
CONTROL
■
Push down the latch of cover
F13
on the rear side of the remote control
F1
to release
it and remove the cover.
■
Insert two type AAA (1.5 V) batteries into the remote control. When inserting the
batteries, ensure the correct polarity as shown inside the battery compartment
F14
.
Put the cover
F13
back on and click it into place.
■
In the event that the batteries are flat, replace them with new ones. Do not combine
various types of batteries or new and old batteries.
■
The signal range of the remote control is approximately 6 m.
SETTING SYSTEM TIME
■
The system time of the vacuum cleaner is the actual time according to your time
zone. It must be correctly set if you wish to use the scheduled cleaning function.
■
In the stand-by mode, hold down button
F4
(
) until the hour setting information
starts flashing on the display
F2
.
■
Using buttons
F5
(
) or
F8
(
) set the time value. Toggle between the hour and
minute numbers using buttons
F6
( ) or
F7
( ).
■
Confirm the set time by pressing button
F4
(
). The appliance will beep 2x and
the set time will be saved to memory as the system time.
■
In the event that no change is made within 10 seconds, the appliance will beep 2x
and the system time setting mode will automatically be cancelled. Time will not be
stored in memory.
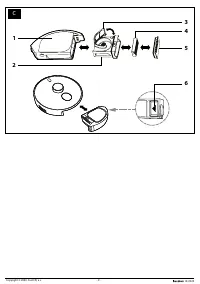
OPERATION
Note:
Before starting the vacuum cleaner, always make sure that either the
water tank with the dust container, or just the dust container with the
respective HEPA dust filters, is inserted inside.
TURNING ON THE ROBOTIC VACUUM CLEANER
■
Hold down the On/Off button
A5
(
) on the vacuum cleaner for more than 3
seconds. The indicator in buttons
A5
and
A6
will start to flash slowly in blue colour
and a melody will be played. When the indicator is permanently lit blue, the vacuum
cleaner is in stand-by mode and ready for operation.
STAND-BY MODE
■
The stand-by mode means that the vacuum cleaner is idle but ready for operation.
Buttons
A5
(
) and
A6
(
) are backlit with a blue colour and the vacuum
cleaner awaits a command.
■
Set the vacuum cleaner to the stand-by mode by pressing button
A5
(
)
on the
vacuum cleaner or button
F9
(
) on the remote control at any time during its
operation.
SLEEP MODE
■
The sleep mode serves to save the battery's capacity. The vacuum cleaner enters
sleep mode either automatically after five minutes of inactivity or when it is unable
to dock in the charging station. The backlight on buttons
A5
(
) and
A6
(
)
will turn off and the vacuum cleaner will automatically switch to the sleep mode.
■
To wake the vacuum cleaner from the sleep mode to the stand-by mode, press
button
A5
(
) on the vacuum cleaner or button
F9
(
) on the remote control.
Note:
When the vacuum cleaner is in sleep mode, it is not possible to wake it
up using the mobile phone application.
In sleep mode, it reacts only to
buttons
A5
(
) or
F9
(
) on the remote control.
Attention:
The battery is gradually discharged also in the sleep mode,
though slowly. If the vacuum cleaner is left in the sleep mode
for an extended period of time (several days), the battery may
become fully discharged. If this happens, the vacuum cleaner will
not react to any button that is pressed and it will be necessary
to place it into the charging station so that it can recharge itself.
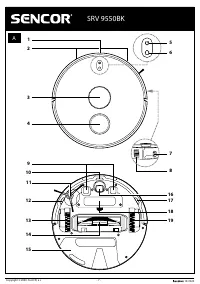
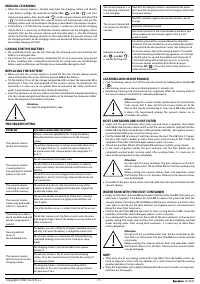
GUIDE TO LIGHT INDICATORS
Colour of indicator in
buttons A5
(
)
and
A6
(
)
Meaning
Blue – permanently lit
Ready for operation
Blue – flashing slowly
Active network configuration mode
Blue – pulsing slowly
Vacuum cleaner system start-up / firmware upgrade
Yellow – flashing slowly
Return to the charging station
Yellow – pulsing slowly
Charging
Red – flashing quickly
Problem
TURNING OFF THE ROBOTIC VACUUM CLEANER
■
If you wish to turn the vacuum cleaner completely off, hold down the On/Off button
A5
(
) for more than 3 seconds. The indicator in button
A5
(
) and
A6
(
) will
turn off and power supply will be shut off. In the turned off state, the vacuum cleaner
does not react to any button other than again holding down button
A5
(
).
SELECTING THE CLEANING MODE
■
Before starting the cleaning process, check that the entry door into your apartment
or house is closed. From the floor surfaces, remove clothing, paper, plastic bags,
toys, power or extension cords and other items that the vacuum cleaner could
suck in or catch. Lift curtains and drapes that reach to the floor so that the vacuum
cleaner does not catch them.
Tip:
When vacuuming in a new environment for the first time, carefully
observe the movement of the vacuum cleaner. You can thereby recognise
problematic obstacles and remove them for the next cleaning session.
AUTOMATIC CLEANING MODE
■
Press button
A5
(
) or button
F9
(
) on the remote control. The vacuum cleaner
will enter the automatic cleaning mode, in which it first vacuums along the walls of
the selected area and then vacuums the inner areas using Z-shape movements. As
soon as the vacuum cleaner finishes cleaning, a voice message will be made and
the vacuum cleaner will seek out the charging station and dock there to recharge.
ALONG-THE-WALLS CLEANING MODE
■
Press button
F11
(
)
on the remote control. The vacuum cleaner will enter the
along-the-walls cleaning mode, in which it moves along the perimeter of the room
and the motorised side rotary brush sweeps out the dirt along the walls, furniture
corners to achieve a perfect clean. As soon as the vacuum cleaner finishes cleaning,
it will seek out the charging station and dock there to recharge.
Note:
Other cleaning modes are available via the smart device application,
see chapter CONTROLLING THE VACUUM CLEANER USING THE MOBILE
APPLICATION
SELECTING SUCTION POWER
■
The vacuum cleaner has three suction power levels.
■
The suction power of the vacuum cleaner can be cyclically increased or decreased
by pressing button
F10
(
) during the cleaning process. The strongest level 3
is set as default.
- When pressed for the first time, it will beep 2x and the display will quickly show
MODE 1 and the power will be set to the lowest level.
- When pressed for the second time, it will beep 2x and the display will quickly show
MODE 2 and the power will be set to the middle level.
- When pressed for the third time, it will beep 2x and the display will quickly show
MODE 3 and the power will be set to the highest level.
MANUALLY CONTROLLING THE MOVEMENT OF THE VACUUM
CLEANER
■
The direction buttons
F5
,
F6
,
F7
and
F8
(
,
, , )
can be used to manually
control the movement of the robotic vacuum cleaner on the floor. When the vacuum
cleaner is moved on the floor, the operation of the side rotary brush is synchronised
with the movement of the motorised wheels. The vacuuming function is disabled
during this time.
■
When the direction button
F5
or
F8
is pressed, the robotic vacuum cleaner will move
in the respective direction. For continuous movement forward, hold down button
F5
or
F8
. Releasing the button will stop the movement of the vacuum cleaner.
Характеристики

Остались вопросы?Не нашли свой ответ в руководстве или возникли другие проблемы? Задайте свой вопрос в форме ниже с подробным описанием вашей ситуации, чтобы другие люди и специалисты смогли дать на него ответ. Если вы знаете как решить проблему другого человека, пожалуйста, подскажите ему :)


