
Реноваторы Metabo MT 18 LTX BL QSL - инструкция пользователя по применению, эксплуатации и установке на русском языке. Мы надеемся, она поможет вам решить возникшие у вас вопросы при эксплуатации техники.
Если остались вопросы, задайте их в комментариях после инструкции.
"Загружаем инструкцию", означает, что нужно подождать пока файл загрузится и можно будет его читать онлайн. Некоторые инструкции очень большие и время их появления зависит от вашей скорости интернета.


ENGLISH
en
11
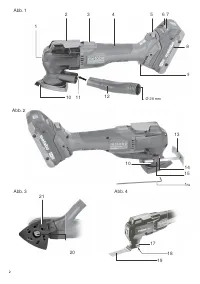
- Put the dust extraction (11) on the housing flange
(17) and fix with screwdriver (16) and screw (15)
in the desired position:
- Connect a suitable extraction device with its
suction hose to the inserted suction adapter (12).
7.2 Attaching the accessory
Prior to any conversion work: remove battery
pack from machine.
Danger of injury due to the sharp accessories.
After stopping work, the tool may still be hot.
Danger of crushing when changing the tool. Wear
protective gloves.
Use only as
accessories.
Use only sharp, undamaged saw blades. Do
not use accessories that are cracked or that
have changed their shape. Use an accessory that is
suitable for the material being sawn.
See fig. 1, 3 and 4, page 2.
1. Swivel the clamping lever (2) forwards by 180
o
.
2. Turn the spring pin (20) slightly in anti-clockwise
3. Put the accessory in the desired position on the
tool holder (18) or remove from the tool holder
(18) . Ensure that it engages in the cams of the
4. Insert the spring pin (20) and turn by 90
o
in
5.
Caution!
The clamping lever (2) may spring
back and can crush your fingers. Handle
carefully. Wear protective gloves.
Close the clamping lever (2) until the stop and
engage. (The release lever has to be in contact
with the housing).
6. Check the accessories for firm hold.
7.3 Installation of sanding disc
Simple attachment and removal thanks to the hook
and loop fastening. Simply press on the sanding
disc so that the holes of sanding disc (21) match.
7.4 Attaching the depth guide
See fig. 2, page 2
Undo the screw (14) on the dust extraction (11) .
Set depth guide (13) to the desired depth. Tighten
the screw (14) again.
7.5 Switching On and Off
Switch on first, then guide the accessory
towards the workpiece.
Avoid switching on the machine accidentally:
always switch it off when the battery pack is
removed from the machine.
Avoid the machine swirling up or taking in dust
and chips. After switching off the machine,
only place it down when the motor has come to a
standstill.
Switching on:
Push the slide switch (3) forward
(continuous operation).
Switching off:
Push the slide switch (3)
backwards.
7.6 Setting the oscillating frequency
See fig. 1, page 2
Set the oscillating frequency on the adjustment
wheel (5). This can also be done during operation.
The best way to determine the ideal setting is
through a practical trial.
For sanding plate Ø 150 maximum speed 8.
7.7 Working Directions
Sandpaper grinding:
The ideal setting is best
determined by a practical test. Apply moderate
pressure on the machine and move it to and fro
across the surface.
Cutting, sawing:
Set high oscillation frequency.
Press down the machine evenly. Avoid jamming!
For plunge cuts: A slight tilting movement speeds
up the work progress.
Scraping:
Set medium to high oscillation
frequency.
Hold the accessory at a flat angle to the workpiece.
See fig. 4, page 2:
To turn the accessory (19), loosen the clamping
lever (2),turn the accessory in the tool holder to the
desired position and close the clamping lever again.
Clean the machine regularly.
This includes
vacuum cleaning the ventilation louvres on the
motor.
9.1 The machine's multifunctional
monitoring system
If the machine switches off automatically, the
machine electronics have activated automatic
protection mode.
In spite of this protective function, overloading
is still possible with certain applications and
can result in damage to the machine.
Causes and remedies:
1.
Battery pack almost flat
(the electronics
prevent the battery pack from discharging totally
and avoid irreparable damage).
If one LED (7) is flashing, the battery pack is
almost flat. If necessary, press the button (6) and
check the LEDs (7) to see the charge level. If the
battery pack is almost flat, it must be recharged!
2. Long continuous overloading of the machine will
activate the
temperature cut-out
.
Leave the machine or battery pack to cool.
8. Cleaning, Maintenance
9. Troubleshooting
Характеристики

Остались вопросы?Не нашли свой ответ в руководстве или возникли другие проблемы? Задайте свой вопрос в форме ниже с подробным описанием вашей ситуации, чтобы другие люди и специалисты смогли дать на него ответ. Если вы знаете как решить проблему другого человека, пожалуйста, подскажите ему :)

