Пылесос VITEK VT-1844 G/R/SR - инструкция пользователя по применению, эксплуатации и установке на русском языке. Мы надеемся, она поможет вам решить возникшие у вас вопросы при эксплуатации техники.
Если остались вопросы, задайте их в комментариях после инструкции.
"Загружаем инструкцию", означает, что нужно подождать пока файл загрузится и можно будет его читать онлайн. Некоторые инструкции очень большие и время их появления зависит от вашей скорости интернета.


6
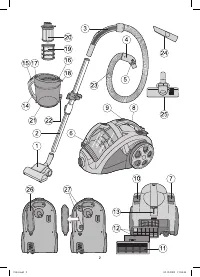
zle (24) or floor/carpet brush (25), and connect it to the
telescopic extension tube (Pic. 3).
Using brushes and nozzles
Turbo brush (1)
Use turbo brush to clean the floor, carpets and covers with
long and short nap, it is ideal for cleaning the wool out from
the carpets. Cylinder brush with coarse nap is rotated by the
air flow, its nap brushes the wool out very effectively, and re-
moves small dirties from the carpet nap.
Notice: to avoid carpet damage because of brush rotation,
do not use the turbo brush to clean the carpets with very
long nap, more then 15 cm length. Do not touch the electri-
cal wires by the rotating the brush, switch off the appliance
after the cleaning immediately.
Crevice nozzle
(24)
This nozzle is intended for cleaning of the radiators, crevices,
corners and spaces between sofa pillows.
Floor/carpet brush (25) (Pic.11-12)
Turn the switcher on the brush to the required position (de-
pending on the type of the surface you need to clean).
Operating instructions
Before using the appliance, unwind a sufficient length of the
cord and insert the plug into the power supply. Yellow mark
on the cord indicates the maximum length of the cord. Do not
expend the cable beyond the red mark.
Switch the appliance on only if dust collecting container and
filters inside the container are installed properly.
1. Push ON/OFF button (10) to switch on the appliance.
2. Adjust the suction power turning regulator (9).
3. After the cleaning is finished press ON/OFF button (10) to
switch off the vacuum cleaner.
4. To rewind the cord press button (7) while holding the
winding cord by the hand to escape damages.
Maintenance
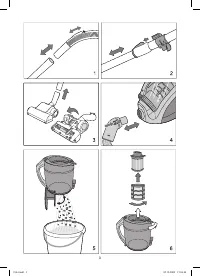
1. Taking dust collecting container (6) out and remov-
ing the dust and trash out of it (Pic. 5)
• Hold the handle of the dust collecting container (14),
press the lock button (15), and detach the container pull-
ing it upwards.
• Open the lower cap of the container (21) pressing the lock
(22).
• Remove the dust and trash out of container.
Notice: it is recommended to clean the container every time
after using the appliance.
2. Disassembling dust collecting container (Pic. 6)
• Switch off the vacuum cleaner and unplug it, detach dust
collecting container, remove the dust and trash out of it,
and close the lower cap.
• Holding the container (6) by the handle (14), press on the
lock of filter block (16), and take the filter block out hold-
ing the lock.
• Detach the preliminary net filter (19) from the main HEPA
filter (20).
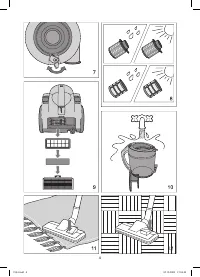
3. Filters cleaning (Pic. 8)
Watch if the filters (19, 20) are clean, as the effectiveness of
the vacuum cleaner operation depends on it; clean the filters
no less then tree-four times a year or often (in case of strong
blocking). Change the filters if required.
• Switch off the cleaner and unplug it, take out the contain-
er (6) and remove the dust and trash out of it, take out the
filters (19, 20).
• Clean dust and trash from the preliminary net filter (19).
• Wash the HEPA filter (20) under the warm water jet. Do not
use dishwasher machine to clean the filters.
• Dry HEPA filter (20). Do not use hair-drier to dry the filter.
• W ipe dust collecting container and dry it. (Pic. 10).
Assembling dust collecting container
- Install preliminary net filter (19) on the main HEPA filter
(20).
- Press on the lock of filter block (16) on the duct collecting
container, and install the filters (19, 20) block back into
the container (6) holding the lock.
Notice: if the filters block (19, 20) is not installed, or installed
not properly, the blocking device (18) would not allow to in-
stall the dust collecting container (6) at its place (Pic. 7).
- Install the dust collecting container (6) at its place press-
ing the button (15) for fixing.
4. Removing output filter (Pic. 9)
• Remove the output filter cap (11) by pressing the latch
downwards.
• Take out the filter (12), and wash it under the water jet, dry
it and install back at its place.
• Install the output filter cap (11) back at its place.
5. Cleaning turbo brush
Detach turbo brush from the telescopic tube, and remove
the hairs and threads winded on the brush.
If cylinder brush does not rotate while appliance operation:
- open the cap on the lower part of the brush, and remove
hears and threads from the propeller (Pic. 3).
6. Vacuum cleaner housing
• W ipe the vacuum cleaner housing with damp cloth.
• Do not allow any liquids drop inside the vacuum cleaner.
• Do not use any dissolvent or abrasive detergents for
cleaning the vacuum cleaner.
Special features
The vacuum cleaner is supplied with special function of
emergency switching off.
If the electric motor is going to become overheated, the au-
tomatic fuse snaps into action. Switch the appliance off im-
mediately by pressing the ON/OFF button (10). Ensure the
air inlets are free, and there are no any objects blocking the
air flow. Unplug the unit from the wall outlet, and let the appli-
ance cool down for some time (approximately, 20 minutes),
afterwards switch the appliance on again. Connect the unit
to the wall outlet, if the cleaner is not switched on, may be
there are a damage. In this case apply to the service center
for repair.
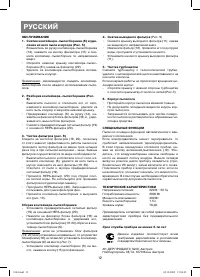
Technical specifications
Power supply:
220 V ~ 50 Hz
Consumption power:
2000 W
Suction power:
400 W
Dust collector capacity: 1,5 L
Noise level:
78 dB
Specifications subject to change without prior notice.
MINIMUM SERVICE LIFE - 5 YEARS
GUARANTEE
Details regarding guarantee conditions can be obtained
from the dealer from whom the appliance was purchased.
The bill of sale or receipt must be produced when making
any claim under the terms of this guarantee.
This product conforms to the EMC-Requirements
as laid down by the Council Directive 89/336/
EEC and to the Law Voltage Regulation (73/23
EEC)
ENGLISH
1844.indd 6
1844.indd 6
02.10.2009 15:06:44
02.10.2009 15:06:44


