Пылесос Electrolux Z 5021 A - инструкция пользователя по применению, эксплуатации и установке на русском языке. Мы надеемся, она поможет вам решить возникшие у вас вопросы при эксплуатации техники.
Если остались вопросы, задайте их в комментариях после инструкции.
"Загружаем инструкцию", означает, что нужно подождать пока файл загрузится и можно будет его читать онлайн. Некоторые инструкции очень большие и время их появления зависит от вашей скорости интернета.


ENGLISH
USING THE CLEANER
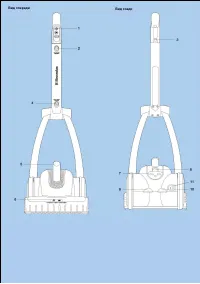
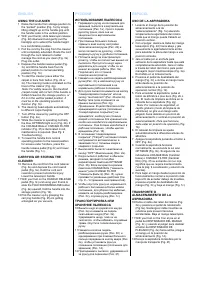
1 Raise the handle from storage position to
the
“parked” position (Fig. 1a) by simply
lifting straight
up on the handle grip until
the handle locks in the
vertical position.
2 With your thumb, slide telescopic release
(Fig. 2d)
downward and gently pull the
handgrip up to extend
the handle height
to a comfortable position.
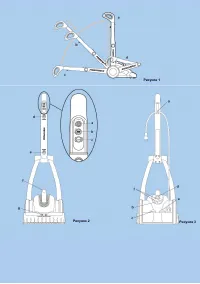
3 Pull the cord by the plug from the cleaner
until
completely extended. Route the cord
through the
cord retainer to better
manage the cord as you
clean (Fig. 3a).
Plug into outlet.
4 Depress the handle release pedal (Fig.
3c) and tilt
the handle back from its
parked position to normal
operating
position (Fig. 1b).
5 To start the cleaner press either the
carpet or bare
floor button (Fig. 2b or
2c).The cleaning mode is
indicated on the
hood of the cleaner (Fig. 2g).
Note: For safety reasons, the brushroll
(carpet
mode) will not turn if the handle is
folded forward
in the storage position, or
if it is in the vertical
parked position. It
must be in the operating
position to
function (Fig. 1b).
6 The cleaning head adjusts automatically
to different
carpet heights.
7 Turn off the cleaner by pushing the OFF
button
(Fig. 2a).
8 While the cleaner is operating normally
the blue
OPTIMUM light is on (Fig. 3b). If
the CHANGE
BAG or CHANGE FILTER
indicator (Fig. 3f) is
illuminated in red,
maintenance is required.
(See Pg. 9
Troubleshooting).
9 To lower the handle from normal
operating position
to the lowest position
for access under furniture,
press the
handle release pedal (Fig 3c) and lower
the handle (Fig. 1c).
CARRYING OR STORING THE
CLEANER
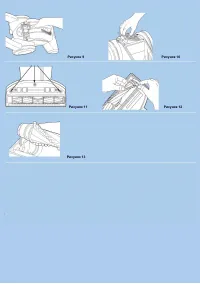
10
Remove the cord from the cord retainer
(Fig. 3a) and depress the cord rewind
pedal
(Fig. 3e). Hold the cord as it
rewinds to prevent
accidental injury.
Lower the telescopic handle.
11 With your foot on the HANDLE RELEASE
pedal
(Fig. 3c) and using your thumb to
slide the FOLD
DOWN RELEASE button
(Fig. 2e) upward, fold
the handle into the
storage position (Fig. 1d).
12 Pick the cleaner up by grasping the
carrying
handle (Fig. 2f).om getting
entangled as you vacuum.
А
А
1
(
. 1 ),
,
.
2
(
. 2d)
,
.
3
,
.
,
(
. 3 ).
.
4
(
. 3 )
.
5
"
/
"
"
" (
. 2b
2 ).
(
. 2g).
:
В
(
"
/
")
,
.
,
(
. 1b).
6
"
/
" ("Carpet")
,
.
7
"OFF" (
) (
. 2 ).
8
,
OPTIMUM
(
. 3b).
CHANGE BAG ("
")
CHANGE FILTER
("
) (
. 3f),
(
.
. 9 –
).
9
,
,
(
. 3 ),
(
. 1 ).
А
А
А
А
10
(
. 3 )
(
. 3 ).
,
,
.
.
11
(
. 3 )
(
.
2 ),
(
) (
. 1d).
12
,
(
. 2f).
ESPA OL
USO DE LA ASPIRADORA
1 Levante el mango de la posición de
almacenamiento
a la de
"estacionamiento" (Fig. 1a) elevando
simplemente la agarradera del mismo
hasta que
el mango quede trabado en
posición vertical.
2 Con el pulgar, deslice la traba del mango
telescópico (Fig. 2d) hacia abajo y jale
suavemente
la agarradera hacia arriba
para extender la altura del
mango a una
posición cómoda.
3 Jale el cable por el enchufe para
extraerlo
de la aspiradora hasta que esté
completamente
extendido. Guíe el cable
a través del retén del
mismo para poder
manejarlo mejor mientras
limpia (Fig. 3a).
Enchúfelo en el tomacorriente.
4 Presione el pedal de destrabado del
mango
(Fig. 3c) e incline el mango hacia
atrás desde
su posición de
estacionamiento a la posición
de
operación normal (Fig. 1b).
5 Para encender la aspiradora, pulse el
botón
de alfombra o piso duro (Fig. 2b o
2c). El modo
de limpieza se indica en la
cubierta de la aspiradora
(Fig. 2g).
Nota: Por razones de seguridad, el
cepillo giratorio
(modo de limpieza de
alfombras) no gira si el
mango está
plegado hacia delante en posición
de
almacenamiento o vertical en posición de
estacionamiento. Para que funcione,
debe estar
en posición de operación (Fig.
1b).
6 El cabezal de limpieza se ajusta
automáticamente
a diferentes alturas de
alfombra.
7 Apague la aspiradora pulsando el botón a
OFF (Fig. 2a).
8 Cuando la aspiradora funciona
normalmente, se
enciende la luz azul
OPTIMUM (Fig. 3b). Si alguno
de los
indicadores CHANGE BAG (Cambiar
bolsa)
o CHANGE FILTER (Cambiar
filtro) (Fig. 3f) se
enciende con luz roja,
significa que se require
mantenimiento.
(Vea la pág. 9 Localización
y solución de
averías).
9 Para bajar el mango desde la posición de
funcionamiento normal a la posición más
baja
a fin de acceder debajo de muebles,
presione
el pedal de destrabado del
mango (Fig. 3c)
y baje el mango (Fig. 1c).
TRANSPORTE O
ALMACENAMIENTO DE LA
ASPIRADORA
10 Retire el cable del retén del mismo (Fig.
3a) y
presione el pedal de rebobinado
(Fig 3e). Sostenga
el cable mientras se
rebobina para prevenir
lesiones
accidentales. Baje el mango telescópico.
11 With your foot on the Con el pie en el
pedal de
DESTRABADO DEL MANGO
(Fig. 3c) y usando
el pulgar para deslizar
el botón de DESTRABADO
DE
PLEGADO (Fig. 2e) hacia arriba, pliegue
el
mango en la posición de
almacenamiento (Fig. 1d).
12 Recoja la aspiradora tomándola por la
manija
de transporte (Fig. 2f)


