Пылесос Electrolux Z 5021 A - инструкция пользователя по применению, эксплуатации и установке на русском языке. Мы надеемся, она поможет вам решить возникшие у вас вопросы при эксплуатации техники.
Если остались вопросы, задайте их в комментариях после инструкции.
"Загружаем инструкцию", означает, что нужно подождать пока файл загрузится и можно будет его читать онлайн. Некоторые инструкции очень большие и время их появления зависит от вашей скорости интернета.


ENGLISH
CHANGING THE EXHAUST FILTER
(EXHAUST filter style EF185)
CAUTION
: Turn off the cleaner and unplug
the
electrical cord before servicing.
When
the FILTER CHANGE indicator is illuminated
in red:
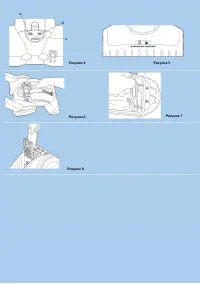
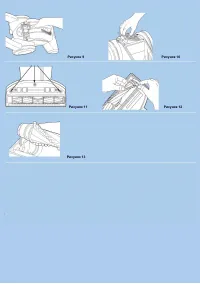
23 Push the bag cover latch and remove the
cover
as shown (Fig. 9).
24 Squeeze the filter tabs (Fig. 10) and lift
the filter
from the cleaner.
25 Position new filter and press down to
snap
in place.
26 Place the front of the bag cover into its
locating slots and close the cover. It will
automatically latch.
CHANGING THE BELT OR BRUSHROLL
(Belt style ZE097)
CAUTION
: Turn off the cleaner and unplug
the
electrical cord before servicing.
27 Remove the three screws that secure the
base
plate that covers the brushroll (Fig.
11).
28 Lift out brushroll and remove hair and
threads.
29 If installing a new belt, slip belt over
ribbed
motor pulley.
30 Thread pulley end of brushroll through
belt
(Fig. 12).
31 Install the left side of brushroll (nearest
the belt)
first, making sure end is fully
seated. Pivot the
right side of brushroll
into place making sure
the square end of
the brushroll end cap aligns
and slides
into the slot (Fig 13). Rotate brushroll
by
hand to make sure it rotates freely.
32 Replace the base plate and secure the
three screws.
А
А
А
(
EF185)
!
,
,
.
22
FILTER
CHANGE (
):
23
,
(
. 9).
24
(
. 10)
,
,
.
25
,
.
26
.
.
А
А
А А
(
ZE097)
!
,
,
.
27
,
,
(
. 11).
.
28
,
,
.
29
,
. (
,
).
30
(
. 12).
31
(
,
),
,
.
,
(
. 13).
,
,
.
32
.
ESPA OL
CAMBIO DEL FILTRO DE SALIDA
(Filtro de SALIDA tipo EF185)
PRECAUCIÓN
: Antes de realizar el servicio,
apague la aspiradora y desenchufe el
cordón eléctrico.
Cuando el indicador
FILTER CHANGE (Cambio
de filtro) se
enciende con luz roja:
23 Presione la traba de la cubierta de la
bolsa
y retire la cubierta como se muestra
(Fig. 9).
24 Apriete las lengüetas del filtro (Fig. 10)
y
levántelo para extraerlo de la aspiradora.
25 Posicione el filtro nuevo y presiónelo
hacia
abajo para colocarlo a presión.
26 Coloque el frente de la cubierta de la
bolsa
en sus ranuras guía y cierre la
cubierta.
Quedará enganchada
automáticamente.
CAMBIO DE LA CORREA OU EL
CEPILLO
GIRATORIO (Correa tipo ZE097)
PRECAUCIÓN
: Antes de realizar el servicio,
apague la aspiradora y desenchufe el
cordón
eléctrico.
27 Retire los tres tornillos que aseguran la
placa
base que cubre el cepillo (Fig. 11).
28 Levante el cepillo giratorio y retire los
cabellos
y los hilos.
29 Si va a instalar una correa nueva,
deslícela
sobre la polea estriada del
motor.
30 Coloque el extremo de la polea del
cepillo
giratorio en la correa (Fig. 12).
31 Instale primero el lado izquierdo del
cepillo
(el más cercano a la correa),
asegurándose
de que el extremo calce
completamente. Gire
el lado derecho del
cepillo hasta que quede
en su lugar,
teniendo en cuenta que el extreme
cuadrado del capuchón del extremo del
cepillo
quede alineado y se deslice dentro
de la ranura
(Fig. 13). Gire el cepillo con
la mano para
asegurarse de que gira
libremente.
32 Vuelva a colocar la placa base y coloque
los
tres tornillos.


