
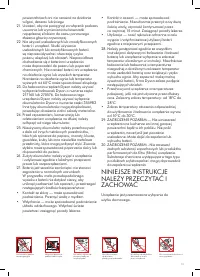
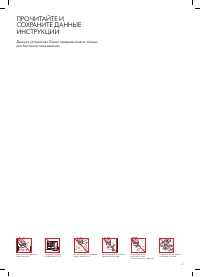
Пылесос Dyson V11 Absolut Extra (SV17) - инструкция пользователя по применению, эксплуатации и установке на русском языке. Мы надеемся, она поможет вам решить возникшие у вас вопросы при эксплуатации техники.
Если остались вопросы, задайте их в комментариях после инструкции.
"Загружаем инструкцию", означает, что нужно подождать пока файл загрузится и можно будет его читать онлайн. Некоторые инструкции очень большие и время их появления зависит от вашей скорости интернета.


10
Additional information
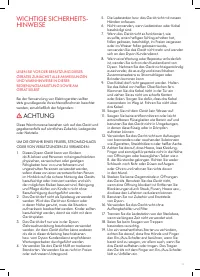
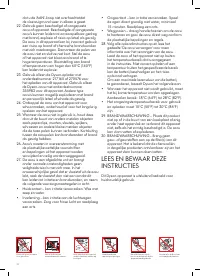
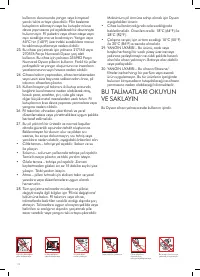
Please read the ‘Important safety instructions’ in the Dyson User manual before proceeding.
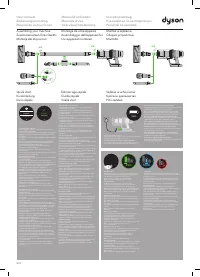
Installing your docking station
•
Unpack the docking station, charger and installation leaflet.
•
Choose a suitable location for the docking station and make sure there is no
pipework (gas, water or air), electrical cables, wires or ductwork directly behind the
mounting location.
•
Don't locate the docking station near a heat source such as a cooker, radiator or in
direct sunlight.
•
Follow the instructions on the installation leaflet.
•
Click the tools into place on the docking station.
•
Place the machine into the docking station.
•
Plug the charger into the mains electricity supply. Switch on (if necessary) to charge
the battery.
•
It's important to fully charge your new machine before using it for the first time, and after
every use.
The docking station must be mounted in accordance with regulations and applicable codes/
standards (state and local laws may apply).
Dyson recommends the use of protective clothing, eyewear and materials when installing the
docking station.
Using your machine
•
Check that the underside of the cleaner head or tool is clean and free from foreign
objects that may cause damage.
•
Before vacuuming your flooring, rugs and carpets, check the
manufacturer’s recommended cleaning instructions.
•
The brush bar on the machine can damage certain carpet types and floors. Some
carpets will fuzz if a rotating brush bar is used when vacuuming. If this happens,
we recommend vacuuming without the motorised floor tool and consulting with your
flooring manufacturer.
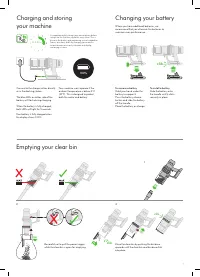
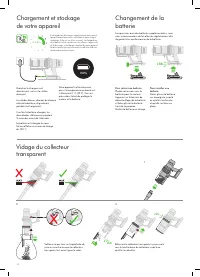
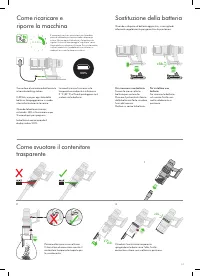
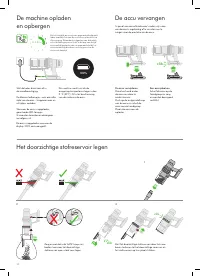
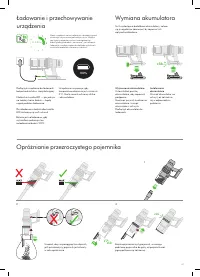
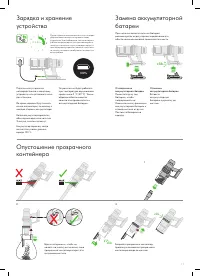
Emptying your clear bin
•
Empty as soon as the dirt reaches the M A X level – don't overfill. Using the machine when
the dirt is above the M A X line may cause the dirt to reach the filter and more frequent
maintenance will be required.
•
Be careful not to pull the power trigger while the clear bin is open for emptying.
•
Press the red wand release button and pull the wand away from the bin.
•
To release the dirt:
–
Hold the machine over a bin in a downwards position.
–
Firmly push the red bin release button.
–
The bin will slide down, cleaning the shroud as it goes and the bin base will open.
–
The bin base won't open if the red bin release button isn't pushed down all the way.
To minimise dust/allergen contact when emptying, cover the clear bin tightly in a dust proof
bag while you empty.
Remove the clear bin carefully from the bag. Seal the bag tightly and dispose.
Be careful not to pull the power trigger while the clear bin is open for emptying.
•
To close the clear bin:
–
Push the bin base upwards until the clear bin and bin base click into place.
Cleaning your clear bin
If it is necessary to clean your clear bin, empty the bin as shown in the 'Emptying your clear bin'
section.
•
Press the red button located on the bin runner to release the bin and slide the bin off
the runner.
•
Clean the clear bin with a damp cloth only.
•
Make sure that the clear bin and seals are completely dry before replacing.
•
To refit the clear bin:
–
Insert the spine on to the bin runner.
–
Close the clear bin by pushing the bin base upwards until the clear bin and bin base click
into place.
The clear bin is not dishwasher safe and the use of detergents, polishes or air fresheners
to clean the clear bin is not recommended as this may damage your machine.
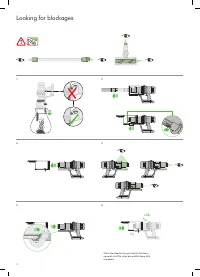
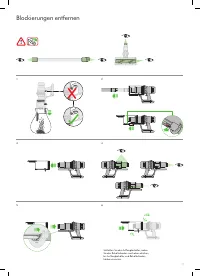
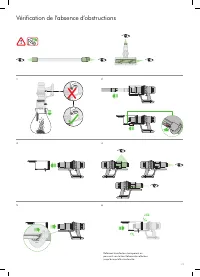
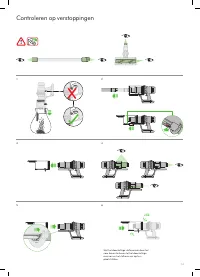
Looking for blockages
•
Your machine is fitted with an automatic cut-out. If any part becomes blocked, the
machine may automatically cut out.
•
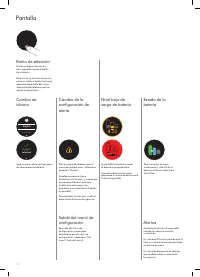
The motor will pulse and the LCD screen will indicate that there is a blockage.
•
Leave to cool down before looking for blockages.
•
Be careful not to pull the power trigger while looking for blockages.
•
Make sure any blockages are clear and all parts are refitted before using your machine.
•
Beware of sharp objects when checking for blockages.
•
Clearing blockages is not covered by your guarantee.
•
To check for blockages in the main body of your machine, remove the clear bin following
the instructions in the 'Emptying your clear bin' section and remove any blockage.
•
If you can't clear an obstruction from the cleaner head, you may need to remove the
brush bar. Use a coin to unlock the fastener, slide the brush bar out of the cleaner head
and remove the obstruction. Replace the brush bar and securely tighten the fastener.
Make sure it is fixed firmly before using your machine.
•
Your machine has carbon fibre brushes. Take care if coming into contact with them,
as they may cause minor skin irritation. Wash your hands after handling the brushes.
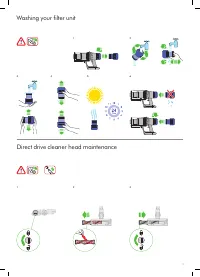
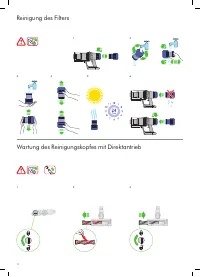
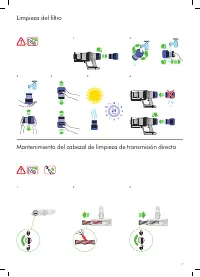
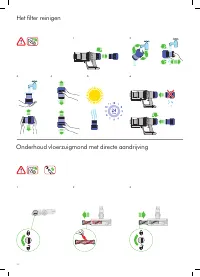
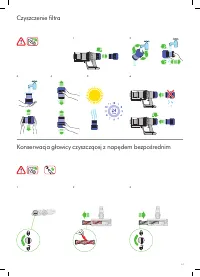
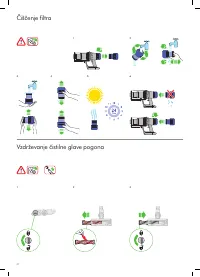
Washing your filter unit
To always get the best performance from your machine, it is important to regularly clean the
filters and check for blockages.
The LCD display will alert you when the filter unit needs washing. We recommend that you
wash your filter at least once a month or when your machine alerts you.
•
Remove the filter unit by twisting it anticlockwise. Gently pull away from the machine.
•
Tap the filter unit gently, to remove any excess dust and debris before washing it.
•
Wash the filter unit in cold water only.
•
Wash the pleated paper element of the filter unit first; hold the filter unit under a cold
water tap with the foam element downwards and run cold water over the pleated paper.
•
Wash the foam element of the filter unit next; hold the filter unit under a cold water tap
with the foam element downwards so that dirty water does not contaminate the pleated
paper element. Run cold water over the inside and outside of the foam element and
squeeze the foam gently to expel the dirt.
•
Repeat washing both parts of the filter unit until the water runs clear.
•
Gently shake the filter unit to remove any excess water and leave to drain with the foam
element end facing up.
•
Leave the filter unit to dry completely in a dry environment with good airflow, for
a minimum of 24 hours.
•
Check that the filter unit is completely dry.
•
To refit, position the filter unit in place on the main body and twist clockwise until it clicks
into place.
The filter unit may require more frequent washing if vacuuming fine dust or if use is mainly
in Boost mode.
Don't put any part of your machine in a dishwasher, washing machine, tumble dryer, oven,
microwave or near a naked flame.
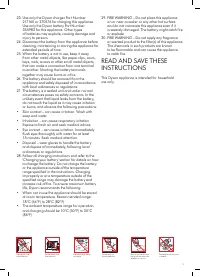
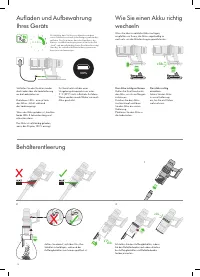
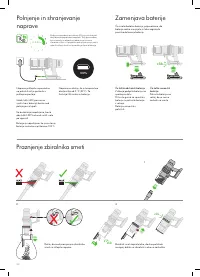
Charging and storing
•
This machine will switch off if the battery temperature is below 10°C (50°F). This
is designed to protect the motor and battery. Do not charge the machine and then move
it to an area with a temperature below 10°C (50°F) for storage purposes.
•
To help prolong battery life, avoid recharging immediately after a full discharge. Allow
to cool for a few minutes.
•
Avoid using the machine with the battery flush to a surface. This will help it run cooler
and prolong battery run time and life.
Battery safety instructions
•
If the battery needs replacing, please contact the Dyson Helpline.
•
Use only the Dyson charger Part Number 217160 or 270576 for charging this machine.
•
Use only the Dyson battery Part Number 355983 for this Dyson machine. Other type
of batteries may explode, resulting in fire and causing injury to persons and damage.
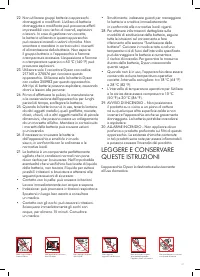
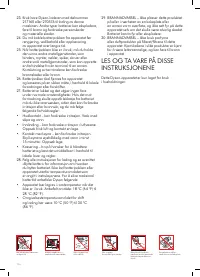
Caution
The battery used in this machine may present a risk of fire or chemical burn if mistreated.
Do not short contacts, heat above 60°C (140°F) or incinerate. Keep away from children.
Do not disassemble or dispose of in fire.
Disposal information
•
Dyson products are made from high grade recyclable materials. Recycle where possible.
•
The battery should be removed from the machine before disposal.
•
Dispose of or recycle the battery in accordance with local ordinances or regulations.
•
Dispose of the exhausted filter unit in accordance with local ordinances or regulations.
•
This symbol indicates that this machine should not be disposed with your general
household waste. To prevent possible harm to the environment or human health from
uncontrolled waste disposal, recycle it responsibly to promote the sustainable reuse
of material resources. When this machine has reached the end of its serviceable
life, please take it to a recognised WEEE (Waste Electrical and Electronic Equipment)
collection facility such as your local civic amenity site for recycling. Your local authority
or retailer will be able to advise you of your nearest recycling facility.
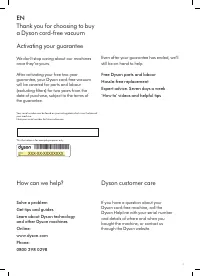
Dyson customer care
After registering your two-year guarantee, your Dyson machine will be covered for parts and
labour (excluding filters), for two years from the date of purchase, subject to the terms of the
guarantee. If you have any queries regarding your Dyson machine, visit www.dyson.com for
online help, general tips and useful information about Dyson.
Alternatively, you can call the Dyson Helpline with your serial number and details of where and
when you bought the machine.
If your Dyson machine needs a repair, call the Dyson Helpline so we can discuss the
available options. If your Dyson machine is under guarantee, and the repair is covered, it will
be repaired at no cost.
Limited 2-year guarantee
Terms and conditions of the Dyson 2-year limited guarantee are set out below. The name and
address details of the Dyson guarantor for your country are set out elsewhere in this document
– please refer to the table setting out these details.
What is covered
•
The repair or replacement of your Dyson machine (at Dyson’s discretion) if it is found
to be defective due to faulty materials, workmanship or function within two years
of purchase or delivery (if any part is no longer available or out of manufacture, Dyson
will replace it with a functional replacement part).
•
Where this machine is sold outside of the EU, this guarantee will only be valid if the
machine is used in the country in which it was sold.
•
Where this machine is sold within the EU, this guarantee will only be valid (i) if the
machine is used in the country in which it was sold or (ii) if the machine is used in Austria,
Belgium, Denmark, Finland, France, Germany, Ireland, Italy, Netherlands, Norway,
Poland, Spain, Sweden, Switzerland or the United Kingdom and the same model as this
machine is sold at the same voltage rating in the relevant country.
What is not covered
Dyson does not guarantee the repair or replacement of a product where a defect is the
result of:
•
Accidental damage, faults caused by negligent use or care, misuse, neglect,
carelessness or operation or handling of the machine which is not in accordance with
the Dyson User manual.
•
Use of the machine for anything other than normal domestic household purposes.
•
Use of parts not assembled or installed in accordance with the instructions of Dyson.
•
Use of parts and accessories which are not genuine Dyson components.
•
Faulty installation (except where installed by Dyson).
•
Repairs or alterations carried out by parties other than Dyson or its authorised agents.
•
Blockages – please refer to the Dyson User manual for details on how to look for and
clear blockages.
•
Normal wear and tear (e.g. fuse, brush bar etc.).
•
Use of this machine on rubble, ash, plaster.
•
Reduction in battery discharge time due to battery age or use (where applicable).
If you are in any doubt as to what is covered by your guarantee, please contact the
Dyson Helpline.
Характеристики

Остались вопросы?Не нашли свой ответ в руководстве или возникли другие проблемы? Задайте свой вопрос в форме ниже с подробным описанием вашей ситуации, чтобы другие люди и специалисты смогли дать на него ответ. Если вы знаете как решить проблему другого человека, пожалуйста, подскажите ему :)


