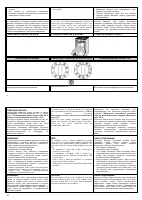
Плита Gorenje K57303AWM - инструкция пользователя по применению, эксплуатации и установке на русском языке. Мы надеемся, она поможет вам решить возникшие у вас вопросы при эксплуатации техники.
Если остались вопросы, задайте их в комментариях после инструкции.
"Загружаем инструкцию", означает, что нужно подождать пока файл загрузится и можно будет его читать онлайн. Некоторые инструкции очень большие и время их появления зависит от вашей скорости интернета.

20
,
“
”,
,
,
,
,
,
,
ғ
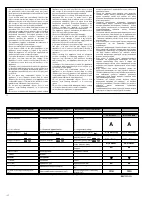
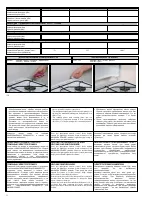
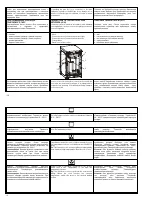
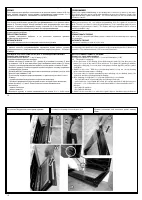
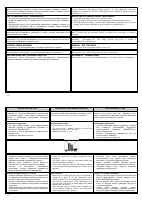
BULB REPLACEMENT
Set all the control knobs to the OFF position and
disconnect the range from the mains.
Unscrew the bulb glass cover in the oven by turning it
anti-clockwise.
Unscrew the bulb and replace it with a new bulb.
Replace the bulb glass cover.
І
і
і
ұ
«
І І
»
,
і
і і
і
і і і
і і і
,
ұ
,
і
,
ұ
,
;
ұ
,
і і і ,
і і і і
ғ
ұ
T
300°, EҚ4, қ30
-
қ40 B, қҢ B ғ
Қғ
қғ
3ғ
4ғ
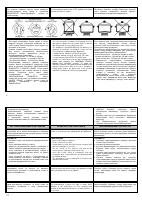
NOTE:
For oven illumination always use
T 300°Ө, EҚ4, қ30
-240V, 25W bulb.
1.
Glass cover
2.
Lamp
3.
Sleeve
4.
Oven rear wall
ұ
і і
T 300°, EҚ4,
қ30/қ40 B, қҢ B
.
Қғ
қғ
3ғ
4
ғ
WARRANTY TERMS AND CONDITIONS
,
,
,
,
,
ё
ғ
„
“,
ғ
„
“
-
ғ
In case of any defects to the appliance during the
warranty period, do not attempt to repair it by yourself.
Make a claim to the nearest authorized dealer or place
of purchase, and make sure you can produce the
endorsed Certificate of W arranty. In the absence of duly
endorsed Certificate of W arranty your claim is void.
і і
і і
і
і і
,
і
ә і
і
і ұ
ғ
, і і
«
і і
»
і
і
і і ғ
«
і і
»
-
ә і
і
ғ
13
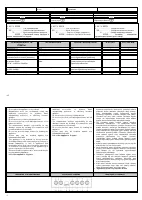
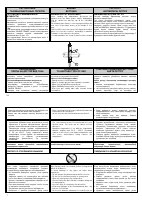
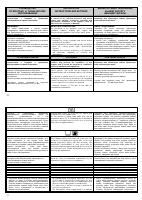
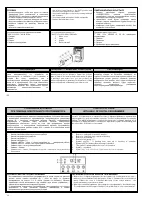
CONTROL OF OVEN
WITH HELP OF DIGITAL PROGRAMMER
-
ғ
(ү –
)
ғ
,
,
ғ
,
,
ё
(
0ғ00 +
ң)
ғ
The digital programmer - timer is designed for oven's switching off in the in advance
set time. The switched off or switched on state of digital programmer is signaled with
lighted symbol (8
–
pot) in the middle of display. The time showing display is constantly
lighting. The digital programmer is fed from the main only, it remains switched off at
interruption of supply and after its renewal (the digits 0.00 + symbol 6 are blinking) and
the correct time should be set once again.
1.
2.
3.
4.
(
-)
5.
(+)
6.
«
»
-
«
»
-
,
7.
–
8.
–
9.
-
-
-
,
1.
Button for sound signal setting up
2.
Button for setting up of operation duration
3.
Button for setting up of the operation finishing
4.
Button for decreasing (-)
5.
Button for increasing (+)
6.
SвЦЛШl „AUTO“
- is glowing from start up to finishing of operation
SвЦЛШl „AUTO“
- blinking after finishing of operation
7.
This symbol is glowing when the oven is in operation
8.
Symbol - stopwatch
9.
Symbol
key -
lock -
Child Lock
-
lights when
the lock is
activated
(
(ү) –
,
қ 3,
)ғ
–
ғ
(
)ғ
ғ
THE BAKING OVEN CAN WORK IN TWO REGIMES
Without use of digital programmer (the pot symbol (8) should glow in this case -
when not, press simultaneously the buttons 2 and 3, otherwise the oven would not
work). Further the oven is controlled with help of two control buttons - the
thermostat and the oven function switch.
With help of digital programmer (the setting up of programmer is described below).
The temperature and the regime should be set up with help of oven control buttons.


