
Печи VITEK VT-2493 - инструкция пользователя по применению, эксплуатации и установке на русском языке. Мы надеемся, она поможет вам решить возникшие у вас вопросы при эксплуатации техники.
Если остались вопросы, задайте их в комментариях после инструкции.
"Загружаем инструкцию", означает, что нужно подождать пока файл загрузится и можно будет его читать онлайн. Некоторые инструкции очень большие и время их появления зависит от вашей скорости интернета.


4
ENGLISH
•
Never use the unit if the power cord or the power
cord plug is damaged, if the unit works improp-
erly or after it was dropped.
•
Do not repair the unit by yourself. Do not disas-
semble the unit by yourself, if any malfunction is
detected or after it was dropped, unplug the unit
and apply to any authorized service center at the
contact address list, given at the warranty certifi-
cate and on the website www.vitek.ru.
•
Transport the unit in the original package only.
•
Keep the unit out of reach of children and dis-
abled persons.
THIS UNIT IS INTENDED FOR HOUSEHOLD USE
ONLY. ITS COMMERCIAL USAGE AND USAGE
IN PRODUCTION AREAS AND WORK SPACES IS
PROHIBITED.
BEFORE THE FIRST USE
After unit transportation or storage at low tem-
perature keep it for at least 3 hours at room
temperature before switching on.
–
Unpack the unit completely and remove any
stickers that can prevent unit operation.
–
Remove the packaging materials and any acces-
sories from the process chamber.
–
Check the unit for damages; do not use it in case
of damages.
SETTING
–
Place the roaster on a flat and hard surface that
will bear the weight of the roaster and the maxi-
mal weight of the food that will be cooked in it.
–
Do not place the unit in places with high moisture
and temperature, and near inflammable objects.
–
Choose the place that is out of the reach of small
children.
–
Place the roaster keeping at least a 20 cm gap
between the sides and rear of the unit and the
wall and a 30 cm gap above the unit.
–
Do not remove supporting legs from the body
bottom.
–
Do not block ventilation openings in the unit
body.
Connecting the roaster to the mains
–
Before switching the roaster on, make sure that
the operating voltage and power consumption of
the unit correspond to your mains.
–
To avoid fire, do not use adapters for connecting
the unit to the mains.
–
Connect the roaster to a socket with reliable
grounding contact.
–
Usage of the plug with a grounding contact
connected to a socket without grounding can
lead to the risk of electric shock.
–
Consult a qualified electrician, if the ground-
ing instructions for the roaster are not com-
pletely clear for you or if you are not sure that
the roaster body is securely grounded.
–
If it is necessary to use the extension cord, use
only a 3-wire extension cord with a grounding
contact on the power cord plug and the socket.
–
Wire section marking of the roaster power cord
and of the extension cord should match.
–
The power cable of the extension cord should
not hang from the edges of the table, where
children can pull it and it should be placed in
such way that excludes possibility of stepping
on it.
Before using the unit
–
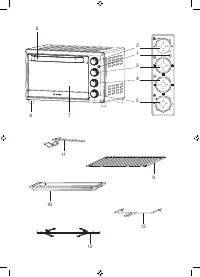
Wash the grid (9), the baking sheet (10), the
handles (11, 13) and the skewer (12) with warm
water and neutral detergent and dry them thor-
oughly.
–
Insert the power plug into the mains socket.
–
Switch the unit on in maximal heating mode,
turning the thermostat control knob (2) and set-
ting it to the position «250».
–
Turn the timer knob (5) clockwise and set the
operation time 10-15 minutes, the unit will start
operating. After the operation time is up, you’ll
hear a sound signal.
ACCESSORIES, FUNCTIONS, MODES
Grid (9)
Use the grid to roast or defrost products. To pre-
vent the lower heating element from getting dirty
always set the baking sheet (10) under the grid.
Remove the grid from the process chamber by the
handle (11).
Skewer (12)
Set the poultry carcass on the skewer and install
the skewer on the holder on the inner walls of the
chamber: fix the right end of the skewer and then
the left one. The skewer rotates only if the left end
is installed properly. To prevent the lower heating
element from getting dirty always set the baking
sheet (10) under the grid. Remove the skewer
from the process chamber by the handle (13).
When taking the poultry out of the roaster, hold
the handle with both hands, first lift the left end of
the skewer and then remove the skewer from the
right holder.


