
Мясорубки Zelmer ZMM9802B - инструкция пользователя по применению, эксплуатации и установке на русском языке. Мы надеемся, она поможет вам решить возникшие у вас вопросы при эксплуатации техники.
Если остались вопросы, задайте их в комментариях после инструкции.
"Загружаем инструкцию", означает, что нужно подождать пока файл загрузится и можно будет его читать онлайн. Некоторые инструкции очень большие и время их появления зависит от вашей скорости интернета.


15
DZIĘKUJEMY ZA WYBÓR MARKI ZELMER. ŻYCZYMY SATYSFAKCJI Z UŻYTKOWANIA
URZĄDZENIA.
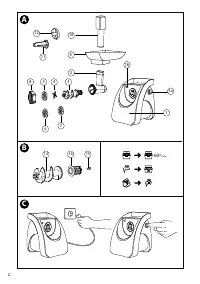
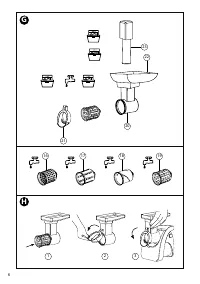
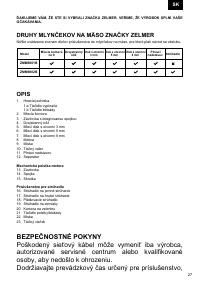
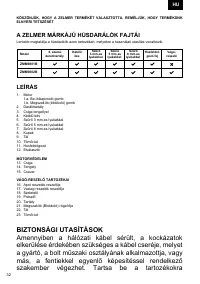
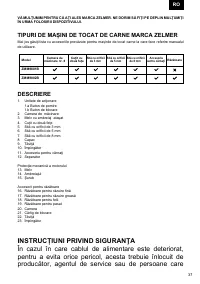
RODZAJE MASZYNEK DO MIELENIA MIĘSA MARKI ZELMER
Poniżej znajduje się wykaz elementów wyposażenia przewidzianego dla maszynek do mielenia mięsa, do
których odnosi się instrukcja użytkowania.
OPIS
1. Napęd maszynki
1.a Przycisk wyłącznika
1.b Przycisk blokady
2. Komora mielenia
3. Ślimak z zamontowanym sprzęgłem
4. Nożyk dwustronny
5. Sitko z otworami 3 mm
6. Sitko z otworami 5 mm
7. Sitko z otworami 8 mm
8. Nakrętka
9. Miska
10. Popychacz
11. Nasadka masarska
12. Separator
Mechaniczne zabezpieczenie silnika
13. Ślimak
14. Sprzęgło
15. Wkręt
Akcesoria szatkownicy
16. Tarka do drobnych wiórek
17. Tarka do grubych wiórek
18. Tarka do plastrów
19. Tarka do przecierania
20. Komora
21. Zaczep blokady
22. Miska
23. Popychacz
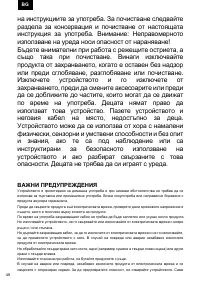
INSTRUKCJE BEZPIECZEŃSTWA
Jeżeli przewód zasilający jest uszkodzony, musi on
zostać wymieniony przez producenta, autoryzowany
serwis lub osobę posiadającą wymagane kwalifikacje,
aby uniknąć zagrożenia.
Przestrzegaj czasu działania akcesoriów podanego w
poszczególnych rozdziałach instrukcji obsługi.
Podczas czyszczenia postępuj zgodnie z rozdziałem
niniejszej instrukcji obsługi dotyczącym konserwacji i
czyszczenia. Ostrzeżenie: Nieprawidłowe użytkowanie
grozi obrażeniami!
Należy zachować ostrożność podczas obsługi ostrzy
tnących i podczas czyszczenia.
Należy zawsze odłączać produkt od zasilania, jeśli
pozostaje on bez nadzoru lub przed montażem,
demontażem bądź czyszczeniem.
Wyłącz urządzenie i odłącz je od zasilania przed zmianą
akcesoriów lub zbliżaniem się do części, które mogą
poruszać się podczas użytkowania.
Dzieci nie mogą korzystać z tego urządzenia.
Urządzenie oraz jego przewód należy przechowywać
poza zasięgiem dzieci.
Urządzenie może być używane przez osoby o
obniżonych zdolnościach fizycznych, sensorycznych i
umysłowych oraz bez doświadczenia i wiedzy, jeśli są
nadzorowane
lub
poinstruowane
w
zakresie
użytkowania urządzenia w bezpieczny sposób oraz jeśli
zrozumiały związane z tym zagrożenia. Dzieciom nie
wolno bawić się urządzeniem.
WAŻNE OSTRZEŻENIA
Urządzenie zostało zaprojektowane do użytku domowego i pod żadnym pozorem nie powinno być
wykorzystywane do użytku komercyjnego lub przemysłowego. Każde nieprawidłowe użycie lub niewłaści-
wa obsługa produktu spowoduje unieważnienie gwarancji.
Przed podłączeniem produktu do sieci należy sprawdzić, czy napięcie sieciowe jest takie samo, jak
wskazano na etykiecie produktu.
Podczas użytkowania przewód zasilania nie może być splątany ani okręcony wokół produktu.
Nie używaj urządzenia ani nie podłączaj i odłączaj go od sieci gdy masz mokre ręce i/lub stopy.
Nie ciągnij za przewód zasilania w celu odłączenia go od sieci i nie używaj go do przenoszenia urządzenia.
W przypadku awarii lub uszkodzenia należy natychmiast odłączyć produkt od sieci.
Nie przetwarzaj twardej żywności, takiej jak kości, orzechy (np. suszone i twarde ziarna soi) lub innej
żywności z twardymi ścięgnami.
Podczas obsługi zamiast popychać żywności rękoma należy korzystać z popychacza.
W przypadku jakiejkolwiek awarii lub uszkodzenia natychmiast odłączyć urządzenie od sieci i skontak-
tować się z autoryzowanym działem wsparcia technicznego. Aby zapobiec ryzyku i zagrożeniom, nie
otwierać urządzenia. Naprawy lub inne operacje dotyczące urządzenia może wykonywać tylko wykwalifi-
kowany personel techniczny z oficjalnego działu wsparcia technicznego marki.
Eurogama Sp. z o.o.
nie ponosi odpowiedzialności za jakiekolwiek szkody lub uszkodzenia, które mogą
wystąpić u ludzi, zwierząt lub przedmiotów w wyniku nieprzestrzegania powyższych ostrzeżeń.
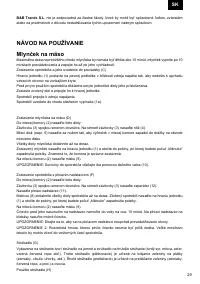
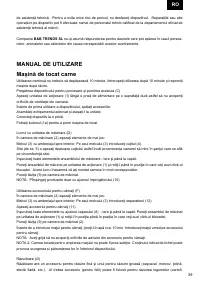
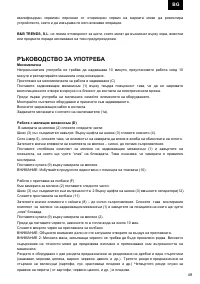
INSTRUKCJE UŻYTKOWANIA
Maszynka do mielenia mięsa
Nieprzerwany czas pracy nie powinien być dłuższy niż 10 minut; przerwij użytkowanie po upływie 10 minut
i ponownie uruchom maszynkę po jej wystygnięciu.
Przygotowanie maszynki do pracy i jej uruchomienie (C)
Napęd (1) postaw w pobliżu gniazdka sieci na twardym podłożu tak, aby nie zasłaniać otworów wentylacy-
jnych w obudowie.
Przed pierwszym użyciem maszynki umyj elementy wyposażenia.
Zmontuj odpowiednie wyposażenie i dołącz do napędu.
Podłącz urządzenie do zasilania.
Przyciskiem wyłącznika (1a) uruchom maszynkę.
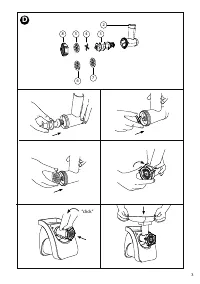
Praca z zespołem mielącym (D)
W komorze mielenia (2) umieścić poniższe części:
Ślimak (3) sprzęgłem do środka. Na trzpień ślimaka (3) wpasować nożyk (4).
Sitko (np. 5) umieścić nad nożykiem tak, aby występ komory wszedł w rowek na obwodzie sitka.
Dokręcić wszystkie elementy zespołu mielącego mocno do oporu.
Założyć zmontowany zespół mielący, na napęd (1) i obróć do pozycji, przy której usłyszysz dźwięk
załączenie blokady. Oznacza to, że komora została właściwie zamontowana.
Nałożyć miskę (9) na komorę mielenia (2).
UWAGA: Produkty popychać tylko za pomocą popychacza (10).
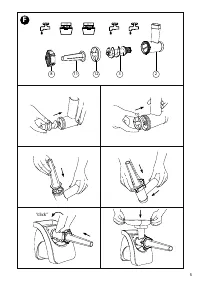
Praca z nasadką masarską (F)
W komorze mielenia (2) umieścić poniższe części:
Ślimak (3) sprzęgłem do środka. Na trzpień ślimaka (3) wpasować separator (12).
Umieścić nasadkę masarską (11).
Dokręć wszystkie elementy nakrętką (8) mocno do oporu. Założyć zmontowany zespół mielący, na napęd
(1) i obróć do pozycji, przy której usłyszysz dźwięk załączenie blokady.
Nałożyć miskę (9) na komorę mielenia (2).
Przed nałożeniem kiełbaśnicy (osłonki z jelita) namocz ją w wodzie przez ok. 10 min. Mokrą kiełbaśnicę
nałóż na nasadkę masarską.
UWAGA: Zwróć uwagę, aby nie zatkać otworów odpowietrzających w nasadce.
UWAGA 2: Masa mięsna wypełniająca jelito nie może być zbyt rzadka. Duża zawartość płynów może
spowodować ich wyciek i przedostawanie się do wnętrza maszynki.
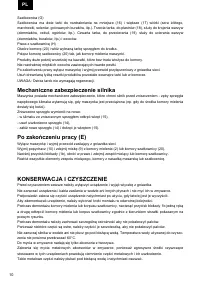
Szatkownica (G)
Szatkownica ma dwie tarki do rozdrabniania na mniejsze (16) i większe (17) wiórki (sera żółtego,
marchewki, selerów, gotowanych buraków, itp.). Trzecia tarka, do plastrów (18), służy do krojenia warzyw
(ziemniaków, cebuli, ogórków, itp.). Czwarta tarka, do przecierania (19), służy do ucierania warzyw
(ziemniaków, buraków, itp.) i owoców.
Praca z szatkownicą (H)
Otwórz komorę (20) i włóż wybraną tarkę sprzęgłem do środka.
Połącz komorę szatkownicy (20) tak, jak komorę mielenia maszynki.
Produkty duże pokrój wcześniej na kawałki, które bez trudu włożysz do komory.
Nie rozdrabniaj miękkich owoców zawierających twarde pestki.
Po zakończeniu pracy wyłącz maszynkę i wyjmij przewód przyłączeniowy z gniazdka sieci.
Usuń drewnianą łyżką resztki produktów pozostałe wewnątrz tarki lub w komorze.
UWAGA: Ostrza tarek nie wymagają regeneracji.
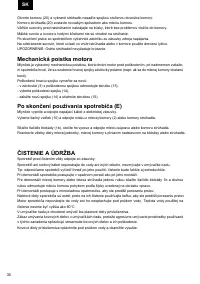
Mechaniczne zabezpieczenie silnika
Maszynka posiada mechaniczne zabezpieczenie, które chroni silnik przed zniszczeniem - zęby sprzęgła
napędowego ślimaka wyłamują się, gdy maszynka jest przeciążona (np. gdy do środka komory mielenia
dostały się kości).
Zniszczone sprzęgło wymienić na nowe:
- w ślimaku ze zniszczonym sprzęgłem odkręć wkręt (15),
- usuń uszkodzone sprzęgło (14),
- załóż nowe sprzęgło (14) i dokręć je wkrętem (15).
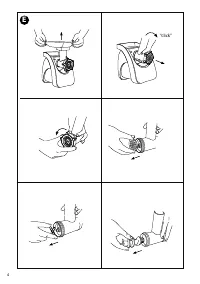
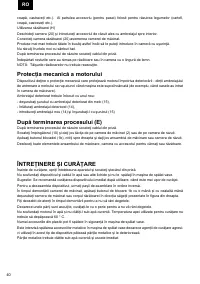
Po zakończeniu pracy (E)
Wyłącz maszynkę i wyjmij przewód zasilający z gniazdka sieci.
Wyjmij popychacz (10) i zdejmij miskę (9) z komory mielenia (2) lub komory szatkownicy (20).
Naciśnij przyciski blokady (1b), obróć w prawo i zdejmij zespół mielący lub komorę szatkownicy.
Rozłóż wszystkie elementy zespołu mielącego, komory z nasadką masarską lub szatkownicę.
KONSERWACJA I CZYSZCZENIE
Przed czyszczeniem zawsze należy wyłączyć urządzenie i wyjąć wtyczkę z gniazdka.
Nie zanurzać urządzenia i kabla zasilania w wodzie ani innych płynach i nie myć ich w zmywarce.
Podpowiedź: zaleca się czyścić urządzenie natychmiast po użyciu, gdy łatwiej jest je wyczyścić.
Aby zdemontować urządzenie, należy wykonać kroki montażu w odwrotnej kolejności.
Podczas demontażu komory mielenia lub korpusu szatkownicy, nacisnąć przycisk blokady 1b jedną ręką
a drugą odkręcić komorę mielenia lub korpus szatkownicy zgodnie z kierunkiem strzałki pokazanym na
prawym rysunku.
Podczas demontażu należy zachować szczególną ostrożność aby nie pokaleczyć palców.
Ponieważ niektóre części są ostre, należy czyścić je szczoteczką, aby nie pokaleczyć palców.
Nie zanurzaj silnika w wodzie ani nie płucz go pod bieżącą wodą. Temperatura wody używanej do czyszc-
zenia nie powinna przekraczać 60°C.
Do mycia w zmywarce nadają się tylko akcesoria z tworzywa.
Zabrania się mycia metalowych akcesoriów w zmywarce, ponieważ agresywne środki czyszczące
stosowane w tych urządzeniach powodują ciemnienie części metalowych i ich uszkodzenie.
Takie metalowe części należy płukać pod bieżącą wodą i natychmiast osuszać.
WE WOULD LIKE TO THANK YOU FOR CHOOSING ZELMER. WE WISH THE PRODUCT PERFORMS
TO YOUR SATISFACTION AND PLEASURE.
TYPES OF ZELMER MEAT MINCERS
Below, you can see an assortment of equipment anticipated for meat mincers, which the user manual
refers to.
DESCRIPTION
1. Drive unit
1.a Switch
1.b Lock button
2. Mincing chamber
3. Feed screw with assembled coupling
4. Double side knife
5. 3 mm hole disc
6. 5 mm hole disc
7. 8 mm hole disc
8. Ring collar
9. Food tray
10. Pusher
11. Sausage stuffer
12. Separator
Mechanical safety device for the motor
13. Scroll
14. Clutch
15. Screw
Shredder accessory
16. Fine grating disc
17. Coarse grating disc
18. Slicing disc
19. Pureeing disc
20. Body
21. Locking tab
22. Tray
23. Pusher
SAFETY INSTRUCTIONS
If the supply cord is damaged it must be replaced by the
manufacturer, its service agent or similarly qualified
persons in order to avoid a hazard.
Respect the operating times of the accessories indicated
in their specific sections of the manual.
Proceed according to maintenance and cleaning section
of this manual for cleaning. Warning: potential injury
from misuse!
Care shall be taken when handling the sharp cutting
knives and during cleaning.
Always disconnect the appliance from the supply if it is
left unattended and before assembling, disassembling or
cleaning.
Switch off the appliance and disconnect from supply
before changing accessories or approaching parts that
move in use.
This appliance shall not be used by children. Keep the
appliance and its cord out of reach of children.
Appliances can be used by persons with reduced
physical, sensory or mental capabilities or lack of
experience and knowledge if they have been given
supervision or instruction concerning use of the
appliance in a safe way and if they understand the
hazards involved. Children shall not play with the
appliance.
IMPORTANT WARNINGS
This appliance is designed for home use and should never be used for commercial or industrial use under
any circumstances. Any incorrect use or improper handling of the product shall render the warranty null
and void.
Prior to plugging in the product, check that your mains voltage is the same as the one indicated on the
product label.
The mains connection cable must not be tangled or wrapped around the product during use.
Do not use the device, or connect and disconnect to the supply mains with the hands and/or feet wet.
Do not pull on the connection cord in order to unplug it or use it as a handle Unplug the product immediate-
ly from the mains in the event of any breakdown or damage and contact
Do not pull on the connection cord in order to unplug it or use it as a handle.
Do not process tough foods, such as bones, nuts (such as dry and hard soybeans) or other food with tough
fiber.
Please utilize the pusher during operation, instead of pushing food by hands.
Unplug the product immediately from the mains in the event of any breakdown or damage and contact an
official technical support service. In order to prevent any risk of danger, do not open the device. Only
qualified technical personnel from the brand´s Official technical support service may carry out repairs or
procedures on the device.
B&B Trends S.L.
disclaims all liability for damages that may occur to people, animals or objects, for the
non-observance of these warnings.
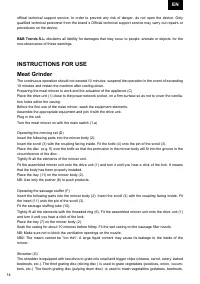
INSTRUCTIONS FOR USE
Meat Grinder
The continuous operation should not exceed 10 minutes; suspend the operation in the event of exceeding
10 minutes and restart the machine after cooling down.
Preparing the meat mincer to work and the actuation of the appliance (C)
Place the drive unit (1) close to the power network socket, on a firm surface so as not to cover the ventila-
tion holes within the casing.
Before the first use of the meat mincer, wash the equipment elements.
Assemble the appropriate equipment and join it with the drive unit.
Plug in the unit.
Turn the meat mincer on with the main switch (1.a)
Operating the mincing set (D)
Insert the following parts into the mincer body (2):
Insert the scroll (3) with the coupling facing inside. Fit the knife (4) onto the pin of the scroll (3).
Place the disc (e.g. 5) over the knife so that the protrusion in the mincer body will fit into the groove in the
circumference of the disc.
Tightly fit all the elements of the mincer unit.
Fit the assembled mincer unit onto the drive unit (1) and turn it until you hear a click of the lock. It means
that the body has been properly installed.
Place the tray (11) on the mincer body (2).
NB: Use only the pusher (8) to push products.
Operating the sausage stuffer (F)
Insert the following parts into the mincer body (2): Insert the scroll (3) with the coupling facing inside. Fit
the insert (11) onto the pin of the scroll (3).
Fit the sausage stuffing tube (10).
Tightly fit all the elements with the threaded ring (6). Fit the assembled mincer unit onto the drive unit (1)
and turn it until you hear a click of the lock.
Place the tray (7) on the mincer body (2).
Soak the casing for about 10 minutes before fitting. Fit the wet casing on the sausage filler nozzle.
NB: Make sure not to block the ventilation openings on the nozzle.
NB2: The meant cannot be “too thin”. A large liquid content may cause its leakage to the inside of the
mincer.
Shredder (G)
The shredder is equipped with two discs to grate into small and bigger chips (cheese, carrot, celery, baked
beetroots, etc.). The third grating disc (slicing disc ) is used to grate vegetables (potatoes, onion, cucum-
bers, etc.). The fourth grating disc (pulping drum disc) is used to mash vegetables (potatoes, beetroots,
etc) and fruit.
Operating the shredder (H)
Recline the catch (5) and put one of the disc with the clutch facing the middle of the chamber.
Snap the catch (5).
Assemble the chamber of the shredder (6) just as like mincing chamber.
Cut large products into smaller elements, which you can easily put into the mincing chamber.
Do not mash soft fruits containing stones.
When the work is finished pull the power cord out from the network supply \socket.
Remove the food remaining in the shredder chamber or on the grater with a wooden spoon.
NB: blades of the disc do not require any regeneration.
Mechanical safety device for the motor
The meat mincer is equipped with mechanical protection, which secures the motor against any damage –
teeth of the coupling break, when the meat mincer is overloaded (f. ex. when bones have entered into the
mincing chamber).
The broken coupling should be replaced with a new one:
- unscrew the coupling from the feed screw (3),
- remove the broken coupling (2),
- put on the new coupling (2) and screw it (3).
After the work has been finished (E)
Turn off the unit and unplug it.
Remove the pusher (8) and remove the food tray off the mincing chamber (2) or the shredder chamber.
Press the safety lock (1b) and turn the mincing set or the grating chamber into right and take it off.
Take apart all the elements of the mincing set, the chamber with the sausage stuffer or the shredder.
MAINTENANCE AND CLEANING
Before cleaning, always turn off the appliance and unplug it from the power supply.
Do not immerse the appliance and power cord in water or other liquids or wash them in the dishwasher.
Prompt: it is suggested that clean the appliance immediately after use, which is
easy for cleaning.
In the event of disassembling the appliance, rotate the appliance on the
opposite direction of installation direction.
When disassembling all mincing chamber or body of shredder, press on the lock button 1 with one hand
and screw off the mincing chamber or body of shredder with the other hand as the direction of the arrow
shown in the right picture.
Please be careful for the disassembly of the appliance, so as not to scratch your fingers.
Do not use abrasives, scrubbers, acetone and alcohol to clean juicer.
Since some parts are relatively sharp, clean them with a brush, so as not to scratch fingers;
Neither immerse the motor in water, nor rinse it under the water tap. Water temperature for cleaning should
not exceed 60 ° C.
Only plastic parts are suitable for dishwashing machine.
It is forbidden to wash metal accessories in the dishwasher, as the aggressive
cleaning agents used in these devices may discolour the metal parts and
damage them.
Those parts should be rinsed under running water and dried immediately.
EN
DANKE, DASS SIE SICH FÜR EIN ZELMER-PRODUKT ENTSCHIEDEN HABEN. WIR WÜNSCHEN
IHNEN ZUFRIEDENSTELLENDE ERGEBNISSE MIT UNSEREM PRODUKT.
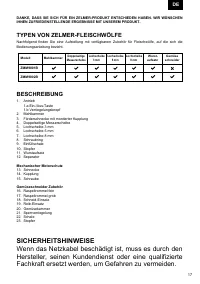
TYPEN VON ZELMER-FLEISCHWÖLFE
Nachfolgend finden Sie eine Aufstellung mit verfügbarem Zubehör für Fleischwölfe, auf die sich die
Bedienungsanleitung bezieht.
BESCHREIBUNG
1. Antrieb
1.a Ein-/Aus-Taste
1.b Verriegelungsknopf
2. Mahlkammer
3. Förderschnecke mit montierter Kupplung
4. Doppelseitige Messerscheibe
5. Lochscheibe 3 mm
6. Lochscheibe 5 mm
7. Lochscheibe 8 mm
8. Schraubring
9. Einfüllschale
10. Stopfer
11. Wurstaufsatz
12. Separator
Mechanischer Motorschutz
13. Schnecke
14. Kupplung
15. Schraube
Gemüseschneider Zubehör
16. Raspeltrommel fein
17. Raspeltrommel grob
18. Schneid-Einsatz
19. Reib-Einsatz
20. Gemüsekammer
21. Sperrverriegelung
22. Schale
23. Stopfer
SICHERHEITSHINWEISE
Wenn das Netzkabel beschädigt ist, muss es durch den
Hersteller, seinen Kundendienst oder eine qualifizierte
Fachkraft ersetzt werden, um Gefahren zu vermeiden.
Beachten Sie die in den einzelnen Kapiteln der
Bedienungsanleitung angegebenen Betriebszeiten der
Zubehörteile.
Um das Gerät zu reinigen, befolgen Sie die
Anweisungen im Abschnitt Reinigung und Wartung
dieses
Handbuchs.
Warnung:
Unsachgemäßer
Gebrauch kann zu Verletzungen führen!
Beim Umgang mit scharfen Messern und bei der
Reinigung Vorsicht walten lassen.
Das Gerät ist bei nicht vorhandener Aufsicht und vor
dem Zusammenbau, dem Auseinandernehmen oder
Reinigen stets vom Netz zu trennen. Schalten Sie das
Gerät aus und trennen Sie es von der Stromversorgung,
bevor Sie Zubehörteile austauschen oder sich Teilen
nähern, die sich während des Gebrauchs bewegen
können. Kinder dürfen das Gerät nicht benutzen. Das
Gerät und seine Anschlussleitung ist von Kindern
fernzuhalten. Geräte können von Personen mit
reduzierten physischen, sensorischen oder mentalen
Fähigkeiten oder Mangel an Erfahrung und Wissen
benutzt werden, wenn sie beaufsichtigt werden oder
bezüglich des sicheren Gebrauchs des Gerätes
unterwiesen wurden und die daraus resultierenden
Gefahren verstanden haben. Kinder dürfen nicht mit dem
Gerät spielen.
WICHTIGE WARNUNGEN
Dieses Gerät ist für den Hausgebrauch bestimmt und sollte unter keinen Umständen für kommerzielle
oder industrielle Zwecke verwendet werden. Bei unsachgemäßem Gebrauch oder unsachgemäßer
Handhabung erlischt die Garantie.
Prüfen Sie vor dem Anschließen des Produkts, ob die Netzspannung mit der auf dem Produktetikett
angegebenen Spannung übereinstimmt.
Während des Gebrauchs darf sich das Netzkabel nicht verheddern oder um das Produkt gewickelt
werden.
Das Gerät darf mit nassen Händen o. Füßen weder benutzt noch ans Netz angeschlossen bzw. vom Netz
getrennt werden.
Ziehen Sie nicht am Verbindungskabel, um es von der Steckdose zu trennen oder es als Tragegriff zu
verwenden. Bei Ausfall oder Beschädigung ist das Produkt sofort vom Netz zu trennen.
Verarbeiten Sie keine harten Lebensmittel wie Knochen, Nüsse (z.B. getrocknete und harte Sojabohnen)
oder andere Lebensmittel mit harten Fasern.
Verwenden Sie bei der Handhabung den Stopfer, schieben Sie die Produkte niemals mit der Hand nach.
Ziehen Sie im Falle eines Ausfalls oder Schadens sofort den Netzstecker und wenden Sie sich an den
offiziellen technischen Kundendienst. Um jegliches Gefahrenrisiko zu vermeiden, darf das Gerät nicht
geöffnet werden. Nur qualifiziertes technisches Personal des offiziellen technischen Kundendienstes darf
Reparaturen oder Eingriffe am Gerät vornehmen.
B&B TRENDS S.L.
lehnt jede Haftung für Schäden an Personen, Tieren oder Gegenständen ab, die
aufgrund der Nichtbeachtung dieser Warnungen entstehen können.
GEBRAUCHSANWEISUNG
Fleischwolf
Ein kontinuierlicher Betrieb sollte 10 Minuten nicht überschreiten. Das Gerät nach 10 Minuten Betrieb
abkühlen lassen und dann neu starten.
Vorbereitung für den Betrieb und Inbetriebnahme (C)
Den Antrieb (1) in der Nähe einer Steckdose auf einem festen, stabilen Untergrund stellen. Dabei die
Lüftungsöffnungen im Gehäuse nicht blockieren.
Vor dem ersten Gebrauch des Gerätes sind alle Zubehörteile mit Wasser zu spülen.
Die entsprechende Ausrüstung zusammenbauen und an den Antrieb anschließen.
Das Gerät an die Stromversorgung anschließen.
Das Gerät mit dem Schalter (1a) starten.
Arbeiten mit dem Fleischwolf-Vorsatz (D)
Folgende Teile in die Mahlkammer einlegen (2):
Schnecke (3) mit der Kupplung nach innen. Auf den Stift (3) der Förderschnecke die Messerscheibe (4)
aufsetzen.
Die Lochscheibe (z.B. 5) so über die Messerscheibe anordnen, dass der Überstand der Mahlkammer in
eine Nut am Umfang der Lochscheibe eindringt.
Alle Teile der Mahleinheit bis zum Anschlag festziehen.
Die montierte Mahleinheit auf den Antrieb (1) aufsetzen und bis zum Einrasten drehen. Dies bedeutet,
dass die Mahlkammer korrekt installiert wurde.
Einfüllschale (9) auf die Mahlkammer (2) aufsetzen.
HINWEIS: Die Produkte nur mit dem Stopfer (10) nachschieben.
Arbeiten mit dem Wurstaufsatz (F)
Folgende Teile in die Mahlkammer (2) einlegen:
Schnecke (3) mit der Kupplung nach innen. Auf den Stift (3) der Förderschnecke den Separator (12)
aufsetzen.
Den Wurstaufsatz (11) aufsetzen.
Alle Teile mit dem Schraubring (8) bis zum Anschlag festziehen. Die montierte Mahleinheit auf den Antrieb
(1) aufsetzen und bis zum Einrasten drehen.
Einfüllschale (9) auf die Mahlkammer (2) aufsetzen.
Wurstfüller (Wursthülle) vor der Verarbeitung ca. 10 Minuten in Wasser einweichen. Eingeweichten
Wurstfüller auf den Wurstaufsatz aufsetzen.
HINWEIS: Achten Sie darauf, die Belüftungsöffnungen im Aufsatz nicht zu verdecken.
HINWEIS 2: Die Fleischmasse, mit der die Wursthülle gefüllt wird, darf nicht dünnflüssig sein. Ein zu hoher
Flüssigkeitsgehalt kann dazu führen, dass die Flüssigkeit ins Innere des Gerätes gelangt.
Gemüseraspel (G)
Gemüseschneider verfügt über zwei Raspeltrommeln (fein und grob) (für Käse, Karotten, Sellerie, gekoch-
te Rüben, etc.). Dritte Raspeltrommel (Scheibenraspel) dient zum Reiben (Kartoffeln, Zwiebeln, Gurken,
etc.). Die vierte Raspeltrommel (zum Reiben) dient zum Reiben von Gemüse (Kartoffeln, Rüben, etc.) und
Obst.
Arbeiten mit dem Gemüseschneider (H)
Die Kammer (20) öffnen und eine der Trommeln mit der Kupplung nach innen einlegen.
Die Kammer der Gemüseraspel (20) so anschließen, wie die Mahlkammer.
Große Produkte vorher in Stücke schneiden, die leicht in die Kammer passen.
Weiche Früchte mit harten Kernen nicht zerkleinern.
Nach Beendigung der Arbeit mit dem Gerät, ist dieses auszuschalten und das Anschlusskabel aus der
Steckdose zu ziehen.
Um alle Produktreste im Inneren der Raspel oder der Kammer zu entfernen ist ein Holzlöffel zu verwen-
den.
HINWEIS: Die Klingen der Raspel müssen nicht nachgeschärft werden.
Mechanischer Motorschutz
Der Fleischwolf verfügt über einen mechanischen Motorschutz, der den Motor vor Schäden schützt - die
Zähne der Spindelkupplung brechen bei Überlastung des Gerätes aus (z.B. wenn Knochen in die
Mahlkammer gelangt sind).
Beschädigte Kupplung ist wie folgt zu ersetzen:
- Schraube (15) in der Schnecke mit der beschädigten Kupplung herausdrehen,
- defekte Kupplung (14) entfernen,
- neue Kupplung (14) einsetzen und Schraube (15) festziehen.
Nach der Arbeit (E)
Gerät ausschalten und den Netzstecker ziehen.
Stopfer (10) herausziehen und die Einfüllschale von der Mahlkammer (2) bzw. Gemüseschneider-Kammer
abnehmen.
Fleischwolf-Vorsatz abnehmen.
Entriegelungsknopf (1b) drücken, den Vorsatz nach rechts drehen und die Mahl- bzw.
Gemüseschneider-Kammer abnehmen.
Alle Teile der Mahleinheit, der Kammer mit Wurstaufsatz bzw. Gemüseschneider abbauen.
WARTUNG UND REINIGUNG
Vor der Reinigung das Gerät immer ausschalten und das Netzkabel ziehen.
Das Gerät und das Netzkabel nicht in Wasser oder andere Flüssigkeiten eintauchen und nicht in der
Spülmaschine waschen.
Tipp: Es wird empfohlen, das Gerät sofort nach Gebrauch zu reinigen
Um das Gerät zu demontieren, sind die Montage-Schritte in umgekehrter Reihenfolge durchzuführen.
Zur Demontage der Mahlkammer oder des Gemüseschneiders ist mit einer Hand der Verriegelungsknopf
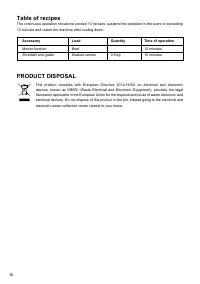
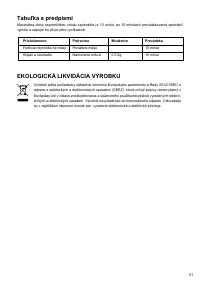
Table of recipes
The continuous operation should not exceed 10 minutes; suspend the operation in the event of exceeding
10 minutes and restart the machine after cooling down.
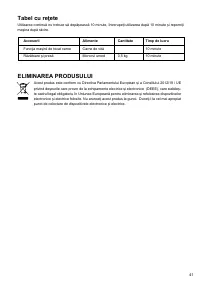
PRODUCT DISPOSAL
Tabela z przepisami
Nieprzerwany czas pracy nie powinien być dłuższy niż 10 minut; przerwij użytkowanie po upływie 10 minut
i ponownie uruchom maszynkę po jej wystygnięciu.
USUWANIE PRODUKTU
1b zu drücken und die Mahlkammer oder der Gemüseschneider mit der anderen Hand in Pfeilrichtung
(siehe rechte Abbildung) herauszudrehen.
Bei der Demontage ist besonders darauf zu achten, sich nicht an den Fingern zu verletzen.
Da einige Teile scharf sind, sind diese mit einer Bürste zu reinigen, um Verletzungen der Finger zu vermei-
den.
Den Motor nicht in Wasser eintauchen und nicht unter fließendem Wasser abspülen. Die Temperatur des
zur Reinigung verwendeten Wassers sollte 60 °C nicht überschreiten.
Nur Kunststoffzubehör ist spülmaschinenfest.
Es ist verboten, Metallzubehör in der Spülmaschine zu waschen, da aggressive Reinigungsmittel, die in
diesen Geräten verwendet werden, Metallteile verdunkeln und beschädigen.
Metallteile unter fließendem Wasser abspülen und sofort abtrocknen.
Tabelle mit Hinweisen
Der Dauerbetrieb sollte 10 Minuten nicht überschreiten; nach 10 Minuten den Betrieb unterbrechen und
die Maschine nach Abkühlung neu starten.
PRODUKTENTSORGUNG


