Мясорубки Braun G 1500 - инструкция пользователя по применению, эксплуатации и установке на русском языке. Мы надеемся, она поможет вам решить возникшие у вас вопросы при эксплуатации техники.
Если остались вопросы, задайте их в комментариях после инструкции.
"Загружаем инструкцию", означает, что нужно подождать пока файл загрузится и можно будет его читать онлайн. Некоторые инструкции очень большие и время их появления зависит от вашей скорости интернета.


5
English
Our products are engineered to meet the highest
standards of quality, functionality and design.
We hope you thoroughly enjoy your new Braun
appliance.
Caution
Read all instructions carefully before using this
product.
•
This appliance was constructed to process normal
household quantities.
•
Please remember to keep your Braun meat
grinder out of the reach of children.
•
Before operating, check whether your voltage
corresponds to the voltage printed on the unit.
•
The motor unit
9
must not be held under running
water, plunged into water, or operated on wet
surfaces.
•
Do not allow the motor unit to become wet,
especially when processing moist food (if it does,
pull the plug out of the socket and clean the
motor unit – see «Cleaning»).
•
Braun electric appliances meet applicable safety
standards.
•
This appliance can only be opened by an author-
ised Braun Service Centre for repairs.
•
Faulty, unqualified repair work may cause acci-
dents or injury to the user.
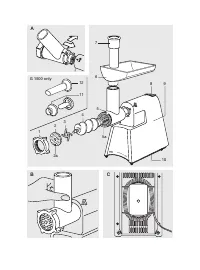
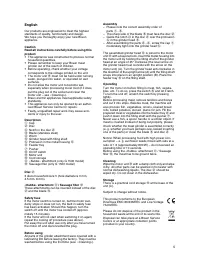
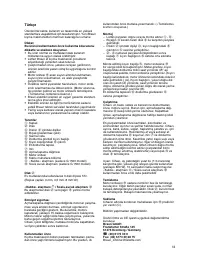
Description
1
Cap
2
Disc
B
Notch in the disc
2
3
Blade (stainless steel)
4
Worm
5
Grinder head with filling shaft
E
Protrusion in the metal housing
5
6
Feeder tray
7
Pusher
8
On/off switch
9
Motor unit
j
Cord storage
«Kubbe» attachment (only G 1500 model)
l
Sausage filler (only G 1500 model)
Disc
2
3 discs household size 5 (hole diameters 3 mm,
4.5 mm, 8 mm).
«Kubbe» attachment
/ Sausage filler
l
These attachments can be inserted instead of the disc
2
and the blade
3
.
Safety fuse
If the motor switch is turned on, but the motor sud-
denly stops or does not run, the built in safety fuse
has been activated. Should this happen, turn the
switch off until the motor has cooled off (approxi-
mately 15 minutes).
If the motor will not start when switching it on again,
repeat the cooling off procedure (see above).
Put away the unit after use only after you have turned
the motor off and disconnected the plug.
Before using
All parts of the grinder attachment were covered with a
lubricating film before leaving the factory. They must be
washed before using the first time (see «Cleaning»).
Assembly
– Please note the correct assembly order of
parts
1
-
5
.
– The sharp side of the blade
3
must face the disc
2
.
– Guide the notch
B
in the disc
2
over the protrusion
E
in the grinder head
5
.
– After assembling the parts
2
-
4
, screw the cap
1
moderately tight onto the grinder head
5
.
The assembled grinder head
5
is joined to the motor
unit
9
with a bayonet lock. Insert the metal housing into
the motor unit by holding the filling shaft of the grinder
head at an angle of 45° clockwise (the level arrow on
the grinder head must coincide with the arrow on the
motor unit) (A). Turn the grinder head anti-clockwise in
the direction of the upright arrow (A) until the filling shaft
snaps into place in an upright position (B). Place the
feeder tray
6
on the filling shaft.
Operating
Turn the motor on before filling in meat, fish, vegeta-
bles, etc. To do so, press the switch
8
and let it latch.
To turn the unit off, unlatch the switch by pressing
lightly.
Before processing meat, remove tendons and bones
and cut it into strips. Besides meat, the machine will
also process fish, vegetables, onions, soaked bread
rolls, boiled potatoes, stoned plums for jam. Fill the
prepared meat or vegetables into the feeder tray
6
and
push it down into the filling shaft with the pusher
7
.
Never use a fork, a spoon handle or a similar object. If
meat is crushed instead of being cut properly, please
check
whether the meat grinder is assembled correctly
(e. g.
whether you have perhaps over-looked inserting
one of the parts) or clean the blade
3
and disc
2
.
Notice: When processing food with high power con-
sumption – e. g. sunflower seeds mixed with oats at a
ratio of 1:3 (approximately 800 W) – do not exceed an
operating time of 10 seconds.
Before using the «Kubbe» attachment / Sausage
filler
l
, the meat has to be ground twice.
Cleaning
Wipe the motor unit
9
with a damp cloth only and wipe
it dry. All other parts can be washed in hot water with
normal dishwashing liquids. The disc
2
should be
wiped dry. Do not clean in the dishwasher.
Storage
There is a practical cord storage
j
at the base of the
unit (C).
Subject to change without notice.
This product conforms to the European
Directives EMC 89/336/EEC and Low Voltage
73/23/EEC.
Please do not dispose of the product in the
household waste at the end of its useful life.
Disposal can take place at a Braun Service
Centre or at appropriate collection points
provided in your country.
+
11
+
11
+
11


