Мясорубки Bosch MFW 24010 - инструкция пользователя по применению, эксплуатации и установке на русском языке. Мы надеемся, она поможет вам решить возникшие у вас вопросы при эксплуатации техники.
Если остались вопросы, задайте их в комментариях после инструкции.
"Загружаем инструкцию", означает, что нужно подождать пока файл загрузится и можно будет его читать онлайн. Некоторые инструкции очень большие и время их появления зависит от вашей скорости интернета.


Robert Bosch Hausgeräte GmbH
5
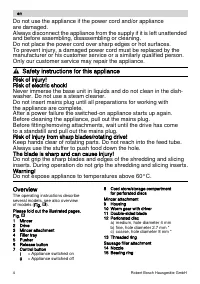
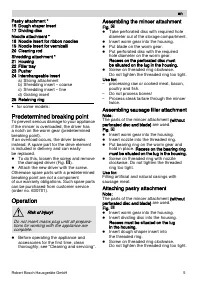
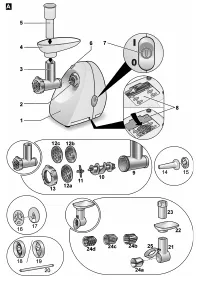
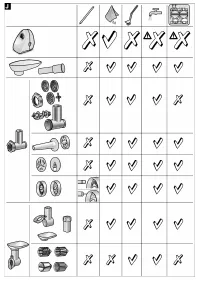
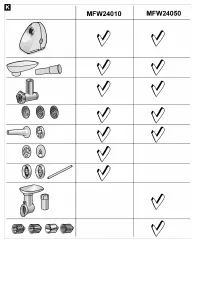
Pastry attachment *
16 Dough shaper insert
17 Dividing disc
Noodle attachment *
18 Noodle insert for ribbon noodles
19 Noodle insert for vermicelli
20 Cleaning rod
Shredding attachment *
21 Housing
22 Filler tray
23 Pusher
24 Interchangeable insert
a) Slicing attachment
b) Shredding insert – coarse
c) Shredding insert – fine
d) Grating insert
25 Retaining ring
* for some models:
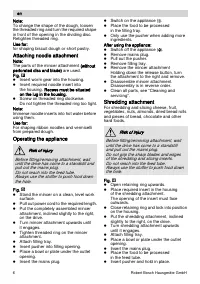
Predetermined breaking point
To prevent serious damage to your appliance
if the mincer is overloaded, the driver has
a notch on the worm gear (predetermined
breaking point).
If an overload occurs, the driver breaks
instead. A spare part for the drive element
is included in delivery and can easily
be replaced.
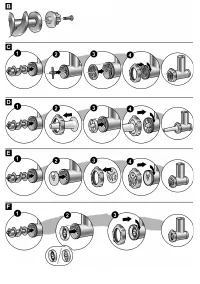
To do this, loosen the screw and remove
the damaged driver (Fig.
).
Attach the new driver with the screw.
Otherwise spare parts with a predetermined
breaking point are not a component
of our warranty obligations. Such spare parts
can be purchased from customer service
(order no. 630701).
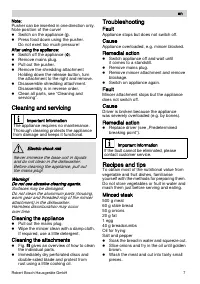
Operation
Before operating the appliance and
accessories for the first time, clean
thoroughly; see “Cleaning and servicing”.
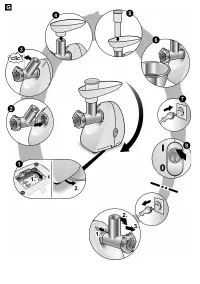
Assembling the mincer attachment
Fig.
Take perforated disc with required hole
diameter out of the storage compartment.
Insert worm gear into the housing.
Put blade on the worm gear.
Put perforated disc with the required
hole diameter on the worm gear.
Recess on the perforated disc must
be situated on the lug in the housing.
Screw on threaded ring clockwise.
Do not tighten the threaded ring too tight.
Use for:
– processing raw or cooked meat, bacon,
poultry and fish.
– Do not process bones!
– Process steak tartare through the mincer
twice.
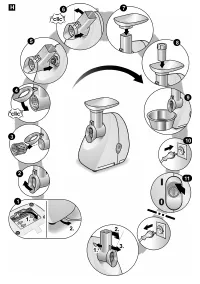
Assembling sausage filler attachment
Note:
The parts of the mincer attachment (without
perforated disc and blade) are used.
Fig.
Insert worm gear into the housing.
Insert nozzle into the threaded ring.
Put bearing ring on the worm gear and
hold in place. Recess on the bearing ring
must be situated on the lug in the housing.
Screw on threaded ring with nozzle
clockwise. Do not tighten the threaded
ring too tight.
Use for:
Filling artificial and natural casings with
sausage meat.
Attaching pastry attachment
Note:
The parts of the mincer attachment (without
perforated disc and blade) are used.
Fig.
Insert worm gear into the housing.
Insert dividing disc into the housing.
Recess must be situated on the lug
in the housing.
Insert dough shaper insert into
the threaded ring.
Screw on threaded ring clockwise.
Do not tighten the threaded ring too tight.
en
Risk of injury!
Do not insert mains plug until all prepara-
tions for working with the appliance are
complete.


