Мультиварки Saturn ST-MC9194 - инструкция пользователя по применению, эксплуатации и установке на русском языке. Мы надеемся, она поможет вам решить возникшие у вас вопросы при эксплуатации техники.
Если остались вопросы, задайте их в комментариях после инструкции.
"Загружаем инструкцию", означает, что нужно подождать пока файл загрузится и можно будет его читать онлайн. Некоторые инструкции очень большие и время их появления зависит от вашей скорости интернета.


6
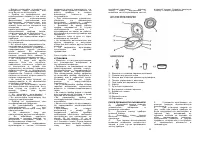
10. At the end of cooking process the
sound will be heard, and multi-cooker
will automatically switch to the keep
warm mode of the prepared dishes:
the indicator REHEAT will light, and
REHEAT function working time will be
indicated on the display.
Press the REHEAT/CANCEL button to
turn off the reheat and open the lid.
Despite the fact the keep warm mode
for prepared dishes is designed for
long
time
period,
it
is
not
recommended to leave the dish in this
mode for a long time since this can
lead to overdrying of the dish.
11. Unplug the appliance.
PROGRAM: CAKE
1. Prepare dough for baking according
to chosen recipe.
2. Grease the bowl with butter or
margarine so the baked dish could be
easily taken out of bowl. Put dough to
bowl and make it even.
3. Ensure that all ingredients
(including liquid) are below the
maximum mark at the inner surface of
the bowl.
4. Put the bowl to the outer shell.
Make sure the bowl is in a good
contact with the heating element.
5. Close the cover until it clicks.
Note:
If the cover is not completely
closed, the program will not work
properly.
6. Plug in the appliance.
7. By pressing the MENU button, set
the program CAKE.
8. The default cooking time is 50
minutes.
9. Press the START button. The multi-
cooker will begin to work, heating
symbol will be flashing on the display
(indicator "HEAT"), as well as
countdown of cooking time will be
displayed in this mode at the display.
Press REHEAT/CANCEL button to
interrupt the cooking process or
cancel the settings.
10. At the end of cooking process the
sound will be heard, and multi-cooker
will automatically switch to the keep
warm mode of the prepared dishes:
the indicator REHEAT will light, and
REHEAT function working time will be
indicated on the display.
Press the REHEAT/CANCEL button to
turn off the reheat and open the lid.
Despite the fact the keep warm mode
for prepared dishes is designed for
long
time
period,
it
is
not
recommended to leave the dish in this
mode for a long time since this can
lead to overdrying of the dish.
11. Unplug the appliance.
PROGRAM: PORRIDGE
1. Prepare all necessary ingredients.
2. Put the ingredients to the bowl,
pour water.
3. Ensure that all ingredients
(including liquid) are below the
maximum mark at the inner surface of
the bowl.
4. Put the bowl to the outer shell.
Make sure the bowl is in a good
contact with the heating element.
5. Close the cover until it clicks.
Note:
If the cover is not completely
closed, the program will not work
properly.
6. Plug in the appliance.
7. By pressing the MENU button, set
the program PORRIDGE.
8. Set the cooking time. Press the
Time Setting button, then, pressing
the HOUR/MINUTE button set the
cooking time. The default cooking
time is 1 hour. Cooking time can be
set within the time range from 20
minutes to 2 hours. Time increments
– 10 min.
9. Press the START button. The multi-
cooker will begin to work, heating
symbol will be flashing on the display
(indicator "HEAT"), as well as
countdown of cooking time will be
displayed in this mode on the display.
10. At the end of cooking process the
sound will be heard, and multi-cooker
will automatically switch to the keep
warm mode of the prepared dishes:
the indicator REHEAT will light, and
REHEAT function working time will be
indicated on the display.
Press the REHEAT/CANCEL button to
turn off the reheat and open the lid.
Despite the fact the keep warm mode
for prepared dishes is designed for
long
time
period,
it
is
not
recommended to leave the dish in this
mode for a long time since this can
lead to overdrying of the dish.
11. Unplug the appliance.
PROGRAM: SOUP
1. Prepare all necessary ingredients.
2. Put the ingredients to the bowl,
pour water.
3. Ensure that all ingredients
(including liquid) are below the
maximum mark at the inner surface of
the bowl.
4. Put the bowl to the outer shell.
Make sure the bowl is in a good
contact with the heating element.
5. Close the cover until it clicks.
7
Note:
If the cover is not completely
closed, the program will not work
properly.
6. Plug in the appliance.
7. By pressing the MENU button, set
the program SOUP.
8. Set the cooking time. Press the
Time Setting button, then, pressing
the HOUR/MINUTE button set the
cooking time. The default cooking
time is 1 hour. Cooking time can be
set within the time range from 20
minutes to 2 hours. Time increments
– 10 min.
9. Press the START button. The multi-
cooker will begin to work, heating
symbol will be flashing on the display
(indicator "HEAT"), as well as
countdown of cooking time will be
displayed in this mode on the display.
10. At the end of cooking process the
sound will be heard, and multi-cooker
will automatically switch to the keep
warm mode of the prepared dishes:
the indicator REHEAT will light, and
REHEAT function working time will be
indicated on the display.
Press the REHEAT/CANCEL button to
turn off the reheat and open the lid.
Despite the fact the keep warm mode
for prepared dishes is designed for
long
time
period,
it
is
not
recommended to leave the dish in this
mode for a long time since this can
lead to overdrying of the dish.
11. Unplug the appliance.
PROGRAM: PASTA
1. Prepare all necessary ingredients.
2. Pour water to the bowl.
3.Ensure that all ingredients (including
liquid) are below the maximum mark
at the inner surface of the bowl.
4. Put the bowl to the outer shell.
Make sure the bowl is in a good
contact with the heating element.
5. Close the cover until it clicks.
Note:
If the cover is not completely
closed, the program will not work
properly.
6. Plug in the appliance.
7. By pressing the MENU button, set
the program PASTA.
8. Set the cooking time. Press the
Time Setting button, then, pressing
the HOUR/MINUTE button set the
cooking time. The default cooking
time is 8 minutes. Cooking time can
be set within the time range from 8
minutes
to
20 minutes.
Time
increments – 1 min.
9. Press the START button. The multi-
cooker will begin to boil water with
heating symbol flashing on the display
(with REHEAT indication).
10. Once the water boils, multi-cooker
will signal that. Now you can put the
pasta to bowl.
11. Press the START button. Now
cooking time countdown begins.
Press the REHEAT/CANCEL button to
cancel cooking process and cancel
settings.
12. At the end of cooking process the
sound will be heard, and multi-cooker
will automatically switch to the keep
warm mode of the prepared dishes:
the indicator REHEAT will light, and
REHEAT function working time will be
indicated on the display.
Press the REHEAT/CANCEL button to
turn off the reheat and open the lid.
Despite the fact the keep warm mode
for prepared dishes is designed for
long
time
period,
it
is
not
recommended to leave the dish in this
mode for a long time since this can
lead to overdrying of the dish.
13. Unplug the appliance.
PROGRAM: YOGHURT
1.Distribute raw materials for yoghurt
(100 ml of the natural yoghurt per 1 l
of milk) on small glass containers.
Pour small amount of water to the
multi-cooker’s inner bowl. Put glass
containers with raw materials to
water.
2. Put the bowl to the outer shell.
Make sure the bowl is in a good
contact with the heating element.
3. Close the cover until it clicks.
Note:
If the cover is not completely
closed, the program will not work
properly.
4. Plug in the appliance.
5. By pressing the MENU button, set
the program YOGHURT.
6. Set the cooking time. Press the
Time Setting button, then, pressing
the HOUR/MINUTE button set the
cooking time. The default cooking
time is 8 hours. Cooking time can be
set within the time range from 6 to 12
hours. Time increments – 30 min.
7. Press the START button. The multi-
cooker will begin to work, heating
symbol will be flashing on the display
(indicator "HEAT"), as well as
countdown of cooking time will be
displayed in this mode on the display.
Press REHEAT/CANCEL button to
interrupt the cooking process or
cancel the settings.
8. At the end of cooking process the
sound will be heard, and multi-cooker
will automatically switch to the keep

