Материнские платы GIGABYTE GA H61M S2V B3 rev 1 1 - инструкция пользователя по применению, эксплуатации и установке на русском языке. Мы надеемся, она поможет вам решить возникшие у вас вопросы при эксплуатации техники.
Если остались вопросы, задайте их в комментариях после инструкции.
"Загружаем инструкцию", означает, что нужно подождать пока файл загрузится и можно будет его читать онлайн. Некоторые инструкции очень большие и время их появления зависит от вашей скорости интернета.

- 13 -
Hardware Installation
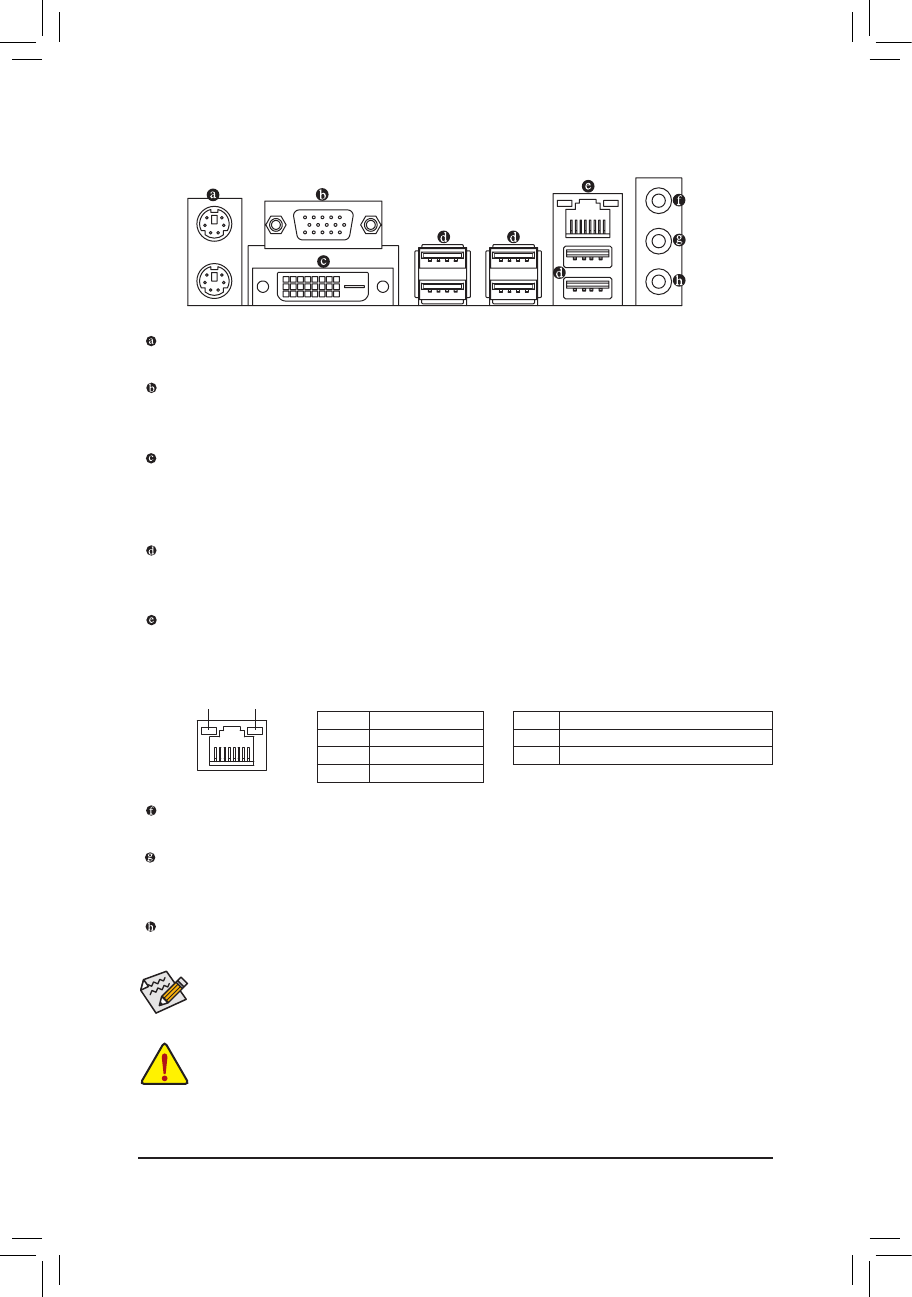
1-6 Back Panel Connectors
PS/2 Keyboard and PS/2 Mouse Port
Use the upper port (green) to connect a PS/2 mouse and the lower port (purple) to connect a PS/2 keyboard.
D-Sub Port
The D-Sub port supports a 15-pin D-Sub connector. Connect a monitor that supports D-Sub connection
to this port.
DVI-D Port
(Note)
The DVI-D port conforms to the DVI-D specification and supports a maximum resolution of 1920x1200
(the actual resolutions supported depend on the monitor being used). Connect a monitor that supports
DVI-D connection to this port.
USB 2.0/1.1 Port
The USB port supports the USB 2.0/1.1 specification. Use this port for USB devices such as a USB key
-
board/mouse, USB printer, USB flash drive and etc.
RJ-45 LAN Port
The Gigabit Ethernet LAN port provides Internet connection at up to 1 Gbps data rate. The following
describes the states of the LAN port LEDs.
(Note) The DVI-D port does not support D-Sub connection by adapter.
Activity LED
Connection/
Speed LED
LAN Port
Activity LED:
Connection/Speed LED:
State
Description
Orange
1 Gbps data rate
Green
100 Mbps data rate
Off
10 Mbps data rate
State
Description
Blinking Data transmission or receiving is occurring
Off
No data transmission or receiving is occurring
When removing the cable connected to a back panel connector, first remove the cable from your
•
device and then remove it from the motherboard.
When removing the cable, pull it straight out from the connector. Do not rock it side to side to
•
prevent an electrical short inside the cable connector.
Line In Jack (Blue)
The default line in jack. Use this audio jack for line in devices such as an optical drive, walkman, etc.
Line Out Jack (Green)
The default line out jack. Use this audio jack for a headphone or 2-channel speaker. This jack can be
used to connect front speakers in a 4/5.1/7.1-channel audio configuration.
Mic In Jack (Pink)
The default Mic in jack. Microphones must be connected to this jack.
To enable 7.1-channel audio, you have to use an HD front panel audio module and enable the
multi-channel audio feature through the audio driver.


