
Машинки для стрижки Vitek VT-2549 - инструкция пользователя по применению, эксплуатации и установке на русском языке. Мы надеемся, она поможет вам решить возникшие у вас вопросы при эксплуатации техники.
Если остались вопросы, задайте их в комментариях после инструкции.
"Загружаем инструкцию", означает, что нужно подождать пока файл загрузится и можно будет его читать онлайн. Некоторые инструкции очень большие и время их появления зависит от вашей скорости интернета.


9
ENGLISH
–
In the final stage of beard cutting remove
the telescopic attachment from the unit,
turn the blades of the unit towards yourself
and, pressing the trimmer slightly, define
the desired shape of the beard.
–
Do not press the trimmer strongly, there is
danger of injuries or cuts when open blades
come in contact with skin.
–
When cutting hair on the cheeks, move
the trimmer downwards; move the trimmer
upwards on the neck.
–
After you have cut the beard and mustache,
maintain their form.
Shaving
The best shaving results are achieved if your
skin is dry.
Your skin may need 2-3 weeks to get used to
this shaving system.
•
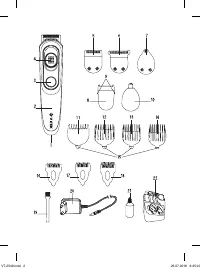
Install the shaving attachment (
8
).
•
Switch the trimmer on by pressing the but-
ton (
3
).
•
Touching the skin slightly, move the trim-
mer back and forth and rotationally at
a time.
•
After shaving switch the trimmer off by
pressing the button (
3
).
•
Clean the shaving attachment (
8
).
Trimmer for cutting hair in the ears
and nose.
Be careful when using the trimmer for cutting
hair in the ears and nose (
10
). Insert only the
metal tip of the trimmer attachment into the
auricle or the nostril.
–
Install the attachment (
10
) on the trimmer
and check whether it is set securely.
–
Switch the unit on by pressing the but-
ton (
3
).
–
Move the metal tip of the trimmer smoothly
back and forth and rotationally; carefully cut
hair in the nose and/or ears.
–
After using switch the unit off by pressing
the button (
3
).
–
Use the trimmer (
10
) only for cutting hair in
the ears and nose.
CLEANING AND CARE
–
Switch the trimmer off after use.
–
Remove the attachments (
11
,
12
,
13
,
14,
16, 17, 18
) from the blade block (
5
or
6
).
Use the brush (
19
) to clean the inside and
outside surface of the attachment from the
cut-off hair.
–
Clean the trimmer body with a soft, slightly
damp cloth, and then wipe it dry.
–
Never immerse the trimmer, the blade
blocks (
5, 6
or
7
), the shaving attach-
ment (
8
), the trimmer (
10
) and the power
adapter into water or any other liquids.
–
You can wash the attachment (
11
,
12
,
13
,
14
,
16, 17, 18
) under a water jet, then wipe it dry.
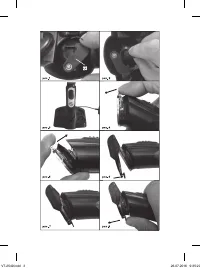
–
Remove the blade block (
5
,
6
or
7
) by
pressing on the upper part of the block on
the blades side (
pic. 4
). Clean the blade
block and the inner cavity of the trimmer
under the blade block with the brush (
19
).
Install the blade block (
5, 6
or
7
) back to
its place by inserting the bottom part of
the block into the groove on the unit body
and pressing the upper part of the block
(
pic. 5
). A click of the locks shows that the
blade block is set properly.
–
Installing and removing the shaving attach-
ment (
8
) and the trimmer (
10
) are similar to
installing and removing the blade block.
–
Clean the blade block and the inner cavity of
the trimmer with the brush (
19
).
–
Do not use solvents or abrasives for clean-
ing the unit set.
–
Lubricate the blades with oil (
21
) after every
use.
Taking care for the shaving attachment (8)
Regular cleaning helps to maintain the shaving
system in good and operable condition.
•
Press the buttons (
9
) simultaneously and
remove the outer shaving block.
•
Use the brush (
19
) to clean the outer shav-
ing block from inside and outside and to
clean the inner cutting block.
•
Install the outer shaving block back to its
place.
IM VT-2549.indd 9
26.07.2016 9:35:21
Содержание
- 12 Содержите
- 13 ПЕРЕД ПЕРВЫМ ИСПОЛЬЗОВАНИЕМ:; минут непрерывной работы.
- 14 Использование сетевого адаптера; Используйте только масло
- 15 ИСПОЛЬЗОВАНИЕ ТРИММЕРА
- 16 Напоминание; Шаг первый; жайте стричь волосы ближе к макушке.
- 17 Шаг пятый – заключительная часть; Установите бритвенную насадку (
- 18 ЧИСТК А И УХОД
- 19 Срок службы прибора – 3 года; Информация для связи –
- 36 RUS
Характеристики

Остались вопросы?Не нашли свой ответ в руководстве или возникли другие проблемы? Задайте свой вопрос в форме ниже с подробным описанием вашей ситуации, чтобы другие люди и специалисты смогли дать на него ответ. Если вы знаете как решить проблему другого человека, пожалуйста, подскажите ему :)


